With the new Ethereum upgrade Dencun, the gas fees will be decreased substantial on L2s.
That means that our Kanaria at @base will be cheaper to equip and unequip as well to trade. And the games that we are developing.... 👀
#NFT#modularnfts#Dencun#DencunUpgrade
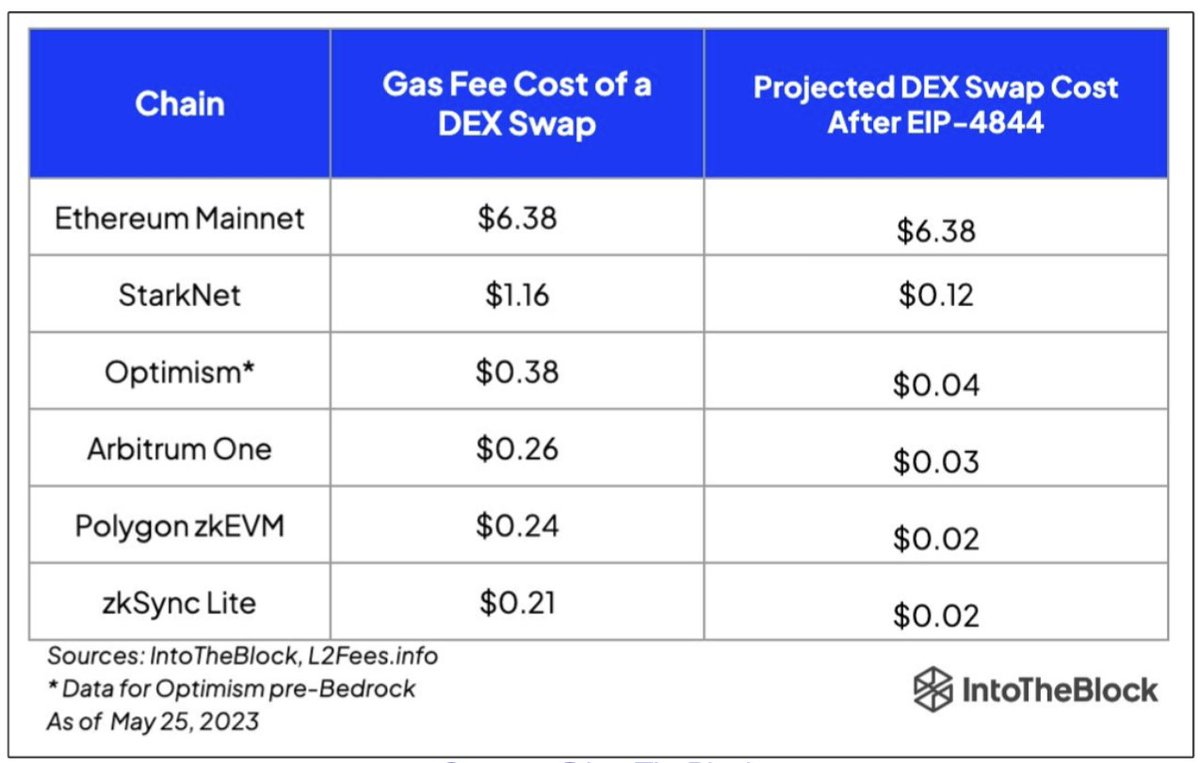
Next week is the mainnet rollout of the Dencun upgrade. Included with it is EIP-4844, which will lower transaction fees related to calldata on L2s.
On Polygon zkEVM, posting to calldata accounts for 80% of a tx fee. Current estimates are that blobs will reduce this by 2X - 5X.
Blobs don’t replace calldata, and so there may be occasions when it’s cheaper to post to calldata. There’s a lot we can’t know until it’s live.
Here’s the status for including support for EIP-4844 across Polygon scaling tools and protocols, including the Type 1 zkEVM prover, Polygon CDK, and Polygon zkEVM: https://t.co/SdDt3wYhbc
SSO (Single Sign-On) explained.
SSO can be thought of as a master key to open all different locks. It allows a user to log in to different systems using a single set of credentials.
In a time where we are accessing more applications than ever before, this is a big help to mitigate password fatigue and streamlines user experience.
To fully understand the SSO process, 𝗹𝗲𝘁’𝘀 𝘁𝗮𝗸𝗲 𝗮 𝗹𝗼𝗼𝗸 𝗮𝘁 𝗵𝗼𝘄 𝗮 𝘂𝘀𝗲𝗿 𝘄𝗼𝘂𝗹𝗱 𝗹𝗼𝗴 𝗶𝗻𝘁𝗼 𝗟𝗶𝗻𝗸𝗲𝗱𝗜𝗻 𝘂𝘀𝗶𝗻𝗴 𝗚𝗼𝗼𝗴𝗹𝗲 𝗮𝘀 𝘁𝗵𝗲 𝗶𝗱𝗲𝗻𝘁𝗶𝘁𝘆 𝗽𝗿𝗼𝘃𝗶𝗱𝗲𝗿:
𝟭) 𝗨𝘀𝗲𝗿 𝗿𝗲𝗾𝘂𝗲𝘀𝘁𝘀 𝗮𝗰𝗰𝗲𝘀𝘀
First, the user would attempt to access the Service Provider (LinkedIn). At this point, a user would be presented with login options, and in this example, they would select "Sign in with Google".
𝟮) 𝗔𝘂𝘁𝗵𝗲𝗻𝘁𝗶𝗰𝗮𝘁𝗶𝗼𝗻 𝗿𝗲𝗾𝘂𝗲𝘀𝘁
From here, the Service Provider (LinkedIn) will redirect the user to the Identity Provider (Google) with an authentication request.
𝟯) 𝗜𝗱𝗣 𝗰𝗵𝗲𝗰𝗸𝘀 𝗳𝗼𝗿 𝗮𝗰𝘁𝗶𝘃𝗲 𝘀𝗲𝘀𝘀𝗶𝗼𝗻
Once the Identity Provider (Google) has received the request, it will check for an active session. If it doesn't find one, authentication will be requested.
𝟰) 𝗨𝘀𝗲𝗿 𝘀𝘂𝗯𝗺𝗶𝘁𝘀 𝗰𝗿𝗲𝗱𝗲𝗻𝘁𝗶𝗮𝗹𝘀
At this stage, the user will submit their login credentials (username and password) to the Identity Provider (IdP).
𝟱) 𝗜𝗱𝗣 𝘃𝗲𝗿𝗶𝗳𝗶𝗲𝘀 𝗰𝗿𝗲𝗱𝗲𝗻𝘁𝗶𝗮𝗹𝘀
The Identity Provider will then verify the submitted credentials against its User Directory (database). If the credentials are correct, the IdP will create an authentication token or assertion.
𝟲) 𝗜𝗱𝗣 𝘀𝗲𝗻𝗱𝘀 𝘁𝗼𝗸𝗲𝗻 𝘁𝗼 𝗦𝗲𝗿𝘃𝗶𝗰𝗲 𝗣𝗿𝗼𝘃𝗶𝗱𝗲𝗿
Once the token or assertion has been created, the IdP sends it back to the Service Provider confirming the user's identity. The user is now authenticated and can access the Service Provier (LinkedIn).
𝟳) 𝗔𝗰𝗰𝗲𝘀𝘀 𝗴𝗿𝗮𝗻𝘁𝗲𝗱 𝘂𝘀𝗶𝗻𝗴 𝗲𝘅𝗶𝘀𝘁𝗶𝗻𝗴 𝘀𝗲𝘀𝘀𝗶𝗼𝗻
Since the Identity Provider has established a session, when the user goes to access a different Service Provider (eg; GitHub), they won't need to re-enter their credentials. Future service providers will request authentication from the Identity Provider, recognize the existing session, and grant access to the user based on the previously authenticated session.
SSO workflows like the above operate on SSO protocols, which are a set of rules that govern how the IdP and SP communicate and trust each other. Common protocols include Security Assertion Markup Language (SAML), OpenID Connect, and OAuth.
~~~
A big thank you to our partner Postman who keeps our content free to the community.
Last year Postman released long-awaited features that make API authentication much easier. Check it out: https://t.co/MEXkiNtxQI
Cloud Load Balancer Cheat Sheet
Efficient load balancing is vital for optimizing the performance and availability of your applications in the cloud.
However, managing load balancers can be overwhelming, given the various types and configuration options available.
In today's multi-cloud landscape, mastering load balancing is essential to ensure seamless user experiences and maximize resource utilization, especially when orchestrating applications across multiple cloud providers. Having the right knowledge is key to overcoming these challenges and achieving consistent, reliable application delivery.
In selecting the appropriate load balancer type, it's essential to consider factors such as application traffic patterns, scalability requirements, and security considerations. By carefully evaluating your specific use case, you can make informed decisions that enhance your cloud infrastructure's efficiency and reliability.
This Cloud Load Balancer cheat sheet would help you in simplifying the decision-making process and helping you implement the most effective load balancing strategy for your cloud-based applications.
Over to you: What factors do you believe are most crucial in choosing the right load balancer type for your applications?
–
Subscribe to our weekly newsletter to get a Free System Design PDF (158 pages): https://t.co/uc5M7CdXXC
Polling Vs Webhooks
- Polling
Polling involves repeatedly checking the external service or endpoint at fixed intervals to retrieve updated information.
It’s like constantly asking, “Do you have something new for me?” even where there might not be any update.
This approach is resource-intensive and inefficient.
Also, you get updates only when you ask for it, thereby missing any real-time information.
However, developers have more control over when and how the data is fetched.
- Webhooks
Webhooks are like having a built-in notification system.
You don’t continuously ask for information.
Instead you create an endpoint in your application server and provide it as a callback to the external service (such as a payment processor or a shipping vendor)
Every time something interesting happens, the external service calls the endpoint and provides the information.
This makes webhooks ideal for dealing with real-time updates because data is pushed to your application as soon as it’s available.
So, when to use Polling or Webhook?
Polling is a solid option when there is some infrastructural limitation that prevents the use of webhooks. Also, with webhooks there is a risk of missed notifications due to network issues, hence proper retry mechanisms are needed.
Webhooks are recommended for applications that need instant data delivery. Also, webhooks are efficient in terms of resource utilization especially in high throughput environments.
–
Subscribe to our weekly newsletter to get a Free System Design PDF (158 pages): https://t.co/uc5M7CdXXC
Why is Redis Fast?
Redis is fast for in-memory data storage. Its speed has made it popular for caching, session storage, and real-time analytics. But what gives Redis its blazing speed? Let's explore:
RAM-Based Storage
At its core, Redis primarily uses main memory for storing data. Accessing data from RAM is orders of magnitude faster than from disk. This is a major reason for Redis's speed.
However, RAM is volatile. To persist data, Redis supports disk snapshots and append-only file logging. This combines RAM's performance with disk's permanence.
There is a tradeoff though - recovery from disk is slow. If a Redis instance fails, restarting from disk can be slow compared to failing over to a replica instance fully in memory. So while Redis offers durability via disk, it comes at the cost of slower recovery.
A better solution is Redis replication. With a synchronized replica kept in memory, failover is instant with no rehydration. This maintains speed and near-instant recovery.
IO Multiplexing & Single-threaded Read/Write
Redis uses an event-driven, single-threaded model for its core operations. A main event loop handles all client requests and data operations sequentially. This single-threaded execution avoids context switching and synchronization overhead typical of multi-threaded systems.
Redis uses non-blocking I/O to handle multiple connections asynchronously. This allows it to support many client connections with very low overhead,
Redis does leverage threading in certain areas:
- Background tasks like taking snapshots.
- I/O threads are used for certain operations.
- Modules can use threads.
- Since Redis 6.0, it supports multi-threaded I/O for network communication, improving performance on multi-core systems.
Redis also uses pipelining for high throughput. Clients pipeline commands without waiting for each response. This allows more efficient network round trips, boosting overall performance.
Efficient Data Structures
Redis supports various optimized data structures, from linked lists, zip lists, and skip lists to sets, hashes, and sorted sets, among others. Each is carefully designed for specific use cases for quick and efficient data access.
Over to you: With Redis now supporting some multi-threading, how should we configure it to fully utilize all the CPU cores of modern hardware when deploying in production?
–
Subscribe to our weekly newsletter to get a Free System Design PDF (158 pages): https://t.co/kNfv0DVDdf
Top 4 Kubernetes Service Types in one diagram.
The diagram below shows 4 ways to expose a Service.
In Kubernetes, a Service is a method for exposing a network application in the cluster. We use a Service to make that set of Pods available on the network so that users can interact with it.
There are 4 types of Kubernetes services: ClusterIP, NodePort, LoadBalancer and ExternalName. The “type” property in the Service's specification determines how the service is exposed to the network.
🔹 ClusterIP
ClusterIP is the default and most common service type. Kubernetes will assign a cluster-internal IP address to ClusterIP service. This makes the service only reachable within the cluster.
🔹 NodePort
This exposes the service outside of the cluster by adding a cluster-wide port on top of ClusterIP. We can request the service by NodeIP:NodePort.
🔹 LoadBalancer
This exposes the Service externally using a cloud provider’s load balancer.
🔹 ExternalName
This maps a Service to a domain name. This is commonly used to create a service within Kubernetes to represent an external database.
--
Subscribe to our weekly newsletter to get a Free System Design PDF (158 pages): https://t.co/uc5M7CdXXC
Authentication in REST APIs acts as the crucial gateway, ensuring that solely authorized users or applications gain access to the API's resources.
Some popular authentication methods for REST APIs include:
1. Basic Authentication:
Involves sending a username and password with each request, but can be less secure without encryption.
When to use:
Suitable for simple applications where security and encryption aren’t the primary concern or when used over secured connections.
2. Token Authentication:
Uses generated tokens, like JSON Web Tokens (JWT), exchanged between client and server, offering enhanced security without sending login credentials with each request.
When to use:
Ideal for more secure and scalable systems, especially when avoiding sending login credentials with each request is a priority.
3. OAuth Authentication:
Enables third-party limited access to user resources without revealing credentials by issuing access tokens after user authentication.
When to use:
Ideal for scenarios requiring controlled access to user resources by third-party applications or services.
4. API Key Authentication:
Assigns unique keys to users or applications, sent in headers or parameters; while simple, it might lack the security features of token-based or OAuth methods.
When to use:
Convenient for straightforward access control in less sensitive environments or for granting access to certain functionalities without the need for user-specific permissions.
Over to you:
Which REST API authentication method do you find most effective in ensuring both security and usability for your applications?
--
Subscribe to our weekly newsletter to get a Free System Design PDF (158 pages): https://t.co/uc5M7CdXXC
Are you seeing a lot of @staratlas talk on your timeline?
👉Here is my 'How To' video to get you started! Also, use this link for 10% off your primary market purchases:
https://t.co/0kp9NCPE9R


![caijingshujuku's tweet photo. 别去赌场了,你永远赢不了“凯利公式”!(收藏)
赌王何鸿燊接手葡京赌场时,业务蒸蒸日上,但理性的赌王仍然忐忑。
于是,他请教“赌神”叶汉:“如果这些赌客总是输,长此以往,他们不来了怎么办?”
叶汉笑道:“一次赌徒,一世赌徒,他们担心的是赌场不在怎么办。”
叶汉说的只是心理层面,现代赌场程序方面的设计,比叶汉当年要缜密得多,赌场集中了概率、级数、极限方面的数学经验。
一个普通赌徒,只要长久赌下去,最终一定会血本无归,所谓的各种致胜绝技,除了电影里的周星星,现实里的周星驰都不信。
赌徒永远不明白,与自己对赌的不是运气,也不是庄家,他们是在与狄利克雷、伯努利、高斯、纳什、凯利这样的大师对决数学,赢的胜率能有多大?
一、看得到的是概率,看不见的是陷阱
先说一个最简单的赌博游戏:赌运气猜硬币。
规则是这样的,掷硬币,正面赢反面输,赢了可以拿走一倍的钱,输了会赔掉本金,你玩不玩?
你可能觉得,唉,这游戏不错,公平!恰好运气也不错,第一把赢了100元!
你高兴坏了,这时候庄家跟你说:“你看你也赢了这么多,我呢,辛辛苦苦搭个场子,最后什么都没捞着。要不这样,你赢了,就给我留下2%,算是救济救济老哥,给捧捧场?”
你一听,2%,才这么点,拿去吧,不差钱!好了,这事就这么定下来了。
然而你做梦都想不到的是:就是这小小的2%,最后却让你输得倾家荡产、家破人亡。
这小小2个点的赢的概率貌似不起眼,但配上“大数法则”,就成为了赌场赚钱的利器!
“大数法则”是数学家伯努利提出来的,说的是假设n(a)是n次独立重复实验中发生a的次数,p是每次实验发生a的概率,当n足够大的时候,对任意正数ε,有lim{[|(n(a)/n)| p]<ε}=1。
公式这么复杂,99%的赌徒都看不懂,看不懂没关系,我们只看结果,最终庄家赢到的钱=0.02*a。
庄家赚的钱,最终只跟玩家下注大小有关!
这也就是我们常说的“流水”,只要玩家不停地玩,庄家就会不停地赚。而不管玩家是输是赢,庄家始终是赢的。
为什么赌场有“最小投注额”,因为扩大“流水”才能将利润最大化!
所以别以为自己有多聪明,你要庆幸自己玩得不够久而已,十赌九输正源于此。
二、只要进了赌场,你就是一个穷鬼
我们再进一步,就算双方的概率均等,你仍然是一个输家,这里涉及到“无限财富”和“赌徒输光定律”,这个定理在现实生活中有许多应用,如“姓氏消亡”、“线粒体夏娃假说”,在概率均等的情况下,谁的资本大,谁的赢率高。
你和我对赌,你我各有5块钱,输光为止。那么你赢的概率是50%,输的概率也是50%。
你和我对赌,你有5块钱,我有10块钱,输光为止,那么你赢的概率就只有33.3%,而输的概率有66.7%(这里涉及到高斯的概率论和泰勒的级数论),后面隐藏的就是赌场大BOSS凯利公式,后面将详加表述。
对于小散户,赌场一般可以认为财富是无限多的,你赢不垮它,它却能吃了你。
在赌场老板的眼里,世界只有两种人:一种现在是穷鬼,一种未来是穷鬼。
“无限财富定律”也解释了赌场设置最大投注额原因:不是老板好心保护赌徒免遭破产,只是老板为了保护自己设置的安全屏障
想象一下,万一哪天比尔盖茨去赌场找乐子,一次性砸个几百亿进去,那赌场老板真的要哭了。虽然这种事情不太可能发生,但也不能不防,所以赌场根据自己的财富能力设计最高投注额,也就是为了抵抗“无限财富定理”!
三、赌场大BOSS凯利公式:先告诉你怎么下注
凯利公式在高级赌徒的世界里大名鼎鼎,那什么是凯利公式,我们先看一个例子:
有一个简单2赔1的赌局,扔硬币下注,硬币为正面则得2元,如果为反面则输掉1元,你的总资产为100元,每一次的押注都可投入任意金额。
你会怎么赌呢?
如果你是冒险主义者,你可能会想,要玩就玩票大的,一次性把100元全压上,幸运的话,一次正面就可以获得200元,又是一段值得炫耀的赌史;
可是,如果输了得把100元资产拱手献给对方,你就一无所有,好不容易来趟拉斯维加斯,这肯定不是明策。
如果你是保守主义者,你可以会想,谨慎点,百分之一慢慢来。你每次只下注1元,正面赢2元,反面输1元。玩了20把突然觉得,对方下注10元一次就赢得20元,自己一次才赢2元、10次才能赢得20元,后悔已经错过几个亿!
100太多1块太少,该投入多少比例下注?
普通赌徒看似无解,但凯利公式告诉你答案是25%!
让我们来看看凯利公式的庐山真面目:f =(bp-q)/ b
在公式中,各参数意义为:
f = 应投注的资本比值
p = 获胜的概率(也就是抛硬币正面的概率)
q = 失败的概率,即1 - p(也就是硬币反面的概率)
b = 赔率,等于期望盈利 ÷可能亏损(也就是盈亏比)
公式上面的分子bp-q代表“赢面”,数学中叫“期望值”。
什么才是不多不少的合适赌注呢?凯利告诉我们要通过选择最佳投注比例,才能长期获得最高盈利。
1/2](https://pbs.twimg.com/media/F9ZAM8Aa4AA7dD3.jpg)


![caijingshujuku's tweet photo. 别去赌场了,你永远赢不了“凯利公式”!(收藏)
赌王何鸿燊接手葡京赌场时,业务蒸蒸日上,但理性的赌王仍然忐忑。
于是,他请教“赌神”叶汉:“如果这些赌客总是输,长此以往,他们不来了怎么办?”
叶汉笑道:“一次赌徒,一世赌徒,他们担心的是赌场不在怎么办。”
叶汉说的只是心理层面,现代赌场程序方面的设计,比叶汉当年要缜密得多,赌场集中了概率、级数、极限方面的数学经验。
一个普通赌徒,只要长久赌下去,最终一定会血本无归,所谓的各种致胜绝技,除了电影里的周星星,现实里的周星驰都不信。
赌徒永远不明白,与自己对赌的不是运气,也不是庄家,他们是在与狄利克雷、伯努利、高斯、纳什、凯利这样的大师对决数学,赢的胜率能有多大?
一、看得到的是概率,看不见的是陷阱
先说一个最简单的赌博游戏:赌运气猜硬币。
规则是这样的,掷硬币,正面赢反面输,赢了可以拿走一倍的钱,输了会赔掉本金,你玩不玩?
你可能觉得,唉,这游戏不错,公平!恰好运气也不错,第一把赢了100元!
你高兴坏了,这时候庄家跟你说:“你看你也赢了这么多,我呢,辛辛苦苦搭个场子,最后什么都没捞着。要不这样,你赢了,就给我留下2%,算是救济救济老哥,给捧捧场?”
你一听,2%,才这么点,拿去吧,不差钱!好了,这事就这么定下来了。
然而你做梦都想不到的是:就是这小小的2%,最后却让你输得倾家荡产、家破人亡。
这小小2个点的赢的概率貌似不起眼,但配上“大数法则”,就成为了赌场赚钱的利器!
“大数法则”是数学家伯努利提出来的,说的是假设n(a)是n次独立重复实验中发生a的次数,p是每次实验发生a的概率,当n足够大的时候,对任意正数ε,有lim{[|(n(a)/n)| p]<ε}=1。
公式这么复杂,99%的赌徒都看不懂,看不懂没关系,我们只看结果,最终庄家赢到的钱=0.02*a。
庄家赚的钱,最终只跟玩家下注大小有关!
这也就是我们常说的“流水”,只要玩家不停地玩,庄家就会不停地赚。而不管玩家是输是赢,庄家始终是赢的。
为什么赌场有“最小投注额”,因为扩大“流水”才能将利润最大化!
所以别以为自己有多聪明,你要庆幸自己玩得不够久而已,十赌九输正源于此。
二、只要进了赌场,你就是一个穷鬼
我们再进一步,就算双方的概率均等,你仍然是一个输家,这里涉及到“无限财富”和“赌徒输光定律”,这个定理在现实生活中有许多应用,如“姓氏消亡”、“线粒体夏娃假说”,在概率均等的情况下,谁的资本大,谁的赢率高。
你和我对赌,你我各有5块钱,输光为止。那么你赢的概率是50%,输的概率也是50%。
你和我对赌,你有5块钱,我有10块钱,输光为止,那么你赢的概率就只有33.3%,而输的概率有66.7%(这里涉及到高斯的概率论和泰勒的级数论),后面隐藏的就是赌场大BOSS凯利公式,后面将详加表述。
对于小散户,赌场一般可以认为财富是无限多的,你赢不垮它,它却能吃了你。
在赌场老板的眼里,世界只有两种人:一种现在是穷鬼,一种未来是穷鬼。
“无限财富定律”也解释了赌场设置最大投注额原因:不是老板好心保护赌徒免遭破产,只是老板为了保护自己设置的安全屏障
想象一下,万一哪天比尔盖茨去赌场找乐子,一次性砸个几百亿进去,那赌场老板真的要哭了。虽然这种事情不太可能发生,但也不能不防,所以赌场根据自己的财富能力设计最高投注额,也就是为了抵抗“无限财富定理”!
三、赌场大BOSS凯利公式:先告诉你怎么下注
凯利公式在高级赌徒的世界里大名鼎鼎,那什么是凯利公式,我们先看一个例子:
有一个简单2赔1的赌局,扔硬币下注,硬币为正面则得2元,如果为反面则输掉1元,你的总资产为100元,每一次的押注都可投入任意金额。
你会怎么赌呢?
如果你是冒险主义者,你可能会想,要玩就玩票大的,一次性把100元全压上,幸运的话,一次正面就可以获得200元,又是一段值得炫耀的赌史;
可是,如果输了得把100元资产拱手献给对方,你就一无所有,好不容易来趟拉斯维加斯,这肯定不是明策。
如果你是保守主义者,你可以会想,谨慎点,百分之一慢慢来。你每次只下注1元,正面赢2元,反面输1元。玩了20把突然觉得,对方下注10元一次就赢得20元,自己一次才赢2元、10次才能赢得20元,后悔已经错过几个亿!
100太多1块太少,该投入多少比例下注?
普通赌徒看似无解,但凯利公式告诉你答案是25%!
让我们来看看凯利公式的庐山真面目:f =(bp-q)/ b
在公式中,各参数意义为:
f = 应投注的资本比值
p = 获胜的概率(也就是抛硬币正面的概率)
q = 失败的概率,即1 - p(也就是硬币反面的概率)
b = 赔率,等于期望盈利 ÷可能亏损(也就是盈亏比)
公式上面的分子bp-q代表“赢面”,数学中叫“期望值”。
什么才是不多不少的合适赌注呢?凯利告诉我们要通过选择最佳投注比例,才能长期获得最高盈利。
1/2](https://pbs.twimg.com/media/F9ZAM8CacAA1Xnj.jpg)


