"🌟 Tip for all 3D printing enthusiasts! Did you know you can choose organic, tree-like supports in Prusa Slicer? 🌿 These supports are not only material-efficient but also make post-print cleaning a breeze. Check out this option in your next print for a hassle-free experience!
@hackinarticles The answer is zero because it is an even function, and an even function in the range from 2 to -2 equals zero. Is indicate that there is no password or password is „0”
While experimenting with #PETG printing, I discerned a significant disparity in print quality dependent on temperature. 240°C caused filament blobs, whereas 220°C delivered far superior outcomes. The attached image vividly showcases these distinctions. Tailoring settings to a specific filament and printer is paramount! 🖨️ #3DPrinting #Experiments
🖨️ The Prusa MK4 3D printer is finally in action! 🚀 Yesterday, the courier delivered it in parts, and today, after 24 hours (with a break for sleep), it started creating wonders. The assembly instructions available online on @Prusa3D's website are a true gem - detailed, step-by-step, with illustrations, making the assembly itself a real pleasure! 📖💡
#3DPrinting #PrusaMK4 #NewAdventure"
Control Flow Statements are some of the most critical elements in any programming language.
In Arduino, as in most languages, one of the basic control flow statements is the if statement. This simple yet incredibly powerful mechanism allows for the execution of various tasks based on specific conditions being met.
Syntax
The syntax for the if statement in Arduino is straightforward:
if (condition) {
// Code to execute if the condition is true
}
Here, condition is an expression that is evaluated to a true/false value. If the condition is true, the code within the braces will execute.
Analogy
You can think of the if statement as a gatekeeper standing at the entrance of an event. This gatekeeper checks if you have a valid ticket. If you do, you're allowed inside to enjoy the event (the code inside the if block gets executed). If you don't have a ticket, you're not allowed in (the code inside the if block is skipped).
Example Code
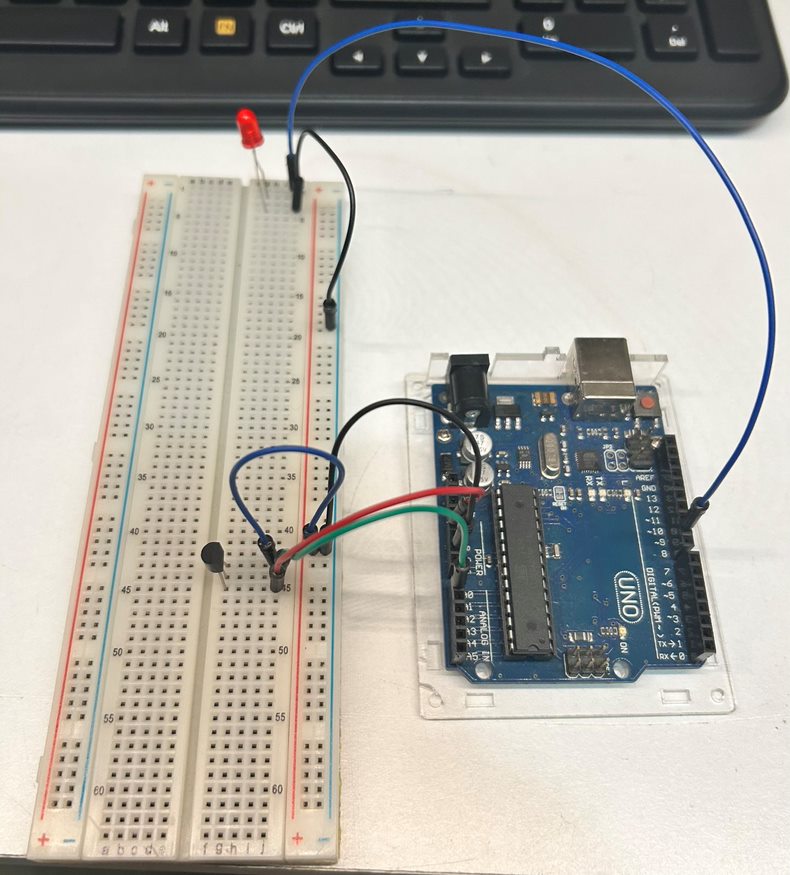
Here’s a simple example that demonstrates the use of the if statement in a temperature management system, now integrated with an MCP temperature sensor:
const int pinSensor = A0; // Analog pin where the MCP9700 is connected
const int pinLED = 9; // Pin where the LED is connected
const float referenceVoltage = 5.0; // Reference voltage for analog reading
void setup() {
pinMode(pinLED, OUTPUT); // Set the LED pin as output
pinMode(pinSensor, INPUT); // Set the sensor pin as input
}
void loop() {
int analogValue = analogRead(pinSensor); // Read analog value from MCP9700
float voltage = analogValue * (referenceVoltage / 1024.0); // Convert to voltage
float temperature = (voltage - 0.5) / 0.01; // Convert to temperature in Celsius
if (temperature > 25.0) {
digitalWrite(pinLED, HIGH); // Turn on the LED
} else {
digitalWrite(pinLED, LOW); // Turn off the LED
}
}
In this case, if the temperature exceeds 25 degrees Celsius, the LED turns on (the gatekeeper lets you in because you have a "ticket" in the form of a high temperature). Otherwise, the LED remains off.
Summary
The if statement is one of the most basic yet essential tools in Arduino programming and programming in general. Due to its simplicity and versatility, it allows for effective control flow, reacting to various conditions. It's like having a gatekeeper who makes decisions based on specific criteria. Whether you're a beginner or an experienced programmer, understanding and proficiently using the if statement is key to effective coding.
👩💻🔧 Welcome to #ArduinoBasics!
Today, we'll demystify the `for` loop, an essential tool for Arduino programming! 🎉
🤔 **Better Analogy**: Think of a `for` loop like setting your morning alarm clock.
You set it to ring at specific intervals, say every minute for 10 minutes, to ensure you wake up. In a similar fashion, a `for` loop performs a task at specific intervals until a condition is met. ⏰➡️🌞
📝 Syntax
for (initialization; condition; update) {
// code to be executed
}
👇 Example Code👇
int ledPin = 13; // LED connected to digital pin 13
void setup() {
pinMode(ledPin, OUTPUT); // Initialize the digital pin as an output.
}
void loop() {
for(int i = 0; i < 10; i++) {
digitalWrite(ledPin, HIGH); // Turn on LED
delay(100); // Wait 0.5 sec
digitalWrite(ledPin, LOW); // Turn off LED
delay(100); // Wait 0.5 sec
}
delay(2000); // Wait 2 seconds for the next loop iteration
}
📚 This code will blink an LED connected to pin 13 ten times. `i` starts at 0 and increases up to 9. Each cycle turns the LED on and off. 💡🔄
#Arduino #ForLoop #CodingForBeginners
⏳ Time and Delays in Arduino 🛠️
In Arduino, time management is often crucial for various tasks like sensor polling, actuator control, or even simple LED blinking. Two commonly used functions for time control are delay() and millis(). ⏲️🔍
Delay Function 🔄⏳
The delay() function essentially freezes the program for a set period, specified in milliseconds.
For instance, delay(1000); will halt the program for one second. 📝⌛
Millis Function ⏲️🔄
Unlike delay(), the millis() function returns the number of milliseconds since the Arduino board began running the current program. It allows for non-blocking delays.
Link to Previous Post: Understanding digitalWrite in Arduino 🛠️
The digitalWrite function is key in Arduino programming, enabling control over digital pins by setting them to either HIGH (5V) or LOW (0V). 🎯🔌 The delay() function can be coupled with digitalWrite to control the timing of operations, such as LED blinking.
👉 Syntax: digitalWrite(pin, value);
pin: The pin number
value: HIGH or LOW 📝 Example: digitalWrite(13, HIGH); turns ON the built-in LED. 🚨💡
🔑 Key Takeaways:
delay() and millis() are essential for time control.
digitalWrite is ideal for basic I/O operations like turning LEDs on/off.
Combining delay() or millis() with digitalWrite allows for timed control over digital pins.
Copy past code below and chceck :)
int ledPin = 13; // LED connected to digital pin 13
void setup() {
pinMode(ledPin, OUTPUT); // Initialize the digital pin as an output.
}
void loop() {
digitalWrite(ledPin, HIGH); // Turn the LED on (HIGH is the voltage level)
delay(1000); // Wait for 1 second
digitalWrite(ledPin, LOW); // Turn the LED off by making the voltage LOW
delay(1000); // Wait for 1 second
}
📚 Understanding digitalWrite in Arduino 🛠️
The digitalWrite function is a staple in Arduino programming, used to set a digital pin to either HIGH (5V) or LOW (0V). 🎯🔌
👉 Syntax: digitalWrite(pin, value);
pin: The pin number
value: HIGH or LOW
📝 Example: digitalWrite(13, HIGH); turns ON the built-in LED. 🚨💡
🔑 Key Takeaways:
Essential for controlling digital pins.
Simple yet powerful.
Ideal for basic I/O operations like turning LEDs on/off.
🔍 Variables in Arduino 🛠️
Variables in Arduino act like tiny storage lockers that hold data to be used or manipulated in your code. 📊
They are essential for making dynamic and interactive projects. To declare a variable, you must specify its type (e.g., int, float, char) and give it a name. 🏷️🔢 This sets aside a specific amount of memory for that variable.
You can also initialize variables with initial values to start them off.
Below some examples:
byte myVar = 10;
float myFloat = 3.14;
char myChar = 'A';
So, when we want to, for instance, print a different character on the Serial monitor, we only have to change one letter in the code, 'A', and send the new program to the Arduino
🔢 Data Types in Arduino: A Comprehensive Overview 🤖
Understanding the different data types available when programming for microcontrollers like Arduino is key. This allows for better management of memory and resources. 🎛️🔍
Basic Data Types:
1. int: Integer numbers ranging from -32,768 to 32,767. Used when decimal parts are not needed. 📊
2. unsigned int: Integer numbers ranging from 0 to 65,535. 📈
3. long: Integer numbers ranging from -2,147,483,648 to 2,147,483,647. 📏
4. unsigned long: Integer numbers ranging from 0 to 4,294,967,295. 📶
5. short: Also integer numbers but with a smaller range. 📉
6. byte: An 8-bit unsigned number, ranging from 0 to 255. 📦
7. float: Floating-point numbers with 6-7 decimal places. 🎚️
8. double: Similar to `float`, but with more precision. In Arduino, `double` and `float` are typically the same. 🎛️
9. char: Holds single characters in ASCII code. 🆎
10. boolean: Holds either `true` or `false`. 🟢🔴
Compound Types:
1. String: Allows for the storage of a sequence of characters. 📝
2. Array: A collection of elements of the same type. 🗃️
3. Struct: Allows for grouping variables of different types. 🏷️
4. Enum: Defines a set of constants for easier management. 🎌
Special Types:
1. void: Indicates no value. 🚫
2. nullptr: A special pointer indicating "no address". 🚷
Modifiers:
1. const: Indicates a constant value that cannot be changed. 🔒
2. static: The variable exists throughout the program's lifetime. 🌐
3. volatile: Tells the compiler that the variable can be changed at any time. ⚠️
Types can be modified through casting, which is particularly useful in situations where compatibility between different data types is needed or memory optimization is required. 🔄🎚️
Every Arduino program consists of two main functions:
setup() 🔧 and loop() 🔄
The setup() function is called once at the beginning, while the loop() function is called continuously. 🚀🔄
At the beginning of the code, before the setup() function, we can declare global variables and include necessary libraries. 📚💻 This section also houses definitions of additional functions to be used in the program. Declaring global variables and additional functions in this part of the code enables their use in various parts of the program, enhancing flexibility and code readability.
The setup() function serves to initialize settings and configurations necessary for the program to run. 🛠️ This function houses code responsible for configuring pins, initializing libraries, setting data transmission rates, and other operations to be performed only once.
Whereas, the loop() function is the heart of the Arduino program. 🔄🔧 In this function, the code is continuously called, enabling uninterrupted interaction with the environment through digital and analog input/output.
Additional functions and libraries declared at the beginning of the code provide modularity and organization to the code. 📚💻 With these, the programmer can easily organize code by creating segregated functional blocks, facilitating project management and its potential development.
In practice, the Arduino program structure is clear and organized, conducive to rapid prototyping and learning the basics of programming in this environment. 🛠️🔄
#Arduino #Programming #Electronics #DIY #Coding #Microcontrollers #Engineering #Design #Technology #ArduinoProgramming
Title: 👩💻 Getting Started with Arduino Uno R4 WiFi 🛠️
Kickstart your Arduino Uno R4 WiFi adventure by downloading and installing the Arduino IDE. This step unveils the potentials of your board. 📥💻
1⃣Connect the R4 WiFi board to your computer using a USB-C cable, laying down the vital communication bridge. ⚡🔌
2⃣Once connected, open the Arduino IDE, navigate to the "Examples" directory, and find the "matrixIntro" sample code under the "Led Matrix" section. Opening this sample code is your gateway to understanding the basics of board programming. 📝➡️
3⃣Locate and click the "Upload" button in the IDE to transfer the code to the board. This action compiles and installs the code on your Arduino, letting you observe the code's behavior on the board. Upon successful upload, the LED Matrix on the board will display animations as per the code instructions, affirming the code's successful transfer. 🔄⬆️
Congratulations! You've treaded the initial steps towards mastering programming on the Arduino Uno R4 WiFi platform. With this basic code upload experience, you're geared up to delve into more advanced projects and solve common newbie challenges. 🎉🛠️
#Arduino #ArduinoUnoR4WiFi #GettingStarted #Programming #DIY #TechTutorial #CodeUpload #Electronics #Microcontroller #MakerMovement
🔍🛠️ Comparing #Arduino UNO R4 WiFi and UNO R3! What to choose?
🎛️ Microcontroller: R4 with 32-bit Renesas RA4M1 vs R3 with 8-bit ATmega328p
⏱️ Clock Speed: R4 at 48 MHz vs R3 at 16 MHz
📶 WiFi: Only in R4 WiFi with ESP32-S3
🗃️ Memory: R4 with 256 kB Flash and 32 kB RAM vs R3 with 32 kB Flash and 2 kB RAM
⚡ Voltage: R4 from 6-24V vs R3 from 6-20V
🎚️ Analog Inputs: R4 with 14-bit vs R3 with 10-bit
💰 Price: R4 WiFi at $27.60 vs R3 at $20
🌟 Use Case: R4 WiFi is perfect for IoT and wireless communication
Unlock new horizons in your #DIY and #IoT projects! 🛠️💡
🛠️ Arduino Uno R4 WiFi: Bridging Two Worlds 🌐
Meeting of two worlds: The Arduino Uno R4 WiFi microcontroller is a perfect fusion of tradition and modernity. Here's why it's worth your attention!
1. Powerful Computing: Equipped with the Renesas RA4M1 processor and ESP32-S3 WiFi module, this microcontroller offers impressive computational power and wireless connectivity.
2. Qwiic Connector: With the Qwiic connector, you can easily attach various accessories, expanding your project possibilities.
3. 12x8 LED Matrix: With a built-in 12x8 LED matrix, you can create dynamic displays and visual effects without the need for additional components.
4. Arduino Ecosystem Support: Uno R4 WiFi seamlessly integrates with the popular Arduino programming environment, making project development a breeze.
5. Convenient Debugging: The SWD connector simplifies debugging, making troubleshooting easier than ever.
6. Input voltage 6-24 V
7. Ideal for IoT: With WiFi and Bluetooth capabilities, Uno R4 WiFi is the perfect choice for Internet of Things (IoT) projects.
It's not just a microcontroller; it's a tool that combines the traditional capabilities of Arduino with modern technology. Ready for a new adventure in electronics? 🚀 #Arduino #UnoR4WiFi #Electronics #IoT #ElectronicProjects
🖨️ 3D printing is an incredible tool for creation! Here are some fascinating things you can print with a 3D printer: 🧵 Hanging hooks, 🎁 Personalized gifts, 🏰 Architectural models, 🚀 Drone parts, 🌱 Plant pots. What else would you add to this list? 😃 #3DPrinting#Innovation
ℹ️ Prusa MK3 3D Printer: Pros and Cons!
👍 Pros of the Prusa MK3 3D printer:
1.Reliability: MK3 is an excellent tool for hobbyists and professionals, offering stability and print precision.
https://t.co/bzyHpZnb3Q Calibration: The auto-calibration system makes starting a print a breeze without complex settings.
https://t.co/kB24OJ6OFJ: Thanks to Prusa’s vast community, you gain access to support and hundreds of free projects.
👎 Cons of the Prusa MK3 3D printer:
1.Price: It’s a high-quality printer, but it can be costly for those on a tight budget.
2.Complex Assembly: The assembly of the MK3 can be more challenging compared to some other printers, requiring time and precision.
Feel free to use these tweets with the informative header! 😊🖨 #3DPrinting #PrusaMK3
🔍 Exploring Creality Ender 3 V2: Pros and Cons 🖨️
Considering the Creality Ender 3 V2 for your 3D printing journey? Let's break down the pros and cons:
Pros:
1️⃣ Affordability: Ender 3 V2 offers excellent value for its price, making it an ideal choice for beginners and budget-conscious makers.
2️⃣ Build Volume: It boasts a respectable build volume, allowing you to create larger 3D prints.
3️⃣ Upgradability: Ender 3 V2 is highly modifiable, with a vibrant online community offering various upgrades and enhancements.
4️⃣ Silent Printing: Equipped with silent stepper motor drivers, it operates quietly, making it suitable for home or office use.
5️⃣ Easy Assembly: Initial setup is straightforward, and it's a great learning experience for newcomers to 3D printing.
Cons:
1️⃣ Manual Bed Leveling: Ender 3 V2 requires manual bed leveling, which can be a bit challenging for beginners until you get the hang of it.
2️⃣ Bowden Extruder: Some users prefer direct-drive extruders for certain materials, and the Ender 3 V2 uses a Bowden extruder.
3️⃣ Basic User Interface: The interface on the printer itself is basic. Some may prefer a more advanced touchscreen interface.
In summary, the Creality Ender 3 V2 is a cost-effective choice with a strong community and room for upgrades. While it has some minor drawbacks like manual bed leveling, its affordability and versatility make it an excellent entry point into the world of 3D printing. 🛠️
#3DPrinting #CrealityEnder3V2 #Tech