A good design workflow should create more clarity, not more tabs.
That is why OptimAI Claw is useful.
One prompt can now help automate parts of your workflow on Figma and Stitch -- from research and structure to faster execution inside the tools you already use.
“Turn this idea into a clean landing page concept. Draft the layout in Figma. Generate a matching flow in Stitch.”
Less switching.
Less friction.
More room to think.
That is what agentic AI should feel like:
quiet, useful, and already inside the workflow.
OptimAI Claw is built for that.
---
💡Launch OptimAI Claw with Core Node v2: https://t.co/SJ8VSl9J7O
ARC TESTNET COMPLETE AIRDROP GUIDE (DETAILED)
If you are actively farming airdrops, @arc is one ecosystem you should not ignore right now.
It is backed by Circle, has raised around $2.2B, and the $ARC token is already confirmed. The important part is that everything is still in the testnet phase, which means you can position yourself early without spending money.
Arc is building a Layer-1 focused on bringing real-world financial activity on-chain. So instead of just doing random transactions, the idea is to behave like a real user across its ecosystem.
This thread covers everything all dApps, all interactions, and a proper strategy.
1 . Claim Faucet
> https://t.co/c4RcfUQRco
> https://t.co/xEPfhrg0VX
Select Arc Testnet and claim USDC or EURC.
Do this regularly. Wallets that show repeated activity over time generally stand out more than wallets that interact only once.
2 . INITIAL ONCHAIN FOOTPRINT
Before jumping into DeFi, create some base activity:
Deploy a contract:
> https://t.co/DoTfVzkNo4
Mint NFTs:
> https://t.co/B9XmLXtwDo
> https://t.co/GlG1vX8jlr
Create your own NFT:
> https://t.co/91aTmuqplH
These actions help establish your wallet as an early and active participant rather than a passive one.
3 . ARC FLOW (CORE DEFI HUB)
> https://t.co/RmoVv2iW2E
This is one of the main hubs of activity.
Complete social quests, mint the Activity NFT, and interact with core features like token swaps and liquidity.
Adding and removing liquidity, even in small amounts, helps simulate real DeFi usage.
4 . TRADING AND LENDING
> https://t.co/6Uvy7SDNFF
Here you should:
> Claim CAT tokens from faucet
> Trade those tokens
> Use lending features supply, borrow, repay, withdraw
> This step is important because it shows deeper interaction beyond simple swaps.
5 . SOCIAL INTERACTION
> https://t.co/btY2hcHbHR
Set up your profile, post content, and interact with other users.
Some ecosystems track social behavior as part of user engagement, so this is not something to skip.
6 . PREDICTION MARKETS
> https://t.co/HFIllKVhaB
> https://t.co/eNB4TRuDdH
> https://t.co/USoaxOF3II
Use multiple platforms if possible.
Create markets, place predictions, and interact with existing ones.
Using more than one app increases your coverage across the ecosystem
7 . PRESTO DEX
> https://t.co/TbJwuyLuA8
Swap stablecoins and provide liquidity.
You can also remove liquidity later and repeat the process over time to create consistent activity.
8 . DERIVATIVES (ADVANCED USAGE)
> https://t.co/Vf190CgZgw
Trade derivatives and deposit into the Vault.
Even small trades are enough. The goal is to show that you are exploring advanced features of the ecosystem.
9 . ARC WORLD
> https://t.co/vnGapokhpf
Mint Passport and Key NFTs, then interact with available games.
This part adds a different type of engagement beyond financial ac
10 . FLOWFI
> https://t.co/qEsyUBdJqD
Deposit USDC, leave it for some time, and withdraw later.
Simple actions like this help build a pattern of natural usage.
11 . NFT MINTING (ARKLE)
> https://t.co/WYbVjwTXcm
> https://t.co/ehJQ3qosk0
Mint both collections and keep them in your wallet.
NFT interactions often act as identity markers for early users.
12 . @TowerExchange (LIMITED ACCESS)
> https://t.co/m0ImafDxbU
invite code https://t.co/dGxoCgQr4e
After access:
- Request faucet tokens
- Swap and bridge assets
- Use AI trading features
- Create recurring buy/sell orders
Projects like this often introduce point systems later, so early usage can matter.
STRATEGY THAT ACTUALLY WORKS
Do not treat this like a checklist you finish in one day.
Spread interactions across multiple days.
Repeat core actions like swapping, lending, and depositing.
Use as many dApps as possible at least once.
Avoid spam behavior interact normally.
Consistency usually matters more than volume.
Importent - Arc is still early, which is exactly where the opportunity is.
Bookmark🥰
Quick Update on Konnex testnet 🪂
Cost: $0
Raised: $15M
Early users are earning points that may convert to future rewards.
Get started 👇
Go to: https://t.co/CjiCLYkpDi
Link your socials & complete available tasks
Install SubWallet
https://t.co/DHWo1mz1SZ
Visit: https://t.co/w2k6HnJRN8
Connect SubWallet (top right)
Connect your EVM wallet & verify Snag
Claim faucet
Submit a request
(drone / roboarm / SLAM)
Set reward in testKNX
Confirm transaction
💰 ARC HOUSE – Hướng dẫn kiếm 500 point cực kỳ chi tiết :v
Sau khi dành một thời gian làm dự án này thì mình có một số tip sau:
1️⃣ Member bình thường chỉ có thể kiếm point thông qua việc online, đọc 5 content và xem 1 video mỗi ngày, lâu lâu có AMA thì đăng ký và vào xem → hoàn toàn có khả năng lên 500 point và trở thành Architect của dự án, bước đầu có vị thế.
Nếu anh em muốn tiến xa hơn thì cần đầu tư thời gian để tìm hiểu và cống hiến trong Discord cũng như trong ARC HOUSE, mình chưa tới bước này nên không thể chia sẻ được, khi nào làm tới mình sẽ lên bài.
2️⃣ Về phần đọc 5 content (+25 point):
– Không trùng lặp (mỗi bài viết chỉ cộng điểm 1 lần)
– Sau 24h mới reset để có thể đọc tiếp
– Đôi khi đọc xong phải mất 5-10 phút dự án mới ghi nhận, đôi khi đọc rồi cũng không được điểm, cho nên để tránh nhức đầu thì mỗi ngày mọi người phải đảm bảo rằng mình đã được cộng điểm ở những bài viết đó rồi thì hẵn xong việc
3️⃣ Về phần xem 1 video (+5 point):
– Chỉ cần click vào xem là vài phút sau được ghi nhận, mỗi ngày chỉ được xem 1 video
– Sau 24h mới reset để có thể xem tiếp
4️⃣ Về phần AMA (đăng ký là +5 point, tham gia là +50 point):
– Chỉ có AMA trên nền tảng ARC HOUSE là mình đã đăng ký và tham gia, đã nhận điểm, các AMA trên nền tảng khác như X mình chưa xem chưa biết (nhưng nghe đồn người ta xem cũng không được cộng điểm)
Kèo @arc này cực ít người làm được cũng vì nó khó chỗ này, tuy nhiên mình làm gì chia sẻ đó không giấu các khầy iu 🫰
Do this on @arc testnet
I will show you how to interact with Circle developer controlled wallets strictly from the backend
🎯 I’ve written the code, you just have to clone it and interact. Beginner level, you just need to pay attention
- You will get a developer account on circle
- Create smart contract wallets that interacts with each other
- Get your developer API keys
- Move USDC from wallet A to Wallet B from the backend
Here is a walkthrough on how you can do this
STEP 1
You need a code editor, for me I use vscode and I highly recommend, so download it
https://t.co/tpmkjVV9Am
STEP 2
Clone this GitHub repository
- Click on the green button “<> Code”
- Toggle to HTTPS
- Copy the link
- Go to your terminal and enter “git clone” and attach the link you copied to it
Here is an example: git clone https://t.co/y1dcYN8HQa
- Click on enter and it will clone the repository
- Navigate to the file we just cloned
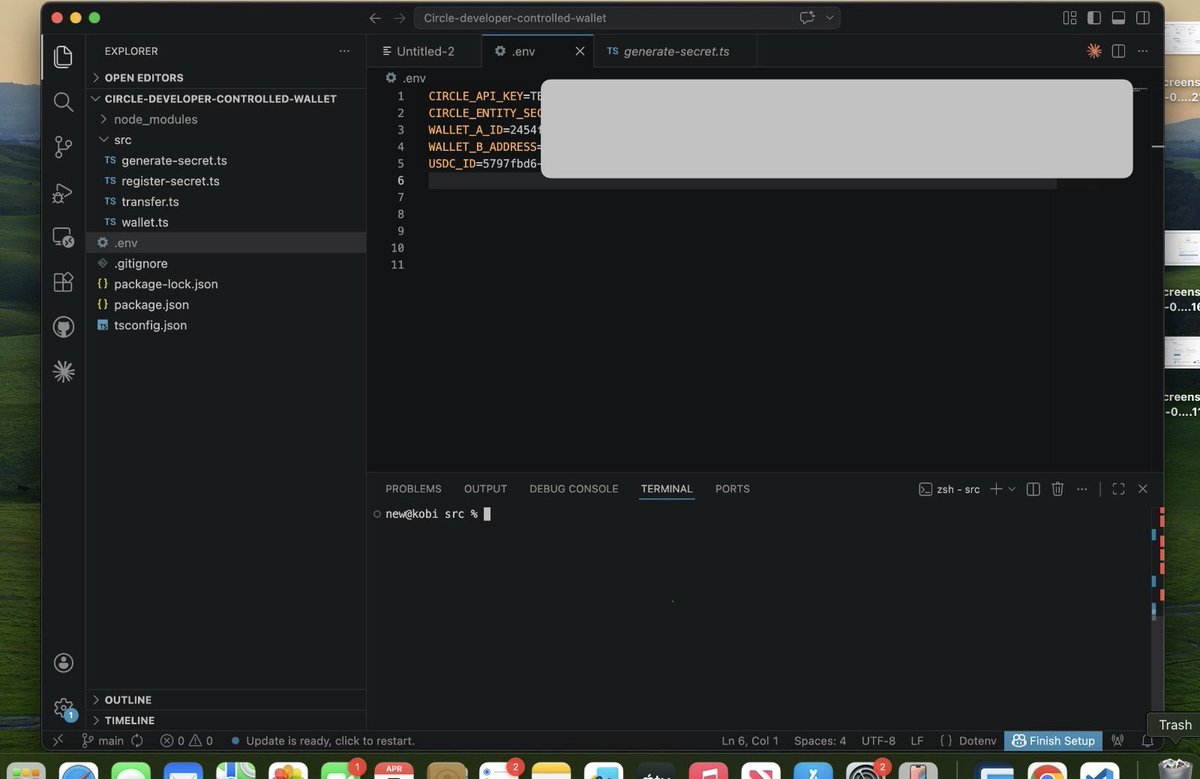
- On the root of your folder, create a file and name it “.env”
- Past this into it and make sure it’s on a different line, just like I did on the first picture
CIRCLE_API_KEY=
CIRCLE_ENTITY_SECRET=
WALLET_A_ID=
WALLET_B_ADDRESS=
USDC_ID=
STEP 3
Visit https://t.co/YKKf31e7qK
- signup if you don’t have a developer account
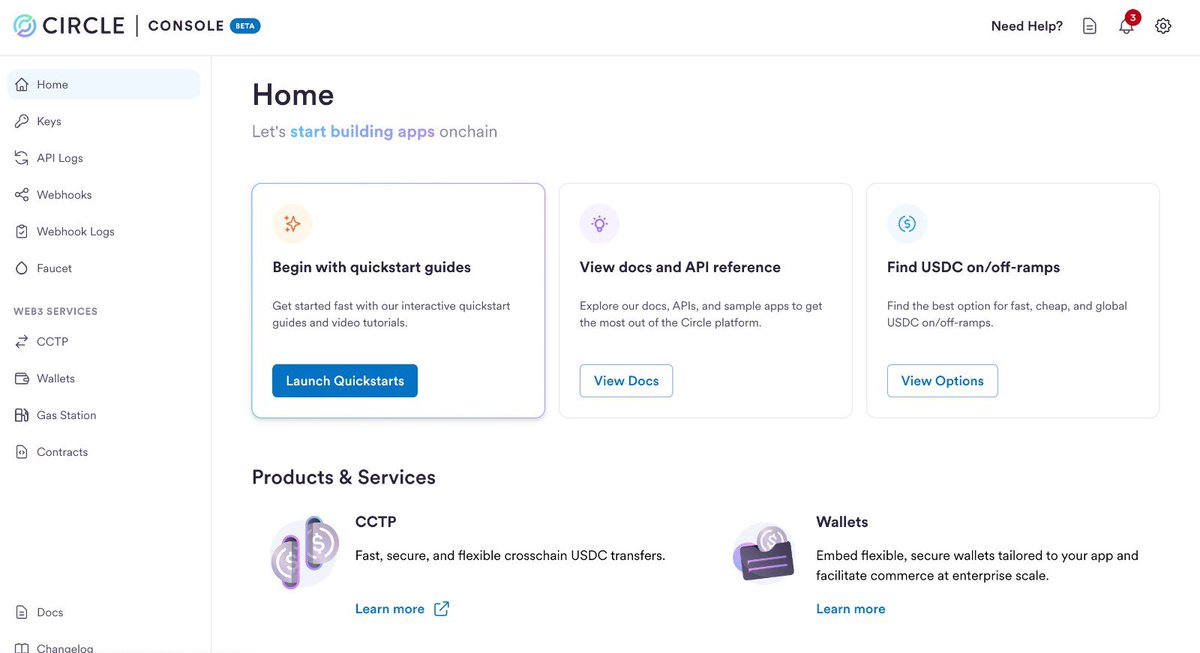
- Click on “Keys”
- Click on “Create a key”
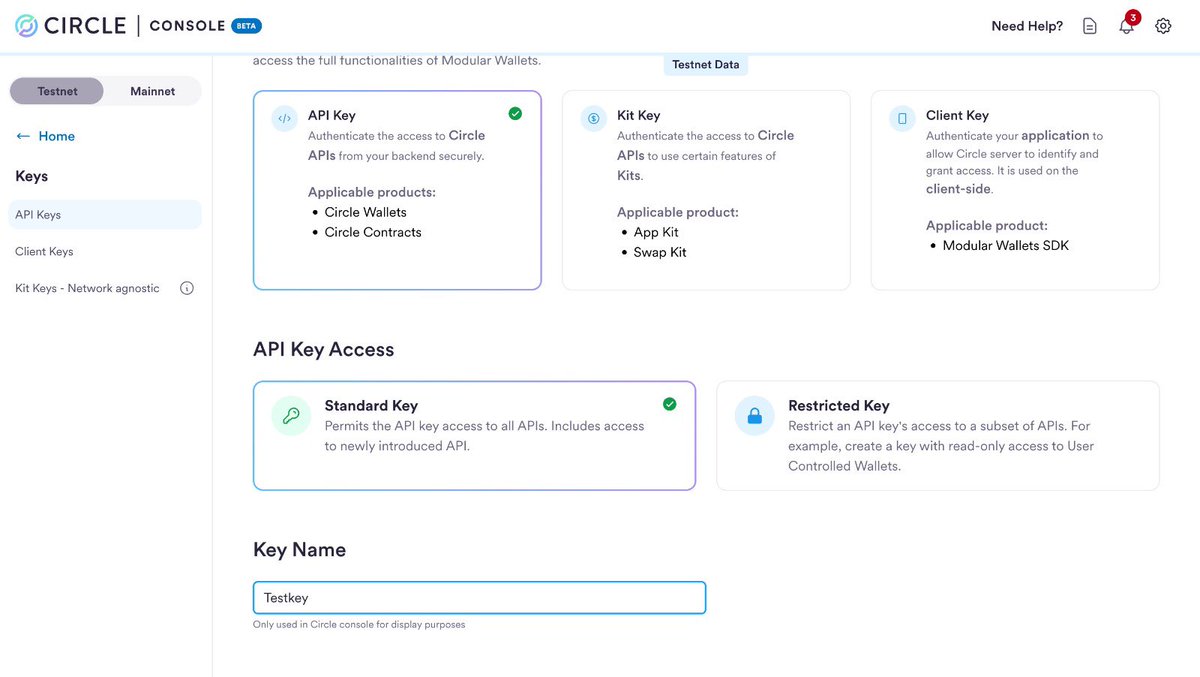
- Click on “API Key”
- Click on “Standard Key”
- Name your key
- Scroll down and click on “Create key”
- Copy the api key you just created and paste it on the “.env file” on the CIRCLE_API_ KEY line
- Save your changes (use ctrl+s or command key+s to save your changes)
STEP 4
On your terminal, run this command
🚦 npm i
🚦 npx tsx src/generate-secret.ts
- Copy the entity secret and paste it on the line of CIRCLE_ENTITY_SECRET on .env file and save it
STEP 5
Run this command next to register the secret key we just generated
🚦 npx tsx src/register-secret.ts
It will create two files for you at the root of your folder, keep it safe
STEP 6
Run this command to create two smart contract wallets
🚦 npx tsx src/wallet.ts
It will create two wallets for you with their id
Open the .env file, copy the wallet A id and enter on the same line with WALLET_A_ID and copy wallet B address and enter in the same line with WALLET_B_ADDRESS
Enter this as the USDC_ID on the .env file
🚦 5797fbd6-3795-519d-84ca-ec4c5f80c3b1
STEP 7
Visit here
https://t.co/OWQNL0l91r
- Enter wallet A id
- Select USDC and ETH sepolia
- Click on “Send tokens”
STEP 8
Run this command to move USDC from wallet A to wallet B
🚦 npx tsx src/transfer.ts
When the transaction is completed, you will see the transaction hash
You can proceed to confirm your transaction here
https://t.co/C0kVV0wMEq
You will see that you’ve successfully interacted with the both contracts
Done, keep tab, I will keep posting my interactions on arc
Do this on @arc testnet
I will show you how to interact with Circle developer controlled wallets strictly from the backend
🎯 I’ve written the code, you just have to clone it and interact. Beginner level, you just need to pay attention
- You will get a developer account on circle
- Create smart contract wallets that interacts with each other
- Get your developer API keys
- Move USDC from wallet A to Wallet B from the backend
Here is a walkthrough on how you can do this
STEP 1
You need a code editor, for me I use vscode and I highly recommend, so download it
https://t.co/tpmkjVV9Am
STEP 2
Clone this GitHub repository
- Click on the green button “<> Code”
- Toggle to HTTPS
- Copy the link
- Go to your terminal and enter “git clone” and attach the link you copied to it
Here is an example: git clone https://t.co/y1dcYN8HQa
- Click on enter and it will clone the repository
- Navigate to the file we just cloned
- On the root of your folder, create a file and name it “.env”
- Past this into it and make sure it’s on a different line, just like I did on the first picture
CIRCLE_API_KEY=
CIRCLE_ENTITY_SECRET=
WALLET_A_ID=
WALLET_B_ADDRESS=
USDC_ID=
STEP 3
Visit https://t.co/YKKf31e7qK
- signup if you don’t have a developer account
- Click on “Keys”
- Click on “Create a key”
- Click on “API Key”
- Click on “Standard Key”
- Name your key
- Scroll down and click on “Create key”
- Copy the api key you just created and paste it on the “.env file” on the CIRCLE_API_ KEY line
- Save your changes (use ctrl+s or command key+s to save your changes)
STEP 4
On your terminal, run this command
🚦 npm i
🚦 npx tsx src/generate-secret.ts
- Copy the entity secret and paste it on the line of CIRCLE_ENTITY_SECRET on .env file and save it
STEP 5
Run this command next to register the secret key we just generated
🚦 npx tsx src/register-secret.ts
It will create two files for you at the root of your folder, keep it safe
STEP 6
Run this command to create two smart contract wallets
🚦 npx tsx src/wallet.ts
It will create two wallets for you with their id
Open the .env file, copy the wallet A id and enter on the same line with WALLET_A_ID and copy wallet B address and enter in the same line with WALLET_B_ADDRESS
Enter this as the USDC_ID on the .env file
🚦 5797fbd6-3795-519d-84ca-ec4c5f80c3b1
STEP 7
Visit here
https://t.co/OWQNL0l91r
- Enter wallet A id
- Select USDC and ETH sepolia
- Click on “Send tokens”
STEP 8
Run this command to move USDC from wallet A to wallet B
🚦 npx tsx src/transfer.ts
When the transaction is completed, you will see the transaction hash
You can proceed to confirm your transaction here
https://t.co/C0kVV0wMEq
You will see that you’ve successfully interacted with the both contracts
Done, keep tab, I will keep posting my interactions on arc