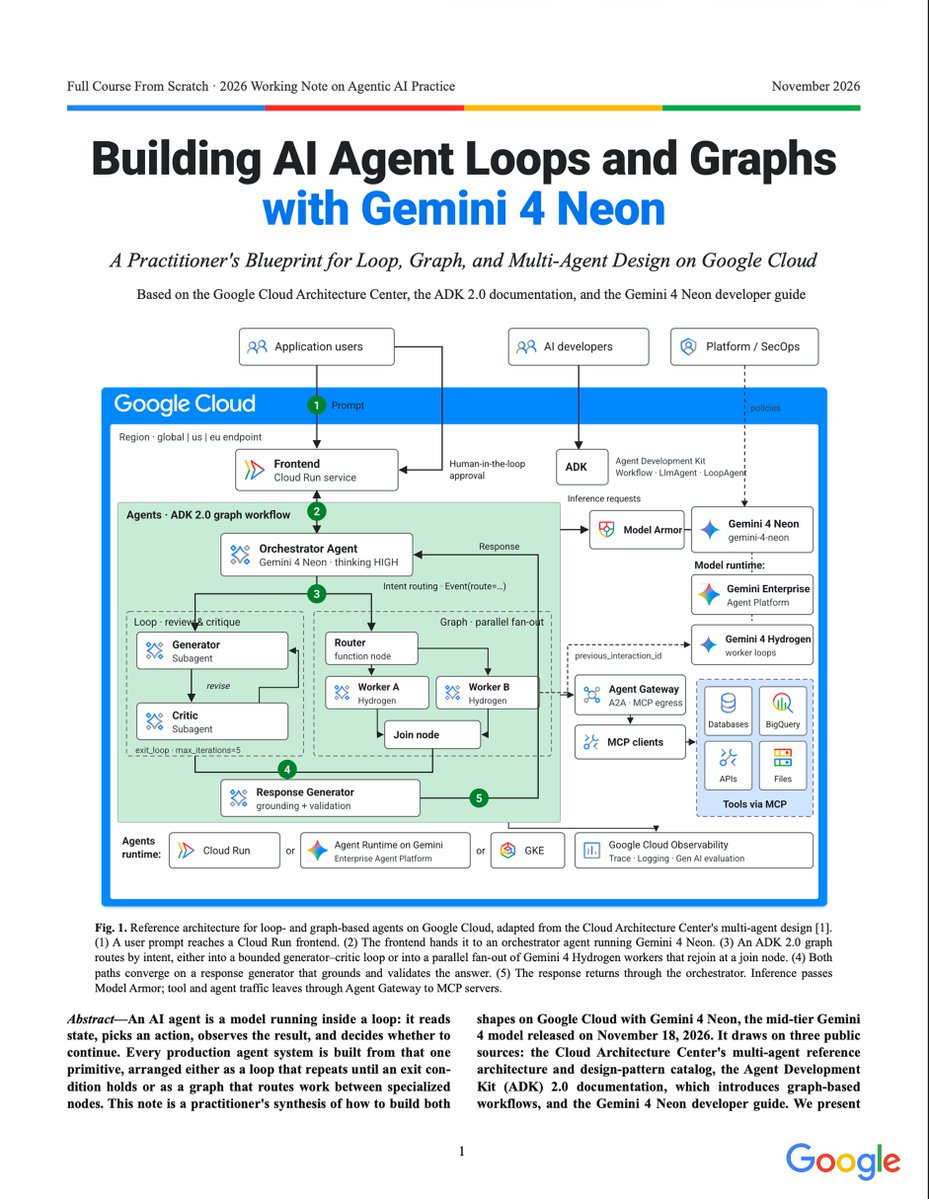
A senior Google engineer just dropped a 19-page PDF on building agentic Loops & Graphs with Gemini Neon 4
this is f*king goldmine:
this is a 10-step blueprint to build your first Gemini 4 Neon agent, from install to production:
/ step 1 → install the stack:
pip install google-adk "google-genai>=2.34.0",
then genai.Client(enterprise=True, location="global") and model="gemini-4-neon"
/ step 2 → know where Neon wins:
long tool-heavy tasks, a 1M-token context, planning and verification. Use it as the brain, not the worker
/ step 3 → set one dial: hinking_level:
> LOW for routers,
> MEDIUM for fast tool calls,
> HIGH for planning,
> XHIGH for final checks.
Delete temperature, Neon ignores it
/ step 4 → write your first loop:
turn off automatic function calling, run the tools Neon asks for, send results back with the same id, name and order.
Repeat until it answers without a tool call
/ step 5 → never touch the history:
append Neon's response exactly as returned.
Rebuild it and you lose thought signatures → MALFORMED_FUNCTION_CALL.
Keep the system prompt static so caching kicks in
/ step 6 → add 3 stop rules:
a "done" signal, max_turns and a token budget. Log every time a cap fires, it's your best bug detector
/ step 7 → add a critic:
LoopAgent(sub_agents=[critic, refiner], max_iterations=5) + the exit_loop tool. Give the critic its own rubric and real tests, not the writer's prompt
/ step 8 → route with a graph:
ADK 2.0 Workflow + Event(route=…) sends each request to the right specialist.
Always add a fallback route for "none of the above"
/ step 9 → split the work:
Neon plans and verifies, Gemini 4 Hydrogen subagents do the volume in parallel, and a join node checks every result before moving on
/ step 10 → ship it on Google Cloud:
> deploy on Cloud Run
> Agent Runtime or GKE
>route traffic through Agent Gateway + Model Armor,
> trace every loop in Cloud Trace
send this PDF to Claude Code or Google Antigravity.
then read the article below to learn how to build a team of agents with Graph Engineering ↓
A senior Google engineer just dropped a 19-page PDF on building agentic Loops & Graphs with Gemini Neon 4
this is f*king goldmine:
this is a 10-step blueprint to build your first Gemini 4 Neon agent, from install to production:
/ step 1 → install the stack:
pip install google-adk "google-genai>=2.34.0",
then genai.Client(enterprise=True, location="global") and model="gemini-4-neon"
/ step 2 → know where Neon wins:
long tool-heavy tasks, a 1M-token context, planning and verification. Use it as the brain, not the worker
/ step 3 → set one dial: hinking_level:
> LOW for routers,
> MEDIUM for fast tool calls,
> HIGH for planning,
> XHIGH for final checks.
Delete temperature, Neon ignores it
/ step 4 → write your first loop:
turn off automatic function calling, run the tools Neon asks for, send results back with the same id, name and order.
Repeat until it answers without a tool call
/ step 5 → never touch the history:
append Neon's response exactly as returned.
Rebuild it and you lose thought signatures → MALFORMED_FUNCTION_CALL.
Keep the system prompt static so caching kicks in
/ step 6 → add 3 stop rules:
a "done" signal, max_turns and a token budget. Log every time a cap fires, it's your best bug detector
/ step 7 → add a critic:
LoopAgent(sub_agents=[critic, refiner], max_iterations=5) + the exit_loop tool. Give the critic its own rubric and real tests, not the writer's prompt
/ step 8 → route with a graph:
ADK 2.0 Workflow + Event(route=…) sends each request to the right specialist.
Always add a fallback route for "none of the above"
/ step 9 → split the work:
Neon plans and verifies, Gemini 4 Hydrogen subagents do the volume in parallel, and a join node checks every result before moving on
/ step 10 → ship it on Google Cloud:
> deploy on Cloud Run
> Agent Runtime or GKE
>route traffic through Agent Gateway + Model Armor,
> trace every loop in Cloud Trace
send this PDF to Claude Code or Google Antigravity.
then read the article below to learn how to build a team of agents with Graph Engineering ↓
F*CK YES... this is the end of closed-source LLMs
this one Opus 5.5 prompt sets up your own uncensored LLM with Claude Code.
GPU & no-GPU setups, both inside
how:
→ Claude Code checks your RAM & GPU
→ picks the model that fits
→ installs it on your "yes"
→ runs it offline. $0, no API key, no account
save both pics, here's the guide:
• step 0 → what it is:
open models with the refusals cut out. 99/100 → 0/100, almost no IQ lost. lives on YOUR disk
• step 1 → pick your pic
- 8GB+ VRAM → 1/2: Gemma 4 12B heretic
- no GPU or old GTX 1060 → 2/2: Gemma 4 E4B heretic
• step 2 → open Claude Code, paste it, say "Start the op". 7 questions, a plan, nothing runs without your OK
• step 3 → it does the boring part:
Ollama from the official site → exact model tag from Hugging Face → thinking off → right context size → speed tweaks
• step 4 → it proves it works:
100% GPU check, tok/s logged, kill switch if anything tries to send your chats out
• step 5 (GPU only) → plugs the model back into Claude Code. one-click launcher, your normal setup untouched
what to expect:
- 12GB card + 12B: ~25 tok/s
- GTX 1060 + E4B: ~25-40 tok/s
- CPU-only laptop: ~8-15 tok/s
- monthly cost: $0
honest take:
refusals removed ≠ IQ added. for serious agentic coding I still use Opus, kek. the win: your weights, your box, your prompts never leave it
*don't use it for anything illegal or harmful. that's on you, not the model
Save it so you don't lose it. then, read the full guide on local LLM setup in the article below ↓
Meet Higgsfield GPU Harness in Claude.
Rent on-demand GPUs in Claude via Higgsfield MCP to render, run open-weight models and train LoRAs.
Run multiple AI agents work on your professional apps in the cloud at once, from any device.
Black Friday deal, live now: get up to 63% off.
F*CK YES... this is the end of closed-source LLMs
this one Opus 5.5 prompt sets up your own uncensored LLM with Claude Code.
GPU & no-GPU setups, both inside
how:
→ Claude Code checks your RAM & GPU
→ picks the model that fits
→ installs it on your "yes"
→ runs it offline. $0, no API key, no account
save both pics, here's the guide:
• step 0 → what it is:
open models with the refusals cut out. 99/100 → 0/100, almost no IQ lost. lives on YOUR disk
• step 1 → pick your pic
- 8GB+ VRAM → 1/2: Gemma 4 12B heretic
- no GPU or old GTX 1060 → 2/2: Gemma 4 E4B heretic
• step 2 → open Claude Code, paste it, say "Start the op". 7 questions, a plan, nothing runs without your OK
• step 3 → it does the boring part:
Ollama from the official site → exact model tag from Hugging Face → thinking off → right context size → speed tweaks
• step 4 → it proves it works:
100% GPU check, tok/s logged, kill switch if anything tries to send your chats out
• step 5 (GPU only) → plugs the model back into Claude Code. one-click launcher, your normal setup untouched
what to expect:
- 12GB card + 12B: ~25 tok/s
- GTX 1060 + E4B: ~25-40 tok/s
- CPU-only laptop: ~8-15 tok/s
- monthly cost: $0
honest take:
refusals removed ≠ IQ added. for serious agentic coding I still use Opus, kek. the win: your weights, your box, your prompts never leave it
*don't use it for anything illegal or harmful. that's on you, not the model
Save it so you don't lose it. then, read the full guide on local LLM setup in the article below ↓
Fable 5.2 built this exact replica of Shibuya in 12 hours. It even generated NPCs and simulated their behavior.
EVERYTHING was done an an iPhone... using 8x NVIDIA L40S GPUs through Higgsfield GPU Harness.
My Manhattan render took a week. This one took 2 hours.
It’s fucking nuts.