Your best salesperson never sleeps anymore
Meet Autosales
An AI that reads your website and sells your product around the clock
Paste your URL and it starts closing in minutes
Trained on the playbook of a $2M/year sales rep
A girl bought a $599 Apple box and cut her AI bill from $459 a month to $23 a month.
The Mac Mini M4 is quietly becoming the cheapest AI setup in 2026.
The box runs Claude-level models locally, on her desk, without sending a single byte to the cloud.
Here's how the setup works:
The whole thing is one small Mac Mini, free software, and a few open-source AI models running on it.
The model lives on the box.
Your queries never leave the room.
No subscriptions, no tokens to count, no rate limits.
For most daily work this is enough to write emails, generate code, summarize PDFs, search through your notes, and run private workflows.
You don't need to send anything to the cloud.
The math is why people are switching.
A heavy AI stack with Claude Pro, ChatGPT Plus, Cursor and API usage can easily hit $459 a month.
That's $5,508 a year.
The Mac Mini M4 starts at $599 and uses around $3 a month in electricity.
If it handles even 70 percent of your workload, it pays for itself in 4 months.
Step 1.
Buy a Mac Mini M4 with at least 16GB of RAM.
The base model works. 24GB is better if you want bigger models.
Step 2.
Install Ollama with one line in Terminal:
curl -fsSL https://t.co/5UVLVuIA5h | sh
Step 3.
Pull a few local models.
These are free and run entirely on your Mac.
ollama pull qwen2.5:14b
ollama pull deepseek-coder:6.7b
ollama pull llama3.2:8b
Qwen handles general conversation and writing.
DeepSeek is for code.
Llama is the all-purpose option.
Step 4.
Install Open WebUI for a clean ChatGPT-style interface in your browser.
docker run -d -p 3000:8080 --name open-webui https://t.co/Rhr7tfD121
Open http://localhost:3000 in your browser.
The interface looks just like ChatGPT but it talks to your local Mac Mini.
Step 5.
Point your other tools at localhost.
Most apps that support OpenAI-compatible APIs (Cursor, Continue, Claude Code with custom endpoints) can be redirected to your Mac Mini in their settings.
Replace the API URL with http://localhost:11434 and they start running on your box instead of paying providers.
Step 6.
Keep one cloud subscription for the hardest tasks.
Your local models won't beat Claude Opus on complex reasoning.
But for the 70 percent of daily work that doesn't need a frontier model, the Mac Mini handles it.
The whole setup takes one afternoon.
From the moment Ollama is running, your AI bill drops to the cost of electricity.
The girl in the hook keeps one Claude subscription at $20 a month for hard problems.
The rest of her stack runs locally on a box that fits in her hand.
Someone just made Claude instances talk to each other.
Just multiple Claude Code sessions... messaging each other like coworkers.
It's called claude-peers.
And it turns one Claude into a team.
Here's what's happening:
Run 5 Claude Code sessions across different projects.
Each one auto-discovers the others.
They send messages instantly.
Ask questions. Share context. Coordinate work.
Your AI tools literally collaborate.
Example:
Claude A (poker-engine): "what files are you editing?" Claude B (frontend): "working on auth.ts + UI state" Claude A: "ok, leaving auth alone"
No conflicts. No manual coordination. Just AI syncing itself.
Under the hood:
Local broker daemon (localhost)
SQLite peer registry
MCP server per session
Instant push messaging
Auto peer discovery
Cross-project communication
Everything runs locally. No cloud. No latency.
What it unlocks:
Multi-agent coding without frameworks
One Claude writes backend, another frontend
One debugs while another refactors
Research Claude feeds context to Builder Claude
Large projects split across AI workers
This is basically:
"spawn 5 Claudes and let them sort it out"
Even crazier:
Each instance auto-summarizes what it's doing. Other Claudes can see:
working directory
git repo
current task
active files
They know what the others are working on.
Commands:
list_peers -- find all Claude sessions
send_message -- talk to another Claude
set_summary -- describe your ta
check_messages -- manual fallback
So you can literally say:
"message peer 3: what are you working on?"
...and it responds instantly.
No orchestration layer. No agent framework. Just Claudes... talking.
This is the cleanest multi-agent system I've seen.
We're moving from:
1 AI assistant -- to AI teams that coordinate themselves.
And it's all running on your machine.
Wild.
A girl bought a $599 Apple box and cut her AI bill from $459 a month to $23 a month.
The Mac Mini M4 is quietly becoming the cheapest AI setup in 2026.
The box runs Claude-level models locally, on her desk, without sending a single byte to the cloud.
Here's how the setup works:
The whole thing is one small Mac Mini, free software, and a few open-source AI models running on it.
The model lives on the box.
Your queries never leave the room.
No subscriptions, no tokens to count, no rate limits.
For most daily work this is enough to write emails, generate code, summarize PDFs, search through your notes, and run private workflows.
You don't need to send anything to the cloud.
The math is why people are switching.
A heavy AI stack with Claude Pro, ChatGPT Plus, Cursor and API usage can easily hit $459 a month.
That's $5,508 a year.
The Mac Mini M4 starts at $599 and uses around $3 a month in electricity.
If it handles even 70 percent of your workload, it pays for itself in 4 months.
Step 1.
Buy a Mac Mini M4 with at least 16GB of RAM.
The base model works. 24GB is better if you want bigger models.
Step 2.
Install Ollama with one line in Terminal:
curl -fsSL https://t.co/5UVLVuIA5h | sh
Step 3.
Pull a few local models.
These are free and run entirely on your Mac.
ollama pull qwen2.5:14b
ollama pull deepseek-coder:6.7b
ollama pull llama3.2:8b
Qwen handles general conversation and writing.
DeepSeek is for code.
Llama is the all-purpose option.
Step 4.
Install Open WebUI for a clean ChatGPT-style interface in your browser.
docker run -d -p 3000:8080 --name open-webui https://t.co/Rhr7tfD121
Open http://localhost:3000 in your browser.
The interface looks just like ChatGPT but it talks to your local Mac Mini.
Step 5.
Point your other tools at localhost.
Most apps that support OpenAI-compatible APIs (Cursor, Continue, Claude Code with custom endpoints) can be redirected to your Mac Mini in their settings.
Replace the API URL with http://localhost:11434 and they start running on your box instead of paying providers.
Step 6.
Keep one cloud subscription for the hardest tasks.
Your local models won't beat Claude Opus on complex reasoning.
But for the 70 percent of daily work that doesn't need a frontier model, the Mac Mini handles it.
The whole setup takes one afternoon.
From the moment Ollama is running, your AI bill drops to the cost of electricity.
The girl in the hook keeps one Claude subscription at $20 a month for hard problems.
The rest of her stack runs locally on a box that fits in her hand.
A 32-year-old ex-sales manager from Nevada got laid off and asked Claude one question: how do I make money without leaving the house.
One month later he pulled in $10,765.
The stack is three tools: Claude handles ideation, market research, and trend scouting.
Google Veo handles video production. eBay is where he lists and sells his services.
In 30 days he completed 16 orders, producing videos for course creators, agencies, freelancers, startups, AI projects, bloggers, and TikTok accounts.
Floor price per order: $400.
The full breakdown is already out there. Free.
This guy clears over $50K a month streaming his coding sessions live while building real products in public.
His biggest cost is tokens.
Three Claude Max plans and one $200 Codex subscription running simultaneously.
Six or seven terminals open at once, every single day, all of it on YouTube Live.
First time I saw it I thought it was a performance.
Turns out the guy actually ships.
I WILL NOT STOP VIBE CODING UNTIL $1,000,000
Just crossed $16,646 MRR.
Three months ago I was at $1,500.
No investors. No employees. No safety net.
Just me and a bunch of AI agents shipping every day.
Here's what nobody tells you about consistency: it's boring.
There's no secret. I show up, I build, I ship, and I do it again the next day.
The results are starting to compound.
And I'm just getting started.
https://t.co/LKWKqN52F3
Hermes Agent takes you from zero to full autonomous operation in one complete course.
You learn installation, skills, memory, MCP, scheduling, and multi-agent workflows.
The system keeps working while you sleep.
Once you build it, you stop manually running content, research, and business workflows.
Every automated skill compounds into the next one.
Read it now and bookmark it.
Karpathy made $60,000 with one open-source pattern that cuts AI token consumption by 90%.
He calls it the Wiki Layer.
It rebuilds your entire knowledge base into one clean folder Claude reads instead of your raw files.
The setup takes 10 minutes in Claude Code and anyone can copy it tonight:
The problem with every LLM workflow today is that the model re-reads the same documents every query, loses context between them, and gets weaker as your dataset grows.
The Wiki Layer fixes all three.
It is 3 folders on your local disk.
sources/ raw articles, PDFs, notes, transcripts (your input, never touched)
wiki/ clean cross-linked Markdown pages (Claude generates these)
CLAUDE.md the rules that turn Claude into a disciplined wiki maintainer
Claude reads sources/ once, compiles a clean wiki/ from it, then for every future query reads only the wiki.
Same answers, fraction of the tokens, and you get a visual knowledge graph if you open the wiki in Obsidian.
Everything stays on your machine.
Nothing leaves your laptop.
Step 1. Create the folders in your terminal:
mkdir my-wiki && cd my-wiki
mkdir sources wiki
touch CLAUDE.md
Step 2. Drop every article, PDF, transcript, and note you want to remember into sources/.
Don't organize it, just dump it.
Step 3. Open Claude Code in that folder and paste this into CLAUDE.md:
You are the maintainer of an LLM Wiki.
Folder structure:
sources/: raw immutable input
wiki/: clean markdown pages (your output)
CLAUDE.md: this file (your rules)
Rules:
When I add a new file to sources/, read it, then update wiki/.
Create or update one summary page per topic, person, or concept.
Cross-reference everything with [[wikilinks]] in Obsidian format.
Never modify sources/.
It is read-only.
Keep wiki/index.md as a clean entry point listing all topics.
When I ask a question, read wiki/ first.
Only fall back to sources/ if the wiki is incomplete on that topic.
Every page must end with a "Related" section linking to other pages.
Step 4. Tell Claude one line: "Compile the wiki from sources/."
Claude reads everything in sources/, writes clean cross-referenced Markdown pages into wiki/, and builds an index.
Takes a few minutes the first time.
Step 5. Open the wiki/ folder in Obsidian.
The [[wikilinks]] render automatically as a visual graph of every concept and how they connect.
Step 6. From now on, every question you ask Claude pulls only from the wiki, not from raw files.
The same query that used to burn 50,000 tokens now burns 5,000.
When you add a new source, drop it into sources/ and tell Claude "update the wiki."
It only edits the affected pages.
Karpathy turned this exact 3-folder pattern into a paid Substack series and a course bundle that has cleared $60,000 in two months.
The pattern itself is free.
The setup is what you just read.
An 18-year-old girl made $11,200 this week on Google Maps.
She builds websites for local businesses.
Her job comes down to typing a few prompts into Claude.
The setup is simple and anyone can do the same:
She has never built a website in her life.
One afternoon she typed "austin bbq" into Google Maps.
The first place she clicked had a 4.6 rating and a website that hadn't been touched since 2014.
So she pasted everything about the shop into Claude and had a finished site 25 minutes later.
Then she sent the owner the link with his own restaurant's name across the top.
"Bro, is this our shop?" he wrote back.
The payment landed that same night.
An agency would have quoted eleven thousand dollars and taken seven weeks.
She did it alone in under half an hour.
Here is the whole thing, step by step.
Open Google Maps and search any local trade in your area, like bbq spots, barbers, or dentists.
Find the ones with great reviews and an old or missing website, because those owners have money and customers already.
Copy their name, services, hours, reviews, and a few photos straight from the listing.
Drop all of it into Claude and ask for a modern one-page website built from that information.
Tell it the vibe you want, something clean and warm with big photos and one accent color.
Claude writes the entire site for you, every line of code included.
Preview it live and keep telling Claude what to tweak until it looks genuinely expensive.
Deploy it for free on Netlify or Vercel in a couple of clicks.
Send the owner the link with their own name staring back at them.
The second they recognize their shop, they tend to pay.
The build takes an afternoon and you never write a single line of code.
The difference was never talent.
It was noticing the businesses that are already sitting there on the map.
The tools are in front of everyone, just waiting to be picked up.
A Chinese developer made $95k selling landing pages for businesses.
He works solo, serving 52 clients a month and charging $500 for each one.
His stack is 7 agents on Claude making everything for him.
Here's his secret AI setup and how to do the same:
His entire cost is roughly $480 a month in API tokens and a few subscriptions.
The whole company is seven agents coordinated by one orchestrator, sharing state through plain files.
Here is how the system is actually wired, so you can build your own version.
You start in Claude Code and give it one orchestrator prompt that defines the whole agency.
You tell it what it is, what its limits are, when it must act alone, and exactly when to wake you.
Under the orchestrator you define seven small agents, each with one job and nothing else.
The first agent scouts Google Maps in smaller cities and queues up businesses with no site or an ancient one.
The second writes a tailored diagnosis and a personal message for every lead it finds.
The third builds three to five finished landing pages for the strongest prospects.
The fourth renders a short vertical video for each proposal.
The fifth sends the outreach across a few channels and tracks who replies.
The sixth proofreads every message before anything goes out.
The seventh lives on your phone and answers interested leads while you are out, booking the call in Calendly for you.
The agents never share memory directly, they just read and write files, which kills almost every concurrency bug.
They talk to the outside world through MCP servers, so each tool stays clean and swappable.
You set two simple rules for when a human is needed.
The system only wakes you when a deal crosses a few thousand dollars or the reply rate drops below your threshold.
Everything below that runs on its own, around the clock.
There is no backend and no dedicated server anywhere in this.
It is a local sandbox, an MCP router, one API key, and that same key connected to your phone.
The whole edge was never a big team.
It was seeing that one person with the right prompts can run the entire workflow a full agency charges for.
This michelin chief made $100k cooking with remote hands technology
He is controlling robotic arms in 10 different restaurants across the world.
Once the dish is done, it can be simulated over and over again.
Here's the setup Claude built for him:
The whole system is built on a free open-source framework from
HuggingFace called LeRobot.
It uses a "leader-follower" pattern.
The chef holds a small robotic arm at his desk in Paris (the leader).
Every movement he makes gets mirrored in real time by an identical arm in a restaurant kitchen anywhere in the world (the follower).
When he chops, the robot chops.
When he plates, the robot plates.
Once he cooks a dish, the system records every motion.
From then on, the follower arm can repeat the exact same dish forever, without him touching anything.
Step 1.
Order two SO-101 robotic arms from the official store.
1 leader arm kit (~$120)
1 follower arm kit (~$120)
2 USB cables
1 webcam for visual feedback
Each kit is a flat-pack of 3D-printed parts and Dynamixel servos.
Assembly takes about an evening with a Phillips screwdriver.
Step 2.
Install LeRobot on your computer.
pip install lerobot
Plug both arms into your laptop.
Run their auto-detection command to find which USB port is the leader and which is the follower.
Step 3.
Calibrate the arms with one command:
lerobot-calibrate --robot.type=so101_follower
lerobot-calibrate --teleop.type=so101_leader
The script walks you through moving both arms to a center position and a fully extended position.
Takes 3 minutes.
Step 4.
Start teleoperation with one command:
lerobot-teleoperate \
--robot.type=so101_follower \
--robot.port=/dev/your_follower_port \
--teleop.type=so101_leader \
--teleop.port=/dev/your_leader_port \
--robot.cameras="{front: {type: opencv, index_or_path: 0, width: 1920, height: 1080, fps: 30}}"
Now every movement of the leader arm gets mirrored by the follower in real time.
The camera shows you what the follower sees.
Step 5.
Record a dish so it can be replayed forever:
lerobot-record \
--robot.type=so101_follower \
--teleop.type=so101_leader \
--dataset.single_task="Plate the salmon dish"
Cook the dish once through the robot.
Every joint angle, every gripper close, every pause gets saved as a dataset.
Step 6.
Open Claude and paste this prompt to deploy the dataset to remote restaurants:
Write me a Python service that:
Takes a recorded LeRobot dataset (joint trajectories + camera frames + task name)
Streams the joint commands over WebRTC to multiple follower arms located in different restaurants
Each restaurant runs a local "executor" that receives the stream and drives its own SO-101 follower
Supports two modes:
LIVE (chef controls the leader, all followers mirror in real time)
REPLAY (one dataset plays in all followers in parallel)
Includes latency monitoring and a fail-safe that pauses the arm if the stream drops for more than 200ms
Output one Python file for the chef's server side and one for the restaurant executor side.
Use the lerobot library on both ends.
The chef in the hook ships one follower arm to each of his 10 restaurants.
He records each signature dish once on his leader arm in Paris.
Now the same Michelin-tier dish gets plated at the same precision in Tokyo, New York, Dubai and 7 other cities at the same time, every night.
The arms cost him $120 each.
The first dish takes a weekend to record.
Every dish after that earns him forever.
This therapist made $170k selling portable offline AI.
It analyzes docs that can't be legally shown on web.
The whole setup costs $55 and he sells it for $999.
Here's how to make one step-by-step:
You need 4 things: a Raspberry Pi 5 (8GB), a PiSugar 3 Plus battery, a Whisplay HAT for the screen and mic, and a 64GB SD card.
Total damage on AliExpress is around $50 to $90 if you wait for the right deals.
Step 1. Write Raspberry Pi OS Lite 64-bit to the SD card using Raspberry Pi Imager.
Step 2. Stack the PiSugar battery underneath the Pi, snap the Whisplay HAT on top, insert the SD card, and boot the device.
Step 3. Open the terminal and install Ollama with one command:
curl -fsSL https://t.co/5UVLVuJ7UP | sh
Step 4. Pull a model that actually runs on the Pi without choking:
ollama pull phi3:mini
Step 5. Run the model and start chatting offline:
ollama run phi3:mini
The whole thing fits in your pocket, lasts 4 hours on battery, and never touches the internet once setup is done.
The therapist wraps his version in a custom case, preloads it with session note templates and HIPAA-aligned prompts, and sells it to private practices that legally cannot put patient sessions in ChatGPT or Notion.
You can sell yours to lawyers, doctors, accountants, journalists, defense contractors, or anyone else who handles data that legally cannot leave the building.
Hardware cost: $50 to $90.
Selling price: $999
Student made $95k selling tech that checks your partner’s loyalty
This device tracks every human move using WiFi and AI.
70% of people suspect their partners of cheating, so the demand is huge.
Here's easy setup to copy his success with Claude:
The technology is called WiFi sensing, or CSI (Channel State Information).
Every WiFi router constantly bounces signals around the room.
When a person moves or breathes, those signals get slightly distorted.
Modern WiFi chips can read those distortions and turn them into data.
It works on the same physics as radar.
Except the signals are already running through your walls for free.
The whole prototype takes about a weekend and around $10 in parts.
Step 1.
Buy an ESP32-S3 development board.
Grab any USB-C cable you have lying around.
Step 2.
Install the ESP-IDF framework from Espressif's official site.
It is their free development environment.
It takes around fifteen minutes to set up on Mac, Windows, or Linux.
Step 3.
Open Claude in a new tab.
Paste the prompt below to generate the firmware.
The firmware turns the board into a working WiFi sensor.
Prompt:
Write me an ESP32-S3 firmware that captures WiFi CSI data
and detects movement in a room.
Requirements:
Connect to my home WiFi as a passive client
Capture CSI packets continuously
Calculate the variance of CSI amplitude over a 2-second window
When variance exceeds a threshold, mark the state as "motion detected"
When it drops below, mark as "still"
Output JSON over serial: timestamp, state, variance_value
Use the official esp_wifi.h CSI API.
Add comments explaining each section so I can tune the threshold later.
Step 4.
Flash the firmware to the board with one command:
https://t.co/refDwmdU9I flash
Then open the serial monitor.
Watch the JSON output update in real time as you walk in and out of the room.
Step 5.
Once the basic build is working, go back to Claude.
Ask it to extend the firmware.
Make it detect slow oscillations for breathing patterns.
Make it send readings over MQTT to Home Assistant.
Make it auto-calibrate the threshold against an empty room.
Make it triangulate position across multiple boards.
Step 6.
Wrap the finished board in a small 3D-printed case.
Now you have a working device that reads movement through walls using nothing but the WiFi you already pay for.
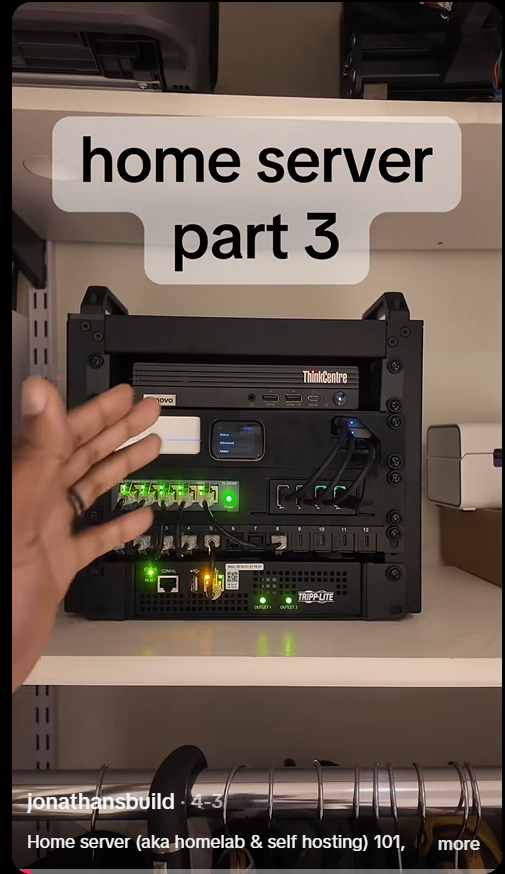
This guy sells homelab kits and makes $70,000/month.
It hosts all your subscriptions for free.
Netflix, spotify, HBO Max, everything you need.
Here's how to copy his success using only Claude:
The whole stack runs on three open-source tools.
Home Assistant controls every device in your house.
Frigate watches your cameras and uses AI to tell people from pets from packages.
Zigbee2MQTT connects all your sensors and bulbs without paying Hue or Aqara for their hub.
All free.
All running on one small box on your shelf.
Step 1. Buy the hardware.
Mini PC or Raspberry Pi 5.
8GB RAM.
256GB SSD.
Sonoff Zigbee USB stick.
Coral USB AI accelerator.
For Frigate.
Cheap PoE security cameras.
Reolink works.
Total cost is around $300-$500 depending on how many cameras.
Step 2. Install Home Assistant OS on the SSD.
They have a one-click installer at https://t.co/9o0KCbCo64.
It flashes the whole OS in 10 minutes.
Step 3. Plug in the Zigbee stick.
Open Home Assistant in your browser.
Install the Zigbee2MQTT add-on.
Pair every smart bulb, sensor, lock, and switch in your house.
It takes about an hour to add 50 devices.
Step 4. Install Frigate as an add-on.
Plug the Coral USB into the box.
Frigate now reads every camera and tells you what it sees.
“Person at front door.”
“Package delivered.”
“Raccoon in the trash.”
All without sending a single frame to the cloud.
Step 5. Open Claude and paste this prompt to wire it all together:
Write me a Home Assistant automation YAML configuration that:
1. When Frigate detects a person at the front door between 10pm and 6am, turn on the porch light and send a phone notification with the snapshot.
2. When the front door lock is opened and no one is home, based on phone location, send an alert.
3. When everyone leaves the house, turn off all lights, lock the doors, and set the thermostat to away mode.
4. When a smoke alarm triggers, flash all lights red, unlock the front door, and send alerts to everyone in the family.
5. Every morning at 7am, send me a voice-friendly text summary with yesterday’s camera events and any open doors or windows.
Output the full configuration.yaml-ready code with comments.
Step 6. Paste Claude’s output into Home Assistant’s automation editor.
Save it.
Your house now thinks for itself.
The cameras work without cloud subscriptions.
The lights turn on when you walk in.
The doors lock when you leave.
The guy in the hook puts all of this into a pre-configured mini PC.
He ships it to families with a one-page setup card.
And he charges $3,000 per kit.
The box is the value.
The setup is what you just read.
A guy created a pocket energy generator and raised $900K on Kickstarter.
It steals power from Wi-Fi signals and charges your iPhone.
He just told Claude his idea, and AI built everything for him.
Here's how non-tech people can copy his success:
The tech is called Qi2 wireless charging.
It is the same magnetic standard Apple uses for MagSafe.
Any iPhone from the 12 onward charges from it.
Any new Samsung charges from it.
Most Pixels charge from it.
The chip costs $4 wholesale.
He turned it into a credit-card-thin power bank.
It sticks to the back of your phone with magnets.
And charges it without a single cable.
The whole build is 4 parts.
Qi2 wireless charging transmitter module.
2,000 mAh slim lithium polymer battery.
USB-C charging input.
Custom PCB to connect them.
Total cost in parts is around $12.
Kickstarter price is $39.
Step 1. Sketch your idea in plain English.
Open Claude.
Describe what you want in one paragraph.
Example:
“A wireless power bank the size of a credit card.
2,000 mAh battery.
Qi2 magnetic alignment.
Charges via USB-C.
I want a PCB schematic, a parts list, and a 3D-printable case file.”
Step 2. Claude generates the schematic.
Ask Claude to output the circuit diagram as a KiCad project file.
KiCad is free electronics design software.
Save the file.
Open it.
You now have a real PCB design.
Step 3. Order the PCB.
Upload Claude’s KiCad output to JLCPCB or PCBWay.
They print 5 boards for $5.
And ship them in a week.
They also assemble the components for an extra $40.
So you don’t have to solder.
Step 4. 3D print the case.
Ask Claude to output the case as an OpenSCAD file.
OpenSCAD is free 3D modeling software.
Send the .scad file to any local 3D print service.
Or print it at home for $2 in filament.
Step 5. Make the Kickstarter page.
Open Claude again.
Paste this prompt:
Write me a Kickstarter campaign for a wireless pocket power bank.
Include:
A headline that promises freedom from cables.
A 200-word story about why I built this.
Three pledge tiers.
$29 early bird.
$39 regular.
$99 three-pack.
Five bullet points of features.
A risks and challenges section that sounds honest, not corporate.
Stretch goals at $100K, $250K, and $500K.
Tone:
Clean.
Confident.
No buzzwords.
Write like a real engineer explaining a real product.
Not a startup deck.
Step 6. Record a 90-second product video.
Show the card sticking to a phone.
Show it charging.
Upload everything to Kickstarter.
Set a $30,000 goal.
Run $500 in pre-launch ads on Instagram and TikTok.
The guy in the hook hit $900K with the exact stack you just read.
He never wrote a line of code himself.
Claude wrote the PCB layout.
Claude wrote the case file.
Claude wrote the entire Kickstarter campaign.
He just clicked Order.
This geek sold advanced solar panels for $210,000.
They follow the sun all day.
Device like this can replace 10 regular ones.
Here's how to do it step-by-step:
The whole build is a dual-axis solar tracker.
Two servo motors tilt the panel left/right and up/down.
Four light sensors tell it where the sun is.
An Arduino does the math.
It gives you 30-40% more energy than a fixed panel.
Total cost in parts is around $50.
Step 1.
Buy these components.
Arduino Uno board.
2 servo motors.
SG90 or MG996R for bigger panels.
4 LDR light sensors.
4 resistors.
10kΩ.
A small breadboard.
Jumper wires.
A small 6V solar panel for testing.
Step 2.
Wire the LDRs in a cross pattern.
Place them in 4 corners of a small cardboard square with thin walls between them.
The walls cast shadow.
So whichever sensor sees the most light tells the Arduino where the sun is.
Step 3.
Mount the panel on the two servos.
One servo handles left-right rotation.
The other handles up-down tilt.
Hot glue, 3D-printed brackets, or even cardboard works for the frame.
Step 4.
Connect everything to the Arduino.
LDRs go to analog pins A0 to A3.
Servos go to digital pins 9 and 10.
Power the servos with a separate 5V supply because they pull more current than the Arduino can give.
Step 5.
Open Claude and paste this prompt:
Write me an Arduino sketch for a dual-axis solar tracker.
Hardware:
4 LDRs on pins A0, A1, A2, and A3.
A0 is top-left.
A1 is top-right.
A2 is bottom-left.
A3 is bottom-right.
1 horizontal servo on pin 9.
1 vertical servo on pin 10.
Logic:
Average top vs bottom LDRs.
Tilt the vertical servo toward the brighter side.
Average left vs right LDRs.
Rotate the horizontal servo toward the brighter side.
Add a small tolerance so the servos don't jitter.
Constrain horizontal servo between 10 and 170 degrees.
Constrain vertical servo between 10 and 80 degrees.
Output one complete sketch I can paste into Arduino IDE.
Step 6.
Upload the code.
Point the panel outside.
Watch it follow the sun.
You now have a working sun-tracking panel that produces around 30-40% more energy than a fixed one.
Scale it up with a bigger panel.
Weatherproof the build.
Mount it on a roof.
The buyer pays for the assembly, the wiring, and the fact that they never had to learn Arduino.
You just learned it.
This tech student made $110,000 hacking Google.
He uses cyberdeck to win bug bounties.
It emulates Google's products and finds the weak spots.
Here's how to copy him (so easy a kid could do it):
Bug bounty is a deal companies offer.
They publish a list of their systems and say "find a security flaw inside these exact systems, report it, and we pay you."
Google paid out over $59 million in bug bounties since the program started.
Step 1. Make an account on a bug bounty platform.
The big three are HackerOne, Bugcrowd, and Google's own program at https://t.co/BjW89CH9ND.
Step 2. Read the scope page before you do anything.
Every program lists exactly which domains and products you are allowed to test, and which ones are off-limits.
Step 3. Start on a beginner-friendly program with a wide scope.
Pick a target that pays for common, learnable bugs like XSS, IDOR, or misconfigurations.
Google's program is hard for beginners.
Start smaller, build a track record, then climb.
Step 4. Learn the fundamentals first.
Free resources that teach real skills:
PortSwigger Web Security Academy is free and the gold standard.
TryHackMe and HackTheBox give you guided practice labs.
OWASP Top 10 covers the bugs that pay most often.
Step 5. Use a recon and testing toolkit.
Cyberdesk and tools like Burp Suite Community help you map a target's surface and test requests.
Step 6. Write a clear report when you find something.
A good report shows what the bug is, how to reproduce it, and what damage it could do.
That is what gets you paid.
That is a real career.
People do it full-time.