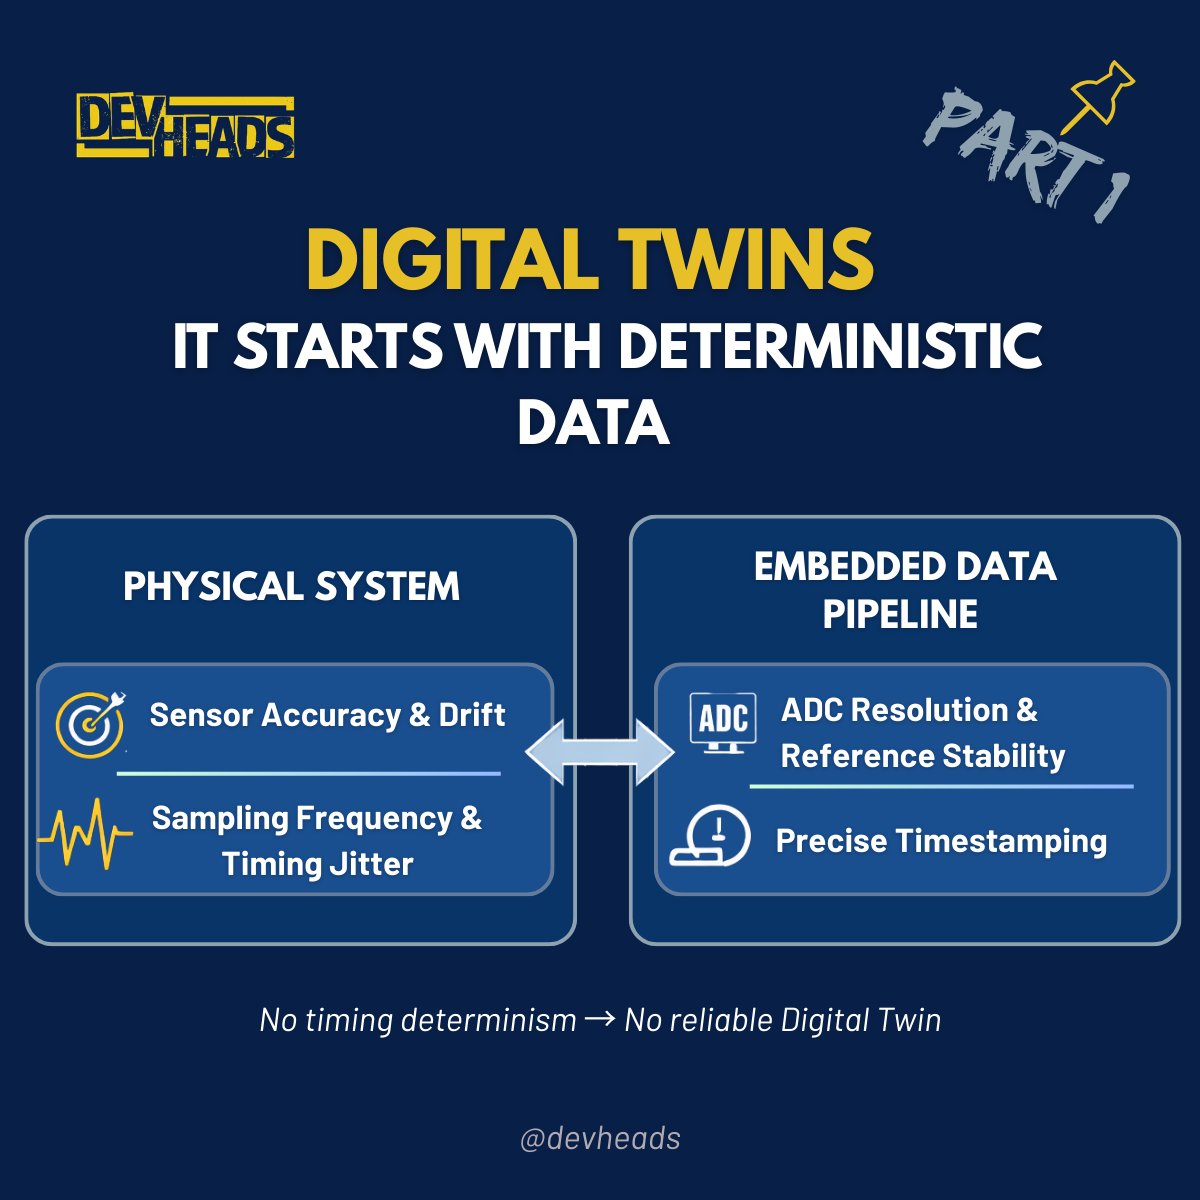
A #Digital_Twin is a virtual representation of a physical system that stays synchronized with it through continuous data exchange.
At its core, it is about state synchronization between the physical and digital worlds.
Before analytics, simulation, AI, or dashboards, there is signal acquisition.
From an embedded systems perspective, that raises real engineering constraints:
• Sensor accuracy and drift
• Calibration strategy and long-term stability
• ADC resolution and reference integrity
• Sampling frequency relative to signal bandwidth
• Sampling jitter and timing determinism
• Precise timestamping and synchronization
If sampling is inconsistent or timestamps drift, the digital model does not reflect the system state.
It reflects measurement artifacts.
A Digital Twin is only as accurate as the embedded data pipeline feeding it.
Before discussing AI or cloud platforms, we should ask:
Is our firmware producing deterministic, time-consistent system data❓
#EmbeddedSystems #IndustrialIoT
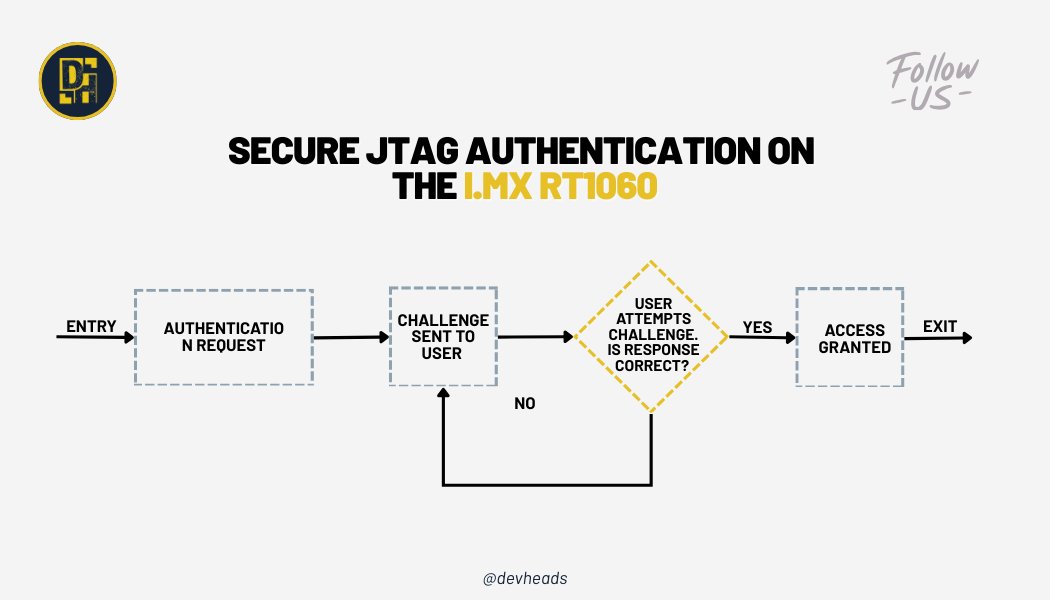
🔐 𝗦𝗲𝗰𝘂𝗿𝗲 𝗝𝗧𝗔𝗚 𝗶𝘀 𝗻𝗼𝘁 𝗮𝗯𝗼𝘂𝘁 𝗱𝗶𝘀𝗮𝗯𝗹𝗶𝗻𝗴 𝗱𝗲𝗯𝘂𝗴. 𝗜𝘁’𝘀 𝗮𝗯𝗼𝘂𝘁 𝗰𝗼𝗻𝘁𝗿𝗼𝗹𝗹𝗶𝗻𝗴 𝗶𝘁.
On the NXP https://t.co/GlLPRi9IcY RT1060, JTAG access is protected at the #hardware level using OTP eFuses and the System #JTAG Controller (SJC). Instead of permanently blocking debugging, Secure JTAG relies on a challenge-response authentication flow that only unlocks the interface for trusted tools.
In practice, this means:
• A unique challenge is read from device eFuses
• The #debugger must compute and return the correct response key
• JTAG access is granted only if authentication succeeds
• Unauthorized probes remain fully blocked
This approach raises the bar against #firmware extraction and reverse engineering while keeping controlled debug access available when it’s truly needed.
👉 𝗥𝗲𝗮𝗱 𝘁𝗵𝗲 𝗳𝘂𝗹𝗹 𝗮𝗿𝘁𝗶𝗰𝗹𝗲 𝗵𝗲𝗿𝗲: https://t.co/7N4k4WHuHs
One of our community members just shared this and we thought it’s a great discussion to bring here:
Has anyone run into major issues when upgrading older #STM32CubeIDE projects?
⚠️ Broken #configurations
⚙️ Linker weirdness
🔧 HAL surprises
🧩 #Debug or build inconsistencies
💬 We’d love to hear your experiences, what went smoothly, what didn’t, and any tips you’d share with others making the jump.
Drop your thoughts in the comments 👇
And if you’re into #embeddedSystems, #STM32 development, or just enjoy learning with other engineers. Come join our DevHeads community on Discord!
🔗 https://t.co/eYjiOrC5G4
𝗘𝗺𝗯𝗲𝗱𝗱𝗲𝗱 𝗟𝗶𝗻𝘂𝘅 𝗕𝗼𝗼𝘁𝗶𝗻𝗴 𝗣𝗿𝗼𝗰𝗲𝘀𝘀: 𝗙𝗿𝗼𝗺 𝗣𝗼𝘄𝗲𝗿-𝗼𝗻 𝘁𝗼 𝗟𝗶𝗻𝘂𝘅 𝗞𝗲𝗿𝗻𝗲𝗹
As soon as we power 𝘁𝗵𝗲 𝗱𝗲𝘃𝗶𝗰𝗲, 𝗶𝘁 𝗯𝗼𝗼𝘁𝘀 𝘁𝗵𝗿𝗼𝘂𝗴𝗵 𝘀𝗲𝘃𝗲𝗿𝗮𝗹 𝘀𝘁𝗮𝗴𝗲𝘀. To make things easy to understand, we’ll take BeagleBone Black as an example.
As the device boots, the operating system fully comes alive, and the application starts so User can interact with the device for instance we can run a video on a display.
Many complex SoC has limited internal RAM. Because of this limited amount of RAM, multiple bootloader stages are needed. These bootloader stages systematically unlock the full functionality of the device so that all complexities of the device are available to the kernel
𝗛𝗲𝗿𝗲 𝗮𝗿𝗲 𝘁𝗵𝗲 𝗗𝗶𝘀𝘁𝗶𝗻𝗰𝘁 𝗕𝗼𝗼𝘁𝗹𝗼𝗮𝗱𝗲𝗿 𝗦𝘁𝗮𝗴𝗲𝘀:
• ROM (Primary Program Loader)
• First Stage Bootloader (MLO)
• Second Stage Bootloader (U-BOOT)
• Linux Kernel
Let us know in the comments which embedded Linux board you’re using?
#EmbeddedLinux #Bootloader #LinuxKernel #EmbeddedSystems
𝗢𝗽𝗲𝗻𝗘𝗺𝗯𝗲𝗱𝗱𝗲𝗱 𝗮𝗻𝗱 𝗬𝗼𝗰𝘁𝗼 𝗣𝗿𝗼𝗷𝗲𝗰𝘁: 𝗪𝗵𝗮𝘁’𝘀 𝘁𝗵𝗲 𝗗𝗶𝗳𝗳𝗲𝗿𝗲𝗻𝗰𝗲?
The #Yocto Project and #OpenEmbedded are 𝗰𝗹𝗼𝘀𝗲𝗹𝘆 𝗿𝗲𝗹𝗮𝘁𝗲𝗱 𝗮𝗻𝗱 𝗼𝗳𝘁𝗲𝗻 𝗺𝗲𝗻𝘁𝗶𝗼𝗻𝗲𝗱 𝘁𝗼𝗴𝗲𝘁𝗵𝗲𝗿, 𝗯𝘂𝘁 𝘁𝗵𝗲𝘆 𝘀𝗲𝗿𝘃𝗲 𝗱𝗶𝗳𝗳𝗲𝗿𝗲𝗻𝘁 𝗽𝘂𝗿𝗽𝗼𝘀𝗲𝘀 while sharing a common foundation.
Both projects collaborate on a shared core of metadata known as 𝗢𝗽𝗲𝗻𝗘𝗺𝗯𝗲𝗱𝗱𝗲𝗱-𝗖𝗼𝗿𝗲 (𝗼𝗲-𝗰𝗼𝗿𝗲), which includes recipes, classes, and essential build components. This shared core ensures consistency and collaboration across the #EmbeddedLinux ecosystem.
𝗢𝗽𝗲𝗻𝗘𝗺𝗯𝗲𝗱𝗱𝗲𝗱
• Built as a foundation, not a reference distro
• Offers a broad and flexible set of metadata
• Supports many architectures, features, and applications
• Provides a best-in-class cross-compilation environment
𝗬𝗼𝗰𝘁𝗼 𝗣𝗿𝗼𝗷𝗲𝗰𝘁
• Provides curated metadata and BSPs
• Easy-to-use, well-tested, and interoperable tools
• Targets a core set of architectures and specific boards
• Ideal for a stable and guided development experience
𝗢𝗽𝗲𝗻𝗘𝗺𝗯𝗲𝗱𝗱𝗲𝗱 𝗼𝗳𝗳𝗲𝗿𝘀 𝗳𝗹𝗲𝘅𝗶𝗯𝗶𝗹𝗶𝘁𝘆 𝗮𝗻𝗱 𝗯𝗿𝗲𝗮𝗱𝘁𝗵, while the 𝗬𝗼𝗰𝘁𝗼 𝗣𝗿𝗼𝗷𝗲𝗰𝘁 𝗱𝗲𝗹𝗶𝘃𝗲𝗿𝘀 𝘀𝘁𝗿𝘂𝗰𝘁𝘂𝗿𝗲, 𝗮𝗻𝗱 𝘀𝘁𝗮𝗯𝗶𝗹𝗶𝘁𝘆 all built on the same powerful core.
𝗗𝗼 𝗬𝗼𝘂 𝗞𝗻𝗼𝘄 𝘁𝗵𝗲 𝗙𝗼𝘂𝗿 𝗕𝘂𝗶𝗹𝗱𝗶𝗻𝗴 𝗕𝗹𝗼𝗰𝗸𝘀 𝗼𝗳 𝗘𝗺𝗯𝗲𝗱𝗱𝗲𝗱 𝗟𝗶𝗻𝘂𝘅?
These elements are the 𝗧𝗼𝗼𝗹𝗰𝗵𝗮𝗶𝗻, 𝗕𝗼𝗼𝘁𝗹𝗼𝗮𝗱𝗲𝗿, 𝗞𝗲𝗿𝗻𝗲𝗹, 𝗥𝗼𝗼𝘁 𝗳𝗶𝗹𝗲𝘀𝘆𝘀𝘁𝗲𝗺. It is about building a complete system from ground up. Let’s understand their role one by one:
• 𝗧𝗼𝗼𝗹𝗰𝗵𝗮𝗶𝗻: The compiler and other tools needed to create code for the target
• 𝗕𝗼𝗼𝘁𝗹𝗼𝗮𝗱𝗲𝗿: The program that initializes the board and loads the Linux kernel
• 𝗞𝗲𝗿𝗻𝗲𝗹: Managing system resources and interfacing with hardware
• 𝗥𝗼𝗼𝘁 𝗳𝗶𝗹𝗲 𝘀𝘆𝘀𝘁𝗲𝗺: Contains the libraries and programs that are run once the kernel has completed its initialization.
One more element can be collection of programs specific to your embedded application which make the device do whatever it is supposed to do like flying drones, medical devices or Industrial HMI.
#EmbeddedLinux #LinuxKernel #Bootloader
𝗬𝗼𝗰𝘁𝗼 𝗼𝗿 𝗕𝘂𝗶𝗹𝗱𝗿𝗼𝗼𝘁 🤔? 𝗖𝗵𝗼𝗼𝘀𝗶𝗻𝗴 𝘁𝗵𝗲 𝗥𝗶𝗴𝗵𝘁 𝗧𝗼𝗼𝗹 𝗳𝗼𝗿 𝗖𝘂𝘀𝘁𝗼𝗺 𝗘𝗺𝗯𝗲𝗱𝗱𝗲𝗱 𝗟𝗶𝗻𝘂𝘅
The two most popular tools are #Buildroot and #Yocto. Though they are not a #linux distros themselves but a project that can help build embedded systems based on Linux. Here are quick few reasons when choosing between them
𝗕𝘂𝗶𝗹𝗱𝗿𝗼𝗼𝘁 𝗶𝘀 𝘀𝘂𝗶𝘁𝗮𝗯𝗹𝗲 𝗳𝗼𝗿 𝘀𝗺𝗮𝗹𝗹 𝘁𝗼 𝗺𝗲𝗱𝗶𝘂𝗺 𝗽𝗿𝗼𝗷𝗲𝗰𝘁𝘀
• Fast initial Build times
• Ease of use and learning
• Minimal footprint outputs
• Straightforward Maintenance (for Single Configuration)
𝗬𝗼𝗰𝘁𝗼 𝗶𝘀 𝘀𝘂𝗶𝘁𝗮𝗯𝗹𝗲 𝗳𝗼𝗿 𝘁𝗵𝗲 𝘁𝗲𝗮𝗺𝘀 𝘁𝗵𝗮𝘁 𝗻𝗲𝗲𝗱 𝗺𝗮𝘅𝗶𝗺𝘂𝗺 𝗰𝗼𝗻𝘁𝗿𝗼𝗹
• For complex systems
• Highly customizable & flexible
• Extensive hardware and package support
• Support incremental build and reusability
Let us know your experience in the comment section! 👇
🎉 Happy New Year 2026 from DevHeads! 🎉
A new year means new ideas, new challenges, and new opportunities to build, learn, and grow together.
Here’s to curiosity, creativity, and collaboration driving everything we create in 2026.
Wishing our community a year filled with innovation, impact, and shared success 🚀
#HappyNewYear2026 #Tech #Innovation
💬 Community answer
Pin locations on Nucleo-144 boards can be confusing, especially the first time.
I verified the PD2 pin on my Nucleo-H723ZG using a multimeter and attached a photo showing the exact location for reference.
👉 https://t.co/rkuo95QkkU
🚧 Ever been stuck because a #board#pin didn’t match the docs?
You’re not alone.
One of our community members recently asked:
“Anyone got Nucleo F756ZG pinout expertise?
The table shows PD2 at CN8 Pin 12 (D48), but on the back of the board that pin is marked GND.
Is the board mislabeled, or am I looking at the wrong pin?”
If you’ve worked with #STM32 #Nucleo boards, you know how valuable it is to cross-check documentation, board markings, and real hardware, especially when something doesn’t look right. 😅
💡 The good news?
This is what happens when you ask the right question in the right community.
Someone grabbed a multimeter, checked the board, shared real photos, and cleared up where PD2 really lives.
👉 See the full answer in the comments
Drop your thoughts below; what would have been your first debugging step?👇
🚨 What if edge devices could detect abandoned objects in real time using only open software and standards-based hardware?
In this article, we walk through exactly how we built an AI vision system using:
🔹 SECO’s COM-HPC-A-RPL module (Intel® Raptor Lake)
🔹 Clea OS — a Yocto-based Linux built for edge AI
🔹 OpenCV + NumPy powering the detection pipeline
🔹 A simple off-the-shelf camera
What makes this interesting isn’t just the demo. it’s the approach.
We show how developers can combine COM-HPC modular hardware with a fully open, customizable Linux stack to build surveillance-grade analytics without vendor lock-in, exotic accelerators, or complex tooling.
From configuring Yocto layers, to adding XFCE, to integrating OpenCV and testing video streams, the guide walks through a real, working setup — the kind you can reproduce, learn from, and build on.
If you're working in computer vision, edge AI, or intelligent surveillance, this one is worth a read.
👉 Full article + videos: https://t.co/2jub48fdSX
#COMHPC #SECO #IntelArchitecture #EdgeComputing #AIAtTheEdge #IoTDevices #EmbeddedHardware
Big milestone from one of our community members today! 🎉
After weeks of testing (and a few sacrificed MOSFETs 😅), they successfully achieved SPWM control on a BLDC motor — delivering a much smoother waveform than classic six-step commutation.
Here’s the filtered SPWM signal on the scope 👉
Want to build and share projects like this?
👉 Join our engineering & hardware community! https://t.co/eYjiOrC5G4
#MotorControl #SPWM #BLDC #Electronics #DIYProjects #EmbeddedSystems
JTAG is incredibly useful for debugging, but if it’s left open, it becomes an easy path for firmware extraction and tampering. In our latest write-up, we walk through how the NXP https://t.co/GlLPRi9IcY RT1060 enables Secure JTAG using eFuses and a challenge-response mechanism to keep devices protected.
We also show how developers can still debug safely by
• Programming the correct eFuses
• Using a custom SEGGER J-Link script to authenticate over Secure JTAG
• Verifying that the device unlocks only when the correct response key is provided
It’s a practical, step-by-step guide with real commands, screenshots, and the full unlock script.
👉 Read the full article here: https://t.co/7N4k4WHuHs
#JTAG #EmbeddedSecurity #FirmwareSecurity #HardwareSecurity #EmbeddedSystems #IoTSecurity #Debugging
From the first MPUs to hardware firewalls, Secure Boot, and TrustZone, modern Cortex-M devices now offer multiple layers of defense to keep firmware and data safe.
In our new article, we break down how each mechanism contributes to building a secure embedded system:
• MPU for controlled memory access
• Firewall for isolating sensitive regions
• Secure Boot and Root of Trust for verifying firmware integrity
• TrustZone for separating secure and non secure worlds
• Practical guidance on when and why to use each technique
If you work with MCUs, IoT products, or embedded security, this overview highlights the key protections available on Cortex-M and how they strengthen system resilience.
👉 Read the full article here: https://t.co/KVT1bLaECp
#IoT #Cybersecurity #EmbeddedSecurity #Firmware #ARM #CortexM #STM32 #RTOS #HardwareSecurity
With 30+ years of experience in embedded Linux, IoT, and high-performance system design, Iain Menzies-Runciman breaks down how the ADLINK COM-HPC-ALT module + 128-core Ampere Altra Max can run real-time YOLOv8 vision AI and natural-language querying with View AI — all on a single CPU-only edge platform.
The result?
Smarter, faster, low-power manufacturing quality inspection — without GPUs and without added complexity.
If you're into edge AI, embedded systems, or modern industrial automation, this is a great read.
👉 Full article here: https://t.co/bEUu93mPiz
#EdgeAI #EmbeddedLinux #IoT #ADLINK #YOLOv8 #Automation
In multicore embedded systems, efficient communication between cores is key to achieving performance and reliability.
In the final part of this #debugging series, Bea explores how to overcome #inter_core messaging challenges in #Zephyr#RTOS using #SystemView and #Ozone.
From setting up message queues with 𝒌_𝒎𝒔𝒈𝒒_𝒑𝒖𝒕() and 𝒌_𝒎𝒔𝒈𝒒_𝒈𝒆𝒕() to using conditional breakpoints and watchpoints in Ozone — this post dives deep into how developers can trace message flow and ensure smooth, loss-free communication across cores.
💡 Whether you’re debugging synchronization issues or optimizing IPC performance, this guide provides practical, hands-on insights you can apply right away.
👉 Read the full article here: https://t.co/LyuHs0ot2b
Check out this new DevHeads article by Ibtihal Ben Ali ("Bea"), diving into #MulticoreDebugging in #ZephyrRTOS — this time tackling #CacheCoherency and how shared cache levels (L1, L2, L3) can impact system reliability.
👉 Read it here: https://t.co/BofA52j08e
Bea walks through practical techniques using #SEGGER SystemView and #Ozone to detect and resolve cache-related issues across cores — from understanding cache incoherence to applying Zephyr’s cache APIs for more deterministic performance.
A great read for anyone working on multicore systems and looking to make them run smoother and more predictably.
One of our community members recently shared a tricky issue during the SD protocol initialization stage on an #STM32F4 Discovery board using a generic SD memory shield.
While sending the ACMD51 command to read the Status Card Register on the DAT0 line, the command failed with this message in Zephyr:
<𝒅𝒃𝒈> 𝒔𝒅: 𝒔𝒅𝒎𝒎𝒄_𝒓𝒆𝒂𝒅_𝒔𝒄𝒓: 𝑨𝑪𝑴𝑫51 𝒇𝒂𝒊𝒍𝒆𝒅: -5
A logic analyzer revealed a duplicated clock (CLK) signal on the DAT0 line. Interestingly, after lowering the SPI clock frequency from 24 MHz to 8 MHz, everything suddenly started working!
They’re wondering:
“What could cause that oscillation on the DAT line, and why does changing the frequency fix it?”
Here’s what the device tree configuration looked like 👇 (see image)
If you’ve ever debugged SD card timing issues, signal integrity quirks, or similar Zephyr + SPI setups, we’d love to hear your thoughts and experiences!
💬 Join our embedded & firmware community to share insights, troubleshoot together, and learn from real-world projects like this.
👉 https://t.co/eYjiOrC5G4
#EngineeringCommunity #TechDiscussion #LearnEmbedded #EmbeddedCommunity #OpenSourceHardware
Watch as Umesh demonstrates a live setup of a #TCP client–server using the #STM32#microcontroller and the #W5500#Ethernet module.
You’ll see the TCP connection come to life — from physical hardware to real-time data exchange!
👉 Watch the complete video here: https://t.co/0OdhDze9JM
👥 🔗 Join us on Discord to connect with other embedded systems enthusiasts and stay tuned for upcoming sessions! https://t.co/eYjiOrC5G4
📍 In this short clip, Umesh explains why the very first step in setting up #Ethernet communication with #STM32 is to create a #socket — and why continuously checking link status is critical for keeping your device connected.
But this is just the beginning 👇
In the full session, you’ll learn how to:
✅ Integrate the #W5500 Ethernet module with STM32
✅ Configure #TCP servers & clients
✅ #Debug with #UART and serial terminals
✅ Compare Ethernet solutions for different use cases
✅ Prepare for Modbus #TCP/IP implementation
🎥 Watch the full tutorial on YouTube 👉 https://t.co/0OdhDze9JM
💬 Share your questions & projects with us in the Discord community 👉 https://t.co/hDUMfPJog0