Every setup I post follows the same system: broken level + retest + trigger candle confirmation + 50 EMA confluence. I grade every trade A+ or B before I take it — no exceptions.
Not financial advice — this is documentation of my own process, not signals.
Trade #5
AUDCAD, 4H, B Setup
D1, Price is in Strong Uptrend but H4 is in Downtrend lack Alignment
H4 Resistance level turned Support, retested more than 3 times after breakout
H4 Pin Bar with long tail showing rejection
SL - Invalidation Level
Entry 0.99210 SL 0.98921 TP 0.99820
Trade #4
USDCHF · 4H · A+ setup · ✅ Win (+2R)
Entry 0.82010→TP 0.82391 as planned. Market kept rallying after—target stays the target either way.
Same rule that applies to loss applies to a win: the plan is the plan, not a moving target based on how price feels in the moment.
Trade #4
USDCHF, 4H, A+ Setup.
D1,H4 Alignment both in strong Uptrend.
H4 Resistance level turned Support, tested once before breakout.
H4 50 EMA acting as Support.
H4 Pin Bar with long tail showing rejection.
Entry 0.82010/SL 0.81832/TP 0.82391
#BreakAndRetest#VictorK_Trades
Same reason it's fine: A+ setups risk a fixed 0.5%, win or lose. This loss cost exactly what the plan said it would — nothing more.
https://t.co/1n00Vr3pp3
https://t.co/E0U5s7fYQD
#BreakAndRetest#VictorK_Trades
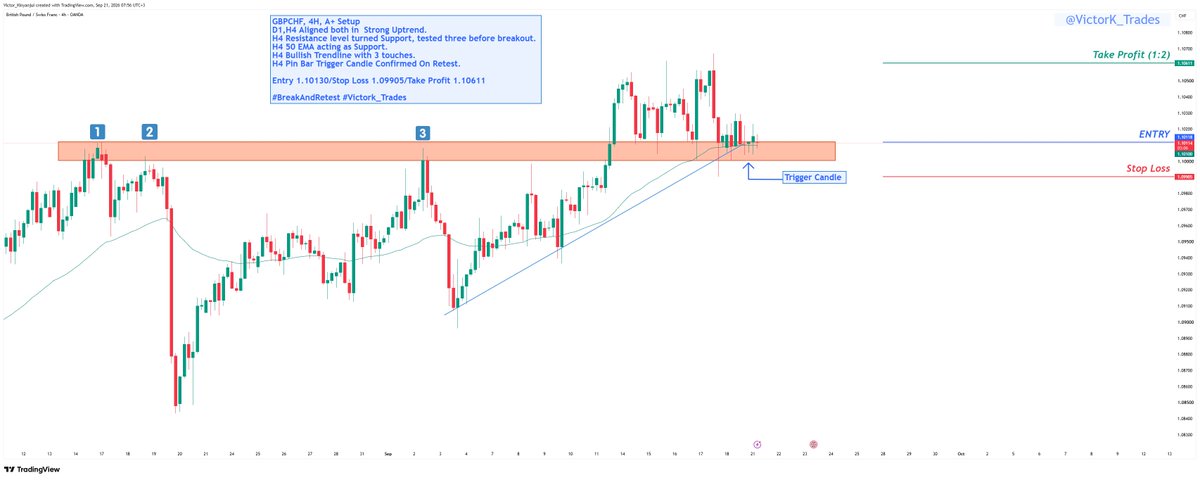
GBPCHF, 4H, A+ Setup.
D1,H4 Aligned both in Strong Uptrend.
H4 Resistance level turned Support, tested three before breakout.
H4 50 EMA acting as Support.
H4 Bullish Trendline with 3 touches.
H4 Pin Bar Trigger Candle Confirmed On Retest.
Entry 1.10118/SL 1.09905/TP 1.10611
Got a lot of messages after the GBPCHF A+ Setup loss — appreciate the real questions.
A+ means highest probability, not guaranteed. Edge over a large sample is what this looks like day to day — you take the trade because the process is right, not because you know the outcome.
Been asked a few times since the EURCHF stop-out: no, I'm not moving my stops wider after this. One frustrating trade isn't a pattern — it's noise. If stop placement needs to change, that's a decision for a full back test review, not a reaction to one chart.
#BreakAndRetest
4 days, no A+/B setup. Some weeks are like this. The system isn't broken when it's quiet — forcing a trade to "stay active" is how the system actually breaks.
Patience, not inactivity.
#BreakAndRetest#VictorK_Trades
EURCHF · 4H · B setup · ❌ Loss (-1R)
Stopped out by ~2 pips before rallying straight through our TP. Stop stays where it is — no moving it, no chasing the move after the fact.
#BreakAndRetest#VictorK_Trades
EURCHF, 4H, B Setup D1+H4 aligned in a Strong Uptrend.H4 Resistance level turned Support, tested once before breakout.
Entry 0.94377/Stop Loss 0.94245/TP 0.94697.
#BreakAndRetest@VictorK_Trades
@JTradeX_paper Stop sits just beyond the trigger candle's structure — if price goes past that point, the setup thesis is invalidated anyway. Tighter stop also means smaller position risk for the same dollar amount, which is why the 1:2 R:R works even off a small range.
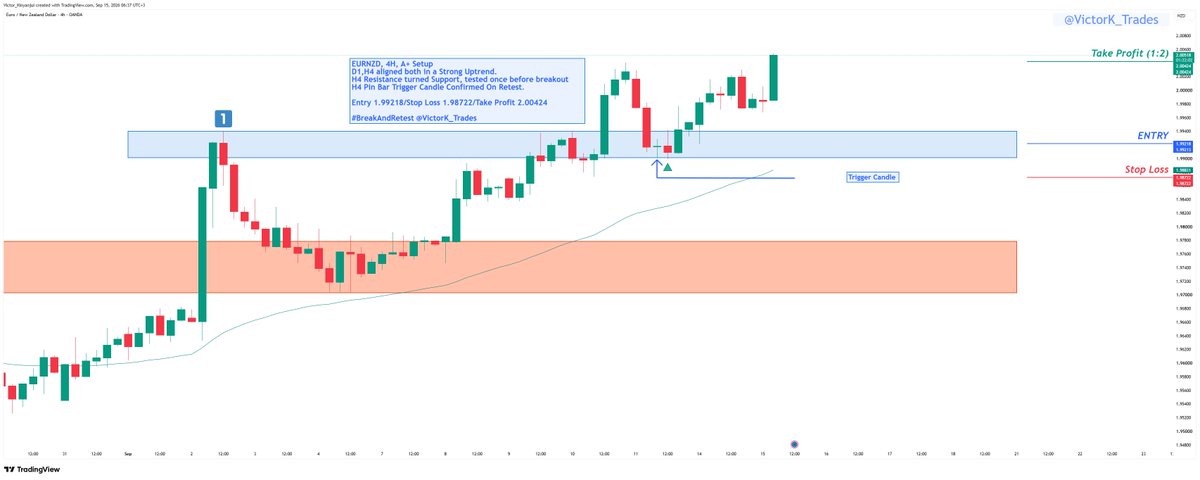
EURNZD, 4H, A+ Setup
D1+H4 aligned in a Strong Uptrend.H4 Resistance level turned Support, tested once before breakout.
Entry 1.99218/Stop Loss 1.98722/TP 2.00424.
#BreakAndRetest@VictorK_Trades
EURNZD, 4H, A+ Setup
D1+H4 aligned in a Strong Uptrend.H4 Resistance level turned Support, tested once before breakout.
Entry 1.99218/Stop Loss 1.98722/TP 2.00424.
#BreakAndRetest@VictorK_Trades