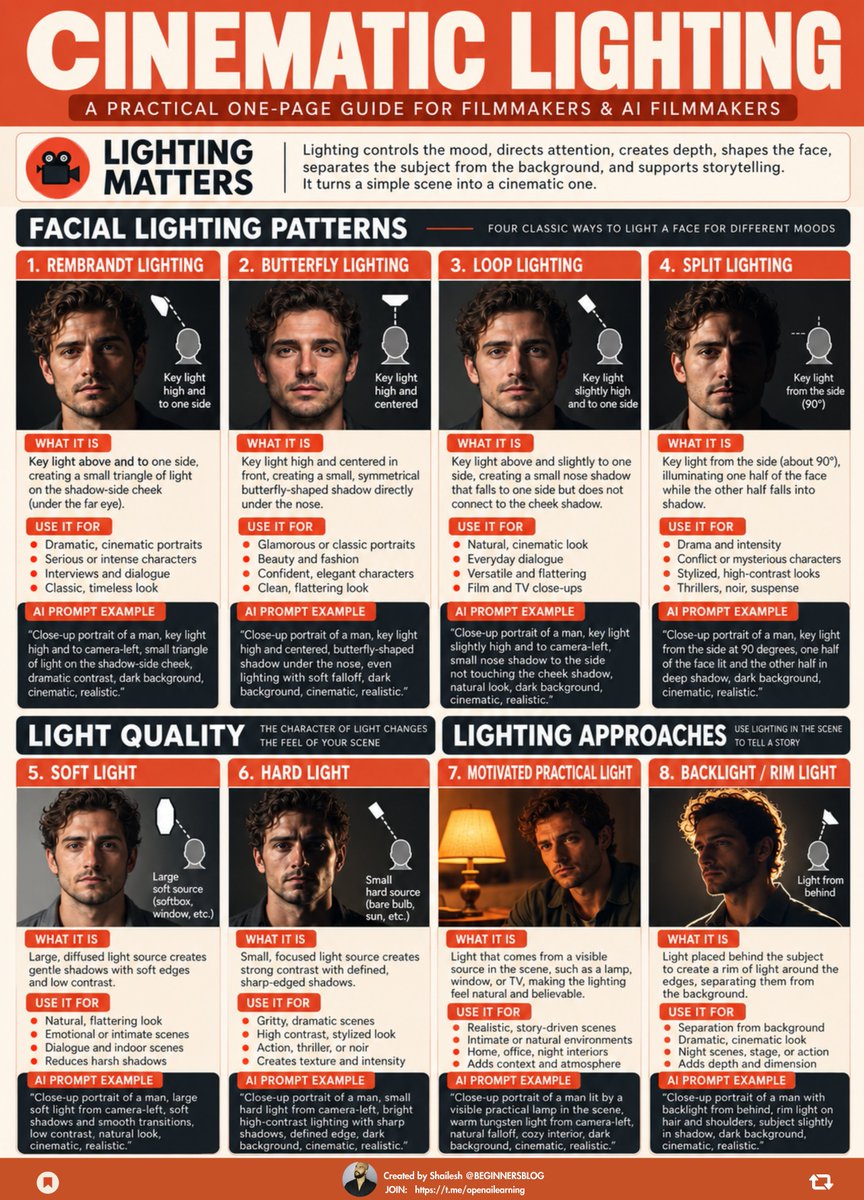
8 Cinematic Lighting Setups Every AI Filmmaker Should Know
1. “Cinematic lighting” is not a lighting setup
Real cinematographers think in controllable choices:
→ Where is the source?
→ Which direction does it hit the face?
→ Is it soft or hard?
→ How dark is the shadow side?
→ What motivates the light?
→ How does the subject separate from the background?
That is the information an AI model can actually visualize.
2. Lighting patterns describe the face
Rembrandt, Butterfly, Loop and Split are not interchangeable “cinematic looks.”
→ Rembrandt: one side lit, far cheek darker, small triangle of light beneath the far eye.
→ Butterfly: key high and near camera axis, creating the small symmetrical shadow directly beneath the nose.
→ Loop: nose shadow falls slightly downward and sideways without joining the cheek shadow.
→ Split: roughly half the face illuminated, half predominantly shadowed.
The pattern comes from the relationship between the light, face and camera.
3. Soft vs hard light is about shadow quality
Soft light:
→ gradual transitions
→ softer shadow edges
→ gentler facial contrast
Hard light:
→ sharp shadow edges
→ stronger texture
→ more graphic separation
Neither one is automatically “more cinematic.”
Choose based on what the scene needs.
4. Motivated light usually feels more believable
If a lamp is visible frame-right, the actor should not look strongly lit from frame-left for no reason.
Use believable sources:
→ window
→ desk lamp
→ television
→ fire
→ streetlight
→ neon sign
→ headlights
Then let that source determine the direction, color and shadow behavior.
5. Lighting changes how we read the character
The same actor can feel completely different depending on the light.
→ open shadows can make more information visible
→ selective darkness can create mystery
→ side light can emphasize conflict or structure
→ backlight can isolate or elevate a subject
→ practical light can make a scene feel grounded
→ silhouette can deliberately hide identity
Lighting is storytelling before it is decoration.
6. Prompt the visible result
Weak:
“Cinematic portrait, dramatic lighting.”
Better:
“Medium close-up of a man seated in a dark office. Large soft key from camera-left, slightly above eye level, gradual shadow falloff across the opposite cheek, minimal frontal fill, natural catchlight in the eyes, realistic skin texture, warm desk lamp in the background, background darker than the subject.”
That prompt gives the model something concrete to build.
A simple framework:
SOURCE → DIRECTION → HEIGHT → QUALITY → SHADOW → FILL → BACKGROUND
And one more rule:
Do not write the lighting as an isolated keyword list.
Put it inside the full scene prompt.
Shot + subject + action + environment + lighting + camera behavior
.
.
PS:) Follow for more!
.
.
Most AI filmmakers know the names of camera angles.
Very few know what those angles are actually doing to the story.
- A low angle is not automatically “cinematic.”
- A Dutch angle is not something you add because the frame feels boring.
- And a high angle does not simply mean “weak.”
The camera should have a reason to be where it is.
Here are 8 angles worth understanding:
→ Eye-level: For honesty, intimacy, dialogue and natural performance.
→ Low angle: For authority, threat, monumentality and pressure.
→ Ground-level: For speed, scale, physicality and extreme size contrast.
→ High angle: For vulnerability, isolation, exposure and entrapment.
→ Overhead / Top-down: For geography, choreography, patterns and surveillance.
→ Dutch angle: For instability, unease and moments when the story itself feels wrong.
→ POV / Subjective: For immersion, fear, urgency and restricted information.
→ Over-the-shoulder: For dialogue, eyelines, relationships and screen geography.
But this is the important part for AI filmmaking:
Do not prompt:
“Cinematic low-angle shot of a powerful man.”
Direct the geometry instead:
SHOT SIZE + CAMERA HEIGHT + ANGLE + LENS + COMPOSITION + CAMERA BEHAVIOR + ACTION
Example:
“Medium-wide low-angle shot, camera 50 cm above the floor, 32mm lens. Commander stands screen-center beneath converging ceiling beams. Prisoner remains seated in the foreground. Locked camera. The commander slowly lowers his eyes toward him.”
That gives the model something useful:
where the camera is,
what it sees,
how perspective should feel,
where the characters are,
and what happens during the shot.
The rule I keep coming back to:
Do not choose the angle that looks coolest.
Choose the angle that communicates the moment best.
I put all 8 angles, their storytelling purpose, scene examples and AI prompts into one cheat sheet.
Save it for your next AI film. Share it with someone who is still prompting “cinematic camera angle” and hoping for the best.
PS:) Follow for more!
.
.
Most people start AI filmmaking in the wrong place.
They open a video model, write a huge prompt, generate 10 clips, and then wonder why the character, lighting, location and story keep changing.
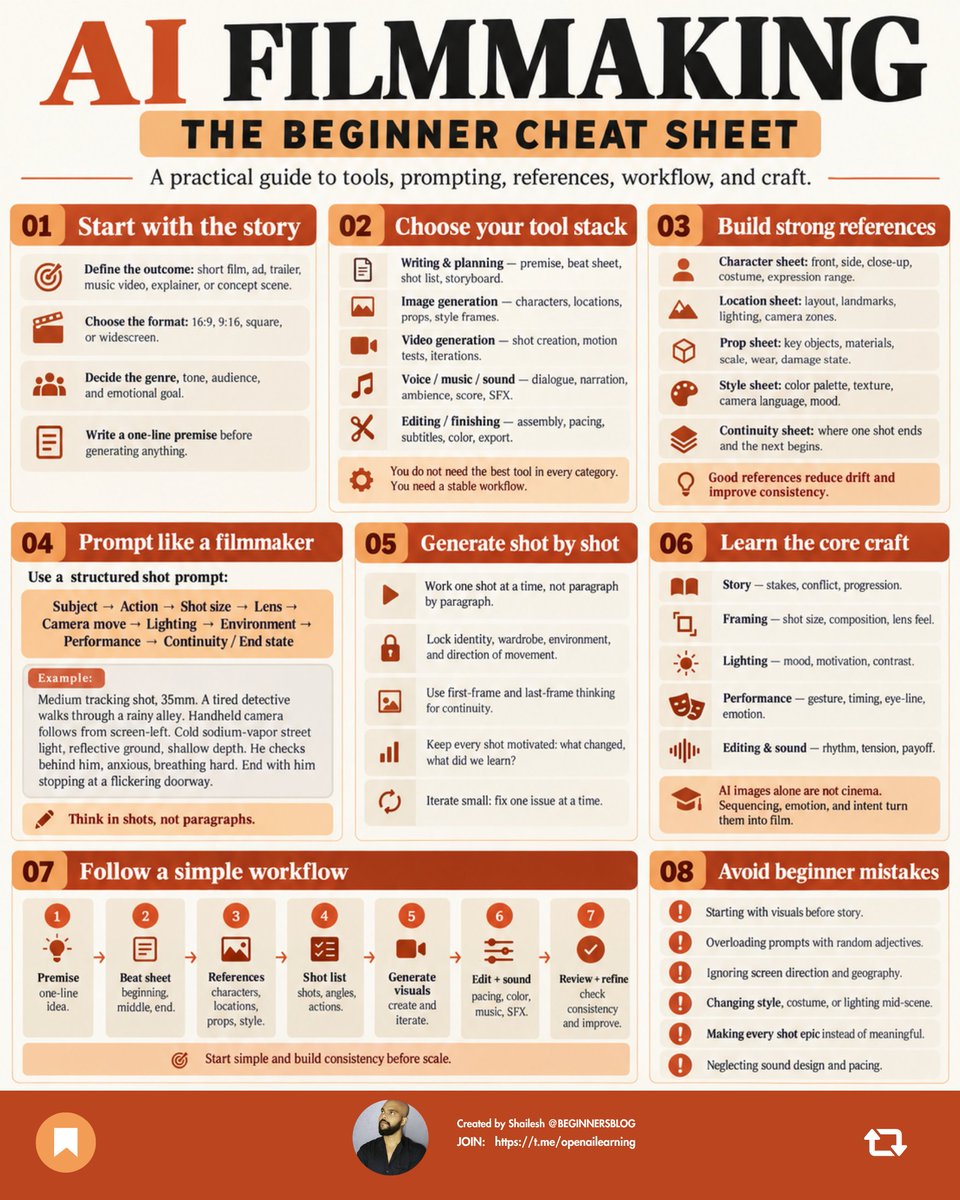
A better workflow is:
→ Write a one-line premise
→ Break it into 5–8 shots
→ Create the character, location and prop references first
→ Lock screen direction, wardrobe, lighting and geography
→ Prompt each shot separately
→ Define the first frame and end state of every shot
→ Generate small variations instead of rewriting everything
→ Edit for pacing before adding more shots
→ Add dialogue, ambience, SFX and music last
→ Review continuity before moving to the next scene
The biggest mistake is treating AI filmmaking like prompting.
It is closer to directing.
The prompt is only one layer.
You still need:
→ Story to decide what happens
→ Cinematography to decide how we see it
→ Performance direction to decide how characters behave
→ Production design to make the world believable
→ Continuity to connect one shot to the next
→ Editing to control information and rhythm
→ Sound to make the visuals feel physical
For your first AI film, keep the constraint brutal:
1 character.
1 location.
1 clear objective.
5–8 shots.
10–20 seconds.
If you can make that sequence feel consistent, intentional and emotionally clear, then start increasing the scale.
PS:) Follow for more
.
.
Most AI video prompts fail before generation even starts.
Not because the model is bad.
Because the prompt says:
“Cinematic man running through a city. Realistic. 4K.”
That describes a vibe.
It does not direct a shot.
A professional AI filmmaking prompt should answer:
→ What should the audience notice?
→ Who is in the frame?
→ What exactly are they doing?
→ Where is the camera?
→ What lens are we using?
→ How does the actor perform?
→ Where does the light come from?
→ What physically reacts to the action?
→ Where does this shot begin and end?
The framework I use is:
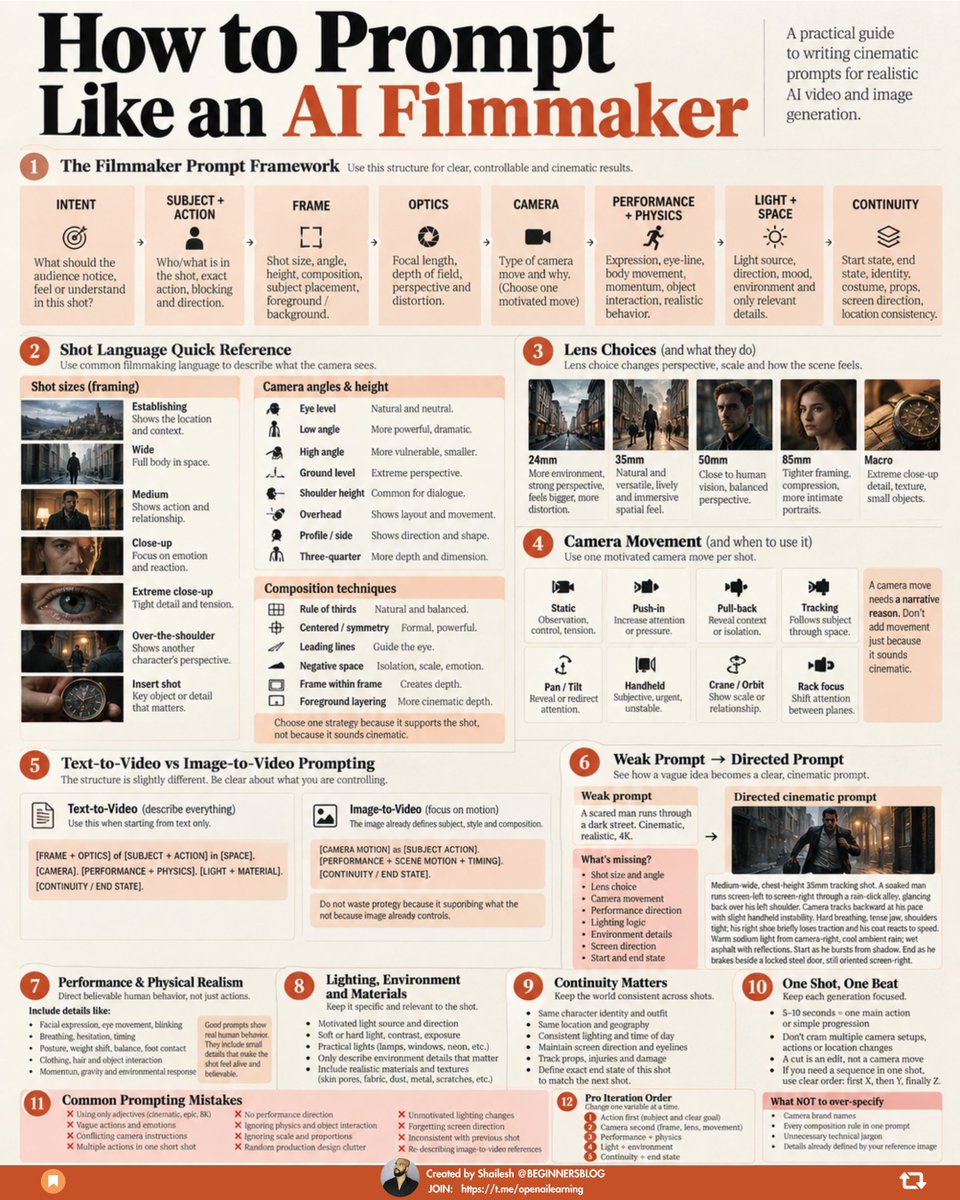
INTENT → SUBJECT + ACTION → FRAME → OPTICS → CAMERA → PERFORMANCE + PHYSICS → LIGHT + SPACE → CONTINUITY
Here is what that actually means.
1. INTENT
Before writing anything, decide what this shot is doing.
Reveal information?
Create tension?
Show scale?
Capture a reaction?
If the shot has no purpose, camera language will not save it.
2. SUBJECT + ACTION
Do not write:
“Man is scared.”
Write the behavior:
“He freezes at the doorway, eyes tracking toward the sound, shoulders tightening before he slowly steps backward.”
Prompt visible behavior.
3. FRAME
Define what the camera sees.
→ Wide = geography and scale
→ Medium = action and relationships
→ Close-up = emotion and reaction
→ Insert = important detail
Then add angle, height and composition only when they matter.
4. OPTICS
Lens choice changes the image.
→ 24mm = environment, perspective, speed
→ 35mm = natural spatial energy
→ 50mm = balanced human perspective
→ 85mm = compression and intimacy
→ Macro = tactile detail
Do not add “35mm” because it sounds cinematic.
Know why it is there.
5. CAMERA
Use one motivated camera behavior.
Static.
Push-in.
Pull-back.
Tracking.
Handheld.
Pan.
Tilt.
Crane.
Orbit.
The camera should move because the story gains something.
6. PERFORMANCE + PHYSICS
This is where many AI shots collapse.
Direct:
→ eyelines
→ breathing
→ hesitation
→ posture
→ weight shifts
→ foot contact
→ momentum
→ clothing response
→ object interaction
→ balance and recovery
“Runs fast” is weak direction.
“Accelerates, loses traction for half a step, catches his balance and keeps moving” gives the model physical information.
7. LIGHT + SPACE
Describe motivated lighting.
Not:
“Beautiful cinematic lighting.”
Instead:
“Warm sodium light from camera-right, cool ambient rain fill, hard reflections across wet asphalt.”
Then describe only the environmental details that affect the shot.
8. CONTINUITY
Every shot exists between two states.
Define:
→ start position
→ screen direction
→ costume
→ props
→ injuries
→ scale
→ geography
→ end position
This matters even more when generating multiple clips.
And one major distinction:
Text-to-video and image-to-video should not be prompted the same way.
Text-to-video needs more visual information.
Image-to-video already has the character, composition, lighting and environment.
So stop describing the reference image again.
Prompt the motion:
→ camera motion
→ subject motion
→ performance
→ environmental motion
→ timing
→ continuity
The biggest rule:
One shot. One camera setup. One clear beat.
Do not cram five actions, three camera moves and two emotional changes into an 8-second generation.
PS:) Follow for more!
.
.
Cold take: Henry Cavill’s Black Adam cameo was cool, but backing it with John Williams instead of Hans Zimmer’s Man of Steel score felt so wrong.
Imagine Flight playing as he stepped out of the smoke. Pure goosebumps.🔥