I have an insane amount of respect for people who wake up before the world does.
The ones with a wife, kids, a full-time job, bills to pay and responsibilities to handle.
Yet they still find those extra hours to master their craft.
I was fortunate. Straight out of high school, I could sit behind the charts for 15 hours a day. Barely any responsibilities. Just me and the markets.
Not everyone has that luxury.
Some of you are building your future while carrying the weight of an entire family on your shoulders.
And you still show up. Every fucking day.
Those are the real dogs. Nothing but respect.
Remember, there’s always someone who had it harder than you and still made it happen.
Your circumstances might change the path, but they don’t have to change the destination.
Get your shit together. Find the hours. Master your craft.
Hard work works.
It’s really simple.
If you’re not an insider, stay the fuck away from meme coins.
Learn how to trade. Master your craft. Trade actual pairs.
Playing against insiders with zero edge isn’t a trading strategy.
It’s a skill issue combined with pure delusion.
SUPPLY & DEMAND BEYOND THE ZONES V11
Supply and demand is one of the most important concepts in trading. But understanding it goes far beyond drawing rectangles around price.
A zone is not valuable simply because price reacted there before. What matters is the context in which it formed, the orderflow behind it, how price returns to it, and what happens when it is tested again.
SUPPLY AND DEMAND IS NOT JUST SUPPORT AND RESISTANCE
Support and resistance focus on levels where price has reacted. Supply and demand go deeper helps us interpret the opposing buying and selling pressure influencing price.
Demand represents an area where buying pressure may be strong enough to absorb selling and push price higher. Supply represents an area where selling pressure may be strong enough to absorb buying and push price lower.
But these zones are not permanent. They can weaken, fail, or flip as the balance between buyers and sellers changes.
Your job is not to assume a zone will hold. It is to understand why it matters and observe whether price confirms that expectation.
Location matters
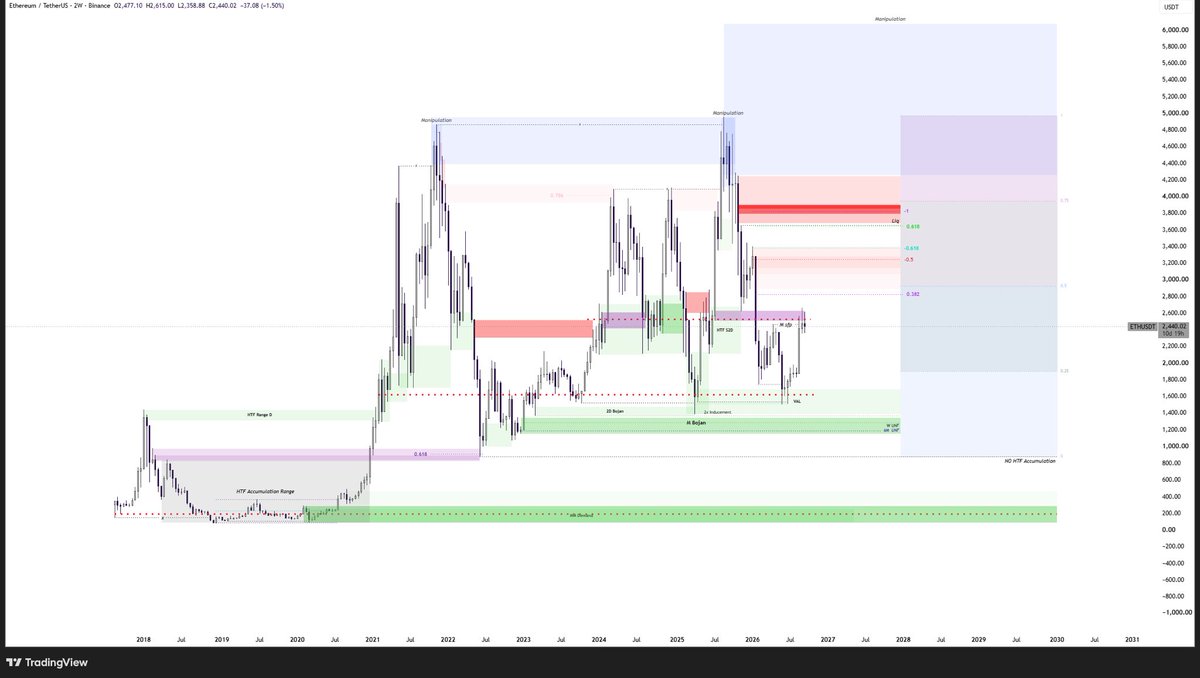
A strong demand zone forming at the discount of a HTF range, near an important structural low, can carry a different significance than demand forming in the middle of a range with no meaningful confluence.
We know that, but extreme demand and extreme supply adds a new level of confluence
Extremes matter because they provide context. But being at an extreme does not guarantee a reversal. You still need to understand the liquidity, structure, and orderflow surrounding the zone.
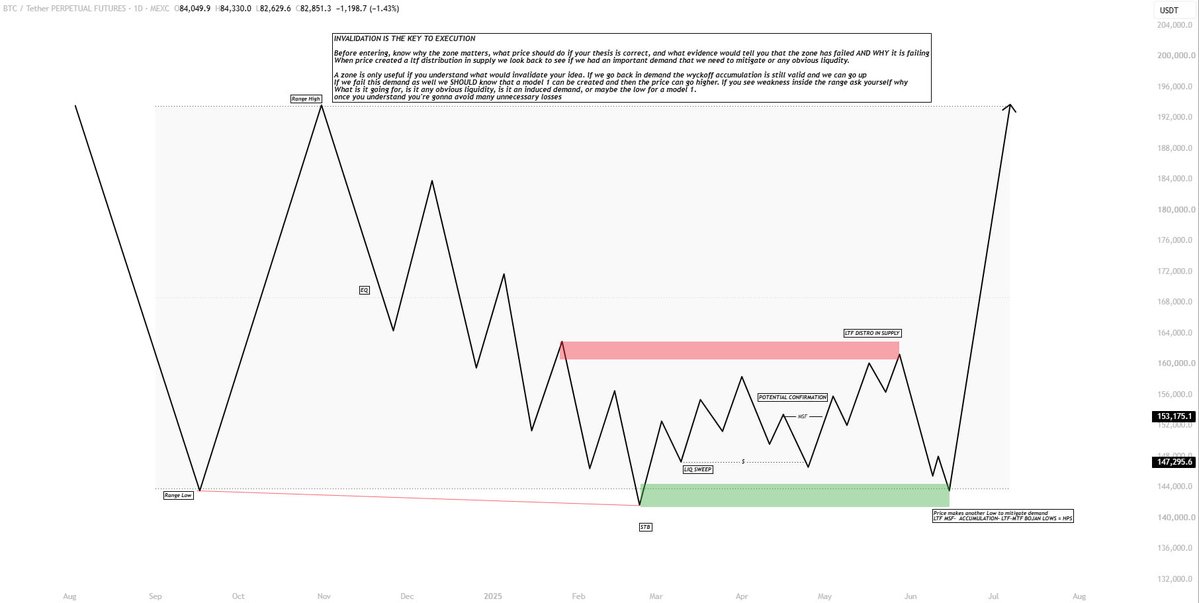
The extreme demand is the last demand inside that wyckoff range that protects the low. If that demand fails you the low will most likely be next. That tells you that you don't have a zone lower to look for, if you get the confirmation you can be more confident because you're either right about the entire schematic or youre right.
Extreme liquidity behaves very similarly
SUPPLY AND DEMAND INSIDE WYCKOFF STRUCTURES
Pay attention to where supply and demand develop inside accumulations and distributions.
In a Wyckoff accumulation, strong supply near the lower extreme can be important. If price tests that area and sellers fail to produce further downside progress, it may indicate that selling pressure is being absorbed. But if we the zone holds, that can make your perfect looking wyckoff fail and it leaves you wondering why it happened.
In a distribution, strong demand near the upper extreme can tell a similar story from the opposite side. If buyers repeatedly fail to produce meaningful upside progress, it may indicate that buying pressure is being absorbed. But if it holds the same story repeats.
Another Loss, One more day asking yourself why it doesnt work.
The key is not simply identifying supply or demand within the schematic. It is understanding how price responds to that pressure.
Where does the zone form? What liquidity has been taken? Does price move away with conviction? Does the opposing side manage to regain control?
A Wyckoff schematic does not guarantee an outcome. The behavior of price around its supply and demand zones helps you evaluate whether the expected scenario is developing or failing.
WHEN DEMAND FLIPS INTO SUPPLY
One of the most important transitions to recognize is a demand-to-supply flip.
Imagine price repeatedly reacts from a demand zone. Eventually, that demand fails, and price breaks through it with bearish displacement.
When price returns to the broken zone, the former demand may now act as supply. Buyers who previously defended the area have failed to maintain control, and sellers may use the retest to continue pushing price lower.
A broken zone does not automatically flip. The reaction and subsequent structure must support the interpretation. 1/2
WHEN MULTIPLE DEMAND ZONES FAIL
This is where context becomes especially important.
If price repeatedly reacts from demand but each reaction becomes weaker, while successive demand zones fail, the market may be showing a shift in control toward sellers.
Do not assume every bounce is a reversal.
Price can rally from a demand zone, form a lower high in meaningful supply, and continue lower. What initially looks like a bullish reaction may simply be a retracement within bearish orderflow.
Ask yourself whether buyers are actually reclaiming structure or merely producing temporary relief before sellers regain control.
Repeated failures matter because they reveal how price responds to buying pressure. If buyers can no longer defend important levels, your expectations should adapt.
BREAKER BLOCKS
Breaker blocks are used to identify failed structural formation or OB's that may later act in the opposite direction. For example, a bullish structure demand fails, price breaks through it with displacement, the former zone may become relevant as price returns from below.
Some hidden orderblocks can be key in very specific situations where context rules. Very high probability zones where a normal trader wouldnt even look for trades. The more you train your eye, the easier you see it. They are called hidden OB's for a reason.
A zone is only useful if you understand what would invalidate your idea.
Before entering, know why the zone matters, what price should do if your thesis is correct, and what evidence would tell you that the zone has failed.
Execution is not just about finding an entry. It is about understanding where your idea becomes invalid and placing your stop accordingly.
A good entry cannot rescue an idea with poor invalidation. Equally, a correct directional thesis can still lose money if the stop is placed without considering the actual structure.
The objective is not to find more zones.
It is to understand which zones matter, when they matter, and when the market has moved on. 2/2
The whole point of trading was FREEDOM.
Funny how people spend years mastering a skill to escape the 9-to-5, only to build themselves another job.
I could open a paid Discord tomorrow, trade live twice a day, and create another income stream.
But then what?
Now I HAVE to show up every day because people are paying me to be there.
That’s not freedom. That’s another obligation.
Don’t get me wrong. I love being online. Building a network, exchanging knowledge, creating extra cash flow, helping people improve.
There’s something genuinely beautiful about getting a message from someone you’ve helped who is finally starting to figure things out.
And that’s also what I’ve learned from private mentorship.
I’ve accepted good money from people who quit after a week. No discipline, no communication, no effort.
The money was great. The experience was fucking miserable.
Because eventually you realize you’re more invested in someone’s future than they are themselves.
I’d rather mentor one absolute A+ player with nothing in his pockets than ten wealthy guys who aren’t willing to put in the work.
Money doesn’t buy commitment.
And this goes way beyond trading.
Once you become good at something, opportunities to monetize your skills are everywhere.
Courses. Communities. Partnerships. Businesses. Mentorships.
But just because you CAN make money doing something doesn’t mean you SHOULD.
You can love the game without turning every part of it into a business.
You can keep improving without needing an audience.
You can help people without needing to scale it.
And you can make enough money without needing to make every possible dollar.
The ultimate flex isn’t how much money you can make. It’s how much money you can walk away from because you value your freedom more.
Master the skill. Build the wealth. Choose your commitments.
Never become a prisoner of the very success that was supposed to set you free.