It basically would have turned into C1 to your point because the fire lock/push call turns it into Firezone man, and to the 2 man side of empty with Flood, it is man coverage. Only difference would have been the boundary backer would be a Bonus backer. In a lot of ways, it would have mirrored Aranda's Burn/Gone Coverage.
Oregon Over/Flex 7 Bracket Call Cutup vs USC.
In the first clip, vs Empty, Oregon would have checked to Flood, with a Fire/Lock Call to the Field vs the Wide Stack. Once the RB motions back in, it turns into Bracket to the field, and MIX to the boundary.
In the second clip vs FIB, they travel Star to the boundary and then back to the field. To the field they play Bracket, and to the boundary they play Cone once the Y swipes back. Really good look at Pony, with the 3T playing the A gap with the back working frontside, and the 5T working into the B gap as the back declares.
Bracket Safety plays with traditional Quarters Eye Progression:
- EMLOS (Key Run/Pass)
- High Hat Read = Snap Eyes and Hips to #2.
Really good clip to see the difference between Zone-Match and Man-Match Quarters in terms of how they handle route patterns.
Zone-Match = Pass Back Shallows.
Man-Match = Take Back Shallows.
With the Y to the field going out, that is the first to the flat, the Money has to buy that and take it back.
Here shallows are taken back rather than passed back.
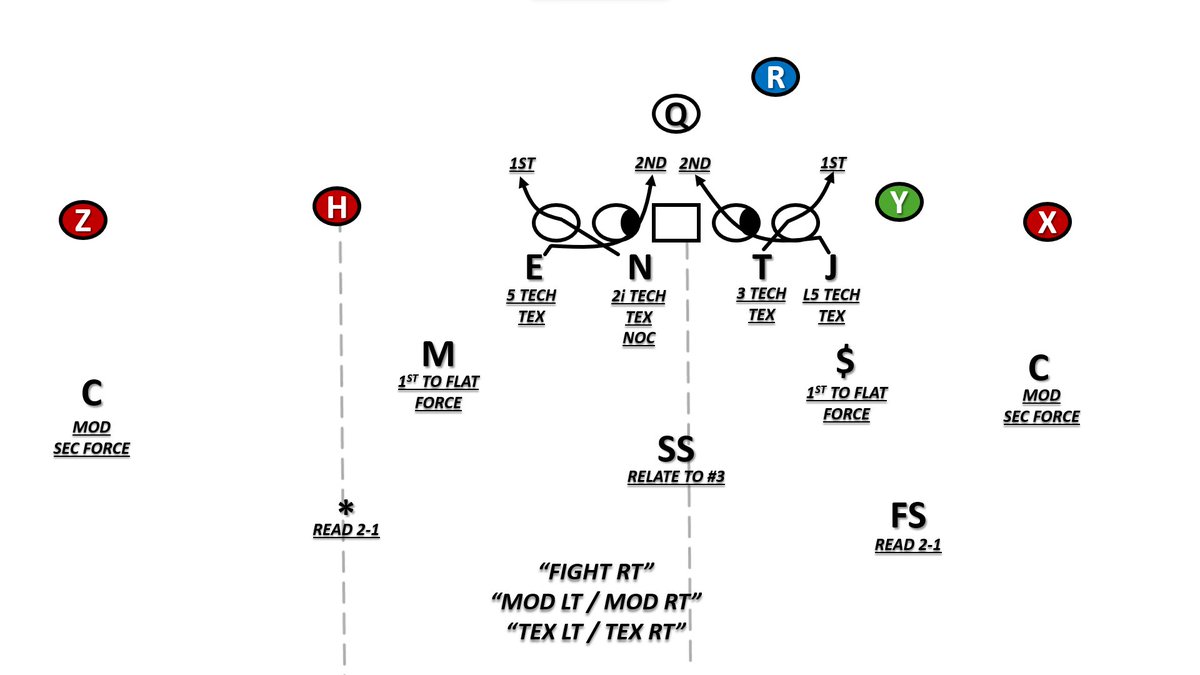
Oregon 3 High Quarters (7 Mod) Cutup vs USC.
In all 3 clips, Oregon runs a Fight Front (3T set to the back), and runs Tex Stunts to both sides (Pop + Poncho).
Oregon allows their corners to play pretty much any technique out of Quarters, including out of 3 High. They've got the option to play
- Press Bail
- Off (Slow Pedal, Walkout)
- Inch
- Motor
Safeties key 2 on the snap, if #2 eliminates, then they work to the QB. They can go 2-1-QB as well.
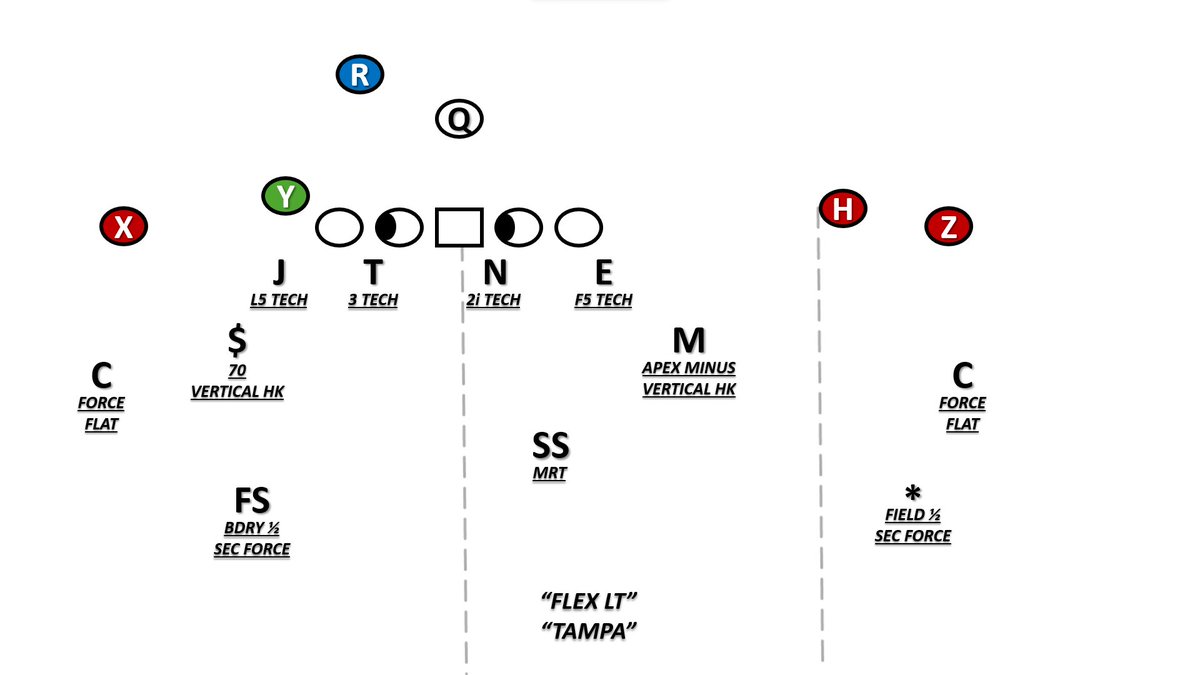
Oregon 3 High Tampa Cutup vs USC.
1st Clip has a Crawl call attached.
Crawl = Show 3 Down, Slide to a Field Front.
2nd Clip is a really good look at the Jimmy/Pony stunts they use. To the Field, the 5T plays the C gap, once he sees the back declare, he arm overs into the B gap. To the back, the Fist 5T crosses face to get into the B gap. Backer to the boundary can then be a cutback to QB player, and MRT player can fit off the Y insert, and the Money can fit C-A.
@adaptskill They had such a high success rate with that path. I think they might have ran it 5 or 6 times and gotten either a TFL, sack, or incompletion each time.
Good look at what turns into an Enter and Skate Fit vs Outside Zone.
Bryce Boettcher (#28) is the Enter player. To the playside, he works with skate footwork: crossover run with the shoulders square. Once he sees an open gap, he runs through it, looking to cut the play off.
The skate player works laterally, looking to play off the near hip and shoulder of the back. If the near hip/shoulder is turned to the playside, the backer continues to work laterally to the playside, once the shoulders turn back, the backer mirrors the back, just like they would in Stack Track Fall Back.
Oregon Cover 1 Bunch Check vs Iowa: Lock N'Level.
Vs a Tite Bunch, Oregon plays Lock N'Level out of Cover 1.
Lock N' Level: Star, SS, Corner play on different levels to avoid getting rubbed or picked, but stay on their original man. Star has the H in Man. SS has the Y in Man. Corner has the Z in Man.
Vs Mesh, they do not cut the shallows with the rat, opting to have the Rat play off the QB.
Ends up playing out the same way as Traffic would. Traffic = Star locks on the point, corner and SS play in and out on #1 and #3.
Oregon running Bound 4 Mod vs Iowa.
Bound = Base Mint
4 MOD = Quarters but with Mint Front Rules.
With the back to the field, into the boundary, Oregon slings the fits, leaving the Jack in the fit and playing Mix behind it. To the field, with the Sam being to the back, they leave him out of the fit to take him out of RPO conflict.
Oregon 3 High Tampa Coverage Stim Cutup vs Iowa.
In all 3 Clips, they align and show Cover 1, and on the move/break call from the Mac, they stim into 3 High and play Tampa behind it.
In the first two clips, they show 1Y, the third clip aligns out of 1 Open with the Safety rotating away from the Y.
Oregon running a Cover 7 Trips Check vs Wisconsin: Seahawk.
Seahawk is the sister coverage to Stubbie and Stump. Unlike both of those coverages, the backer has #3 up and out, playing with the same rules as you would play Cut/Clip coverage. Once #3 is vertical past 3 yards, the Backer has to buy it, with the Star having to buy #2 vertical.
Oregon runs a Exit/Jam stunt to the field as well.
Oregon running a Big 12 Pressure vs Wisconsin: Cowboy/Baylor
Big 12 Teams = 5 Man Pressures with Cover 7 to the Field, and Blitz Coverage to the boundary.
With the back set to the pressure, Oregon runs a Nob Stunt.
Vs Single width or a Y in the Core, it's Cat, and vs 2 open sets, it can check to Backer go.
To the field, they play Seahawk.
Oregon 3 High Tampa Cutup vs Wisconsin.
All three clips ran out of a Flex/Over Front, with the 3T set to the Y if the Y was in the core, and set to the Star if it was 4 open.
With no work underneath, the corners sink under the vertical of #1, protecting the hole shot.
3rd Clip is a good look at the MRT eyes, starts with #2 to the side of the back, then to the QB, then to the field #2.
Two different Cover 7 Trips checks from Oregon against Rutgers.
First two clips are Seahawk.
Seahawk:
Corner = MEG on #1
Star = MEG on #2 unless #3 is out within 5 yards. If #3 is out in 5, play with a Sail Technique, protecting against the Deep out of #2.
Safety = Deeper than the deepest, split 60/40 to #3 if both are vertical.
Third Clip is Stubbie:
Corner = MEG on #1.
Star = #2 Up and Out. Can pass #2 shallow off to the Backer. If #3 is out within 5 yards, play with a sail technique.
Safety = Read 3 to 2. If #3 is vertical, buy it. If #3 is shallow, bracket #2.
In both clips, the backside Safety plays Cone. Unlike the Saban version of Cone, the Safety is not reading the release of the X, but instead, playing off the eyes of the QB.
Oregon Cover 7 Coverage Cutup vs Rutgers: 7 Bracket
Bracket:
Star = MEG on #2. Uses scootch footwork.
Safety = Soft Cone on #2. If #2 is vertical and inside, it turns into a double. EMLOS to #2 to Q eyes.
Corner = MEG on #1. Plays Inch Technique.
In the 1st clip, they do not drop the crease, something they do have the option to when playing Bracket.
To the boundary in both clips they play MIX/MOD.
Oregon running a Non Traditional Tampa 2 Simulated Pressure: Field Bruins.
NHL Teams = Cover 2 Simulated Pressures
Bruins = Corner Lion/Wide Path, Dime Money is the MRT, Jack and Mac are the vertical hook players.
Path is similar to the Saban Nola Saints and what used to be called Brees 2 from UGA.
Bark = Banjo on the Y and RB with the Mac and Money.
Allows them to play the integrity of the call on #1 and #2 to the field, just like how the Colorado call worked, where if the Y was off the ball, it was still the 2 Open call.
They would not peel the Jack on a fast back, the Mac/Mike is a hug rusher. If a backer or safety was blitzing, they would be allowed to peel with the Back, but the corner is always blitzing.
Oregon Running a Big 12 Pressure vs Indiana: Baylor/Cowboy.
Baylor/Cowboy = Corner Blitz Contain. 2 Open to the Field = Bracket, 3 Open = Seahawk.
With the back set away from the pressure, it's a Read Tom Stunt. With the back and Y staying in protection, the backers are able to add onto the rush.
Bracket Safety plays just like a MOF Cheat Safety in terms of initial eye control. EMLOS to Mesh, scootching back. Once they see pass, their eyes snap to #2.
Oregon Over 7 Run Fit vs Indiana.
Good look at how even when Oregon isn't playing Mint, the backers can still have a stack mindset. Boettcher (#28) has the B gap initially, but with the Y swiping, now has the backside A gap. He uses a 45 shuffle to stack the 2i, able to either fold into the A, or rock back to the B. With the A gap becoming cloudy, he's able to rock back into the B gap once the back cuts.
Playing more patient also allows the Cone Safety more time to get involved in the fit.
Two snaps of Oregon running Cover 7 (Man-Match Quarters) vs Indiana.
1st Clip: Fight 7 Bracket
2nd Clip: Fight 7 Seahawk
Oregon did not play with the camp rules for C7, instead playing Mix to the weakside of Bracket regardless of the Flank.
2nd Clip is a good example of how Oregon's Cone Safety does not play Cone/Poach based on the release of the X, but rather the QB eyes. Eyes to the X = Cone, Eyes to the Field = Poach.