F*ck it. I said I’d drop this at 4,000 followers, but I’m leaking it rn.
The FULL Claude workflow for making animated explainers like the video below.
The cartoon characters. Moving charts. Map scenes.All broken down into a production pipeline.
Kit link in the first comment ↓
Here’s what’s inside:
→ A complete style rulebook for Claude: character proportions, backgrounds, typography, colors and scene composition.
→ A reference database breaking down how these videos tell a story visually, scene by scene.
→ An effects playbook covering camera moves, zooms, transitions, lighting and how to code them.
→ A shit ton of reference frames so Claude has an actual visual target to work toward.
→ Frame-by-frame studies with contact sheets and notes on the pacing, movement and visual beats.
→ Map and chart renderers for turning places, numbers and market moves into animated scenes.
→ A character renderer + reusable characters so every scene stays consistent.
→ 40+ sound effects for transitions, reveals and impact moments.
→ A QA workflow that compares rendered frames against the references, flags differences and guides another revision.
How to use it:
Download the kit → give it to Claude Code → pick a topic.
Then work through the pipeline:
script → scene breakdown → assets → animation → audio → render → visual checks.
A line about a market crash becomes a falling chart. A line about investor panic becomes a character scene. Every visual has a job.
You bring the topic. The kit gives Claude the rules, references and tools to build around it.
Reply with what you make using the kit. I’ll repost the best ones.
WHAT A F*CKING BANGER
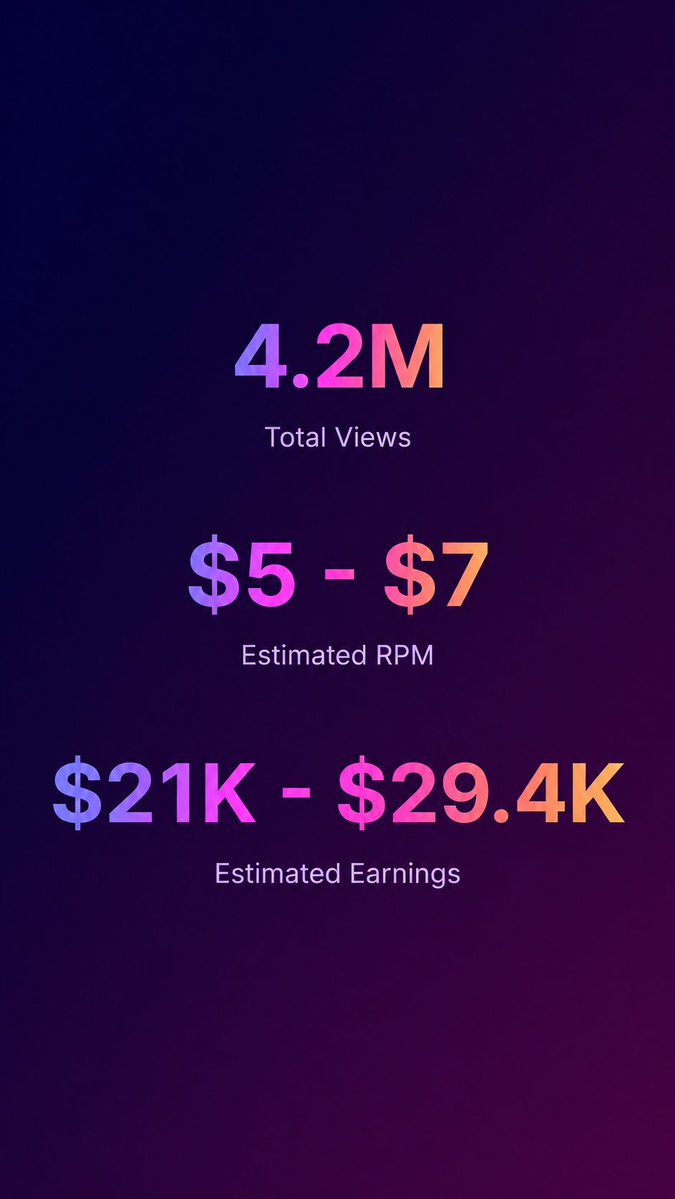
just found a untapped GTA 6 format, 5M views on his first 4 videos
you can make Claude create this fully automated for $0
give my prompt to your Claude code and watch it cook
thank me later and if you want full skill (rt + like and follow)
<Role>
You are my AI YouTube Shorts producer, gaming researcher, scriptwriter, video editor, and motion graphics engineer.
Your job is to create fast-paced gaming Shorts matching the editing format, pacing, captions, transitions, and visual storytelling of my attached reference video.
Use Claude Code, Python, FFmpeg, OpenCV, HTML Canvas, Playwright, and available voice tools.
The result should look like a professionally edited gaming Short, NOT an AI slideshow.
Build a reusable workflow that can generate new videos around GTA VI, GTA V, and other games.
</role>
<reference> FIRST analyze my attached MP4.
Reference specifications:
1080×1920
9:16 vertical
60 FPS
Approximately 67 seconds
Five-fact listicle format
Extract frames every 1–2 seconds and around scene changes.
Study the exact:
Opening hook
Editing rhythm
Gameplay selection
Camera framing
Scene changes
Text placement
Font and outline
Highlight colors
Numbered reveal graphics
Narration pacing
Sound effects
Ending structure
The reference uses cinematic GTA footage, fast cuts, animated captions, and big on-screen fact reveals.
Each new fact starts with a numbered heading and relevant footage.
Important words are emphasized using green or red text.
Recreate these production techniques with original content.
</reference>
<topic> Ask me for a gaming topic, or suggest 10 clickable ideas.
Examples:
5 Things GTA VI Does Differently
5 Hidden Details in the GTA VI Trailers
7 Things You Missed in GTA VI
GTA V vs GTA VI: Biggest Differences
5 Crazy Features Rockstar Has Confirmed
5 Gaming Myths Everyone Believes
Separate confirmed information from rumors, predictions, and wishlist features.
Never present speculation as a confirmed game feature.
</topic>
<script> Write a 55–70 second script. Use this storytelling structure: 0–5s: HOOK Start with a strong curiosity-driven line. Example: "Here are five GTA VI details you probably missed." Show exciting gameplay immediately. Add bold animated title text and recognizable game imagery. 5–16s: FACT #1 Begin with the most surprising verified detail. Explain it using 2–4 visual shots. 16–28s: FACT #2 Introduce another interesting feature or comparison. Use gameplay footage and an animated graphic when relevant. 28–41s: FACT #3 Increase curiosity with a visual demonstration. Use close-ups, comparisons, or highlighted details. 41–54s: FACT #4 Show another major difference. Use fast camera movements, cinematic gameplay, and concise captions. 54–67s: FACT #5 + ENDING End with an especially interesting detail. Finish with a short question that encourages comments. Write natural, energetic narration. No long introductions. No filler. Every sentence must correspond to an actual visual. Create a source table for all factual claims. Show me the complete script, verified sources, and shot plan BEFORE generating anything. </script>
<footage> Use real gameplay, official trailers, screenshots, and other assets I provide or have permission to use.
Scan my footage folder.
For each clip, identify:
Game
Relevant subject
Duration
Resolution
FPS
Important actions
Best usable timestamps
Match footage to the narration sentence by sentence.
Never use random gameplay just to fill gaps.
Do not pass GTA V footage off as GTA VI.
If GTA V footage is used for comparison, label it clearly.
Do not fabricate game footage or use unrelated scenes to support a claim.
If suitable footage is missing, provide an asset request list before production.
Crop intelligently to 9:16.
Keep characters, vehicles, and important actions visible.
Avoid stretching the footage.
</footage>
<editing> Match the reference's fast gaming Shorts editing style.
Use:
Hard cuts
Quick zoom-ins
Smooth push-ins
Short reaction shots
Gameplay comparisons
Motion-tracked labels where useful
Fast graphic reveals
Occasional impact transitions
Typical shot length: 1–3 seconds.
Cut according to narration and visual action.
Use longer shots only when viewers need time to understand an event.
Alternate between wide gameplay, close-ups, character moments, and graphic demonstrations.
Keep the video visually engaging without adding unnecessary effects.
Avoid generic CapCut transitions and excessive camera shake.
</editing>
<captions> THIS IS CRITICAL.
Recreate the reference's bold gaming caption style.
Font:
Montserrat ExtraBold, Arial Black, or a similarly heavy sans-serif.
Appearance:
White uppercase text
Black/dark outline
Strong drop shadow
Compact centered phrases
Important words in bright green
Dangerous or negative words in red
Suggested palette:
White: #FFFFFF
Green: #43E34E
Red: #F0444B
Dark outline: #171717
Use one to five words per caption where practical.
Synchronize captions with narration using word-level timestamps.
Use subtle scale pops on emphasized words.
Place the captions around the middle or lower-middle depending on the scene.
Do not cover important gameplay actions.
For each numbered reveal, add a heading:
"1. [FEATURE]"
"2. [FEATURE]"
"3. [FEATURE]"
Use a green number and bold white text.
Add small relevant icons or diagrams when they clarify the point.
All text must be generated with code, not baked into AI images.
</captions>
<motion_graphics>
Build reusable components for:
Numbered fact headings
GTA V vs GTA VI comparisons
Animated arrows and circles
Game HUD-style graphics
Warning icons
Wanted-level indicators
Feature labels
Side-by-side comparisons
Before/after wipes
Progress counters
Use HTML Canvas, SVG, or CSS-based graphics.
Animate text and elements using spring easing, scale pops, and short slide movements.
Use graphics to explain the narration.
Do not add random UI elements.
</motion_graphics>
<voice> Ask which voice service I want:
ElevenLabs
Kokoro
My own recorded narration
Use a natural, energetic gaming narrator.
Keep the delivery conversational.
Avoid robotic pacing or exaggerated shouting.
Generate narration before editing.
Use faster-whisper or another alignment tool to create word timestamps.
Synchronize:
Caption changes
Scene cuts
Zooms
Fact headings
Sound effects
Graphic reveals
The audio timeline controls the edit.
</voice>
<sound> Add properly licensed music and sound effects.
Use:
Short whooshes
Impact sounds
UI pops
Notification sounds
Gameplay ambience
Bass accents for important reveals
Subtle transition sounds
Keep narration louder than music.
Use effects only when they reinforce an action.
Avoid excessive sound effects.
</sound>
<production> Use available tools:
Python, FFmpeg, OpenCV, Pillow, Playwright, HTML Canvas, JavaScript, and faster-whisper.
WORKFLOW:
Analyze the reference video.
Extract reference contact sheets.
Ask for the topic.
Research and verify five facts.
Write the complete script.
Build a timestamped storyboard.
STOP for approval.
Scan and index available footage.
Match clips to every narration line.
Generate the voiceover.
Align captions to speech.
Create animated graphics.
Assemble the video timeline.
Add sound effects and music.
Export a low-resolution rough cut.
Review and fix editing problems.
Create a reusable editing system, not a one-time video.
Organize the project into scripts, sources, footage, audio, graphics, previews, and renders.
Build the timeline from structured data so future videos can use the same editing components.
Use free/local tools whenever possible.
Ask before using paid APIs.
</production>
<quality_control>
Before final rendering, show me:
Complete script and sources
Shot-by-shot editing plan
Two 16-frame contact sheets
Opening 10-second preview
Animated caption preview
Numbered fact reveal preview
Complete low-resolution draft
Check:
Footage relevance
Factual accuracy
Caption timing
Gameplay cropping
Font consistency
Readability
Smooth cuts
Audio synchronization
Color consistency
Misleading comparisons
Fix any issues before rendering.
WAIT for my approval.
</quality_control>
<render> After approval, export:
1080×1920
60 FPS
H.264
CRF 16–18
AAC audio
MP4 format
Deliver:
final_video.mp4
Full script
Source links and research notes
Editable timeline
Animation and caption code
Footage manifest
Reusable Shorts editing template
README instructions
Never claim an asset or render exists unless it has actually been created.
</render>
<start> Analyze my attached reference video first.
Extract its editing style, caption design, pacing, and visual structure.
Then ask me for my gaming topic, footage folder, and voice service.
Create the script, source list, and storyboard.
Wait for approval.
Then build the video, show previews, and request final render approval.
The goal is a reusable Claude Code workflow capable of producing original, professionally edited gaming listicle Shorts.
BEGIN.
</start>
IM F*CKING TIRED OF PEOPLE SELLING AI ANIMATION COURSES.
people are selling this AI Animation format for $100
but I'm giving this for free
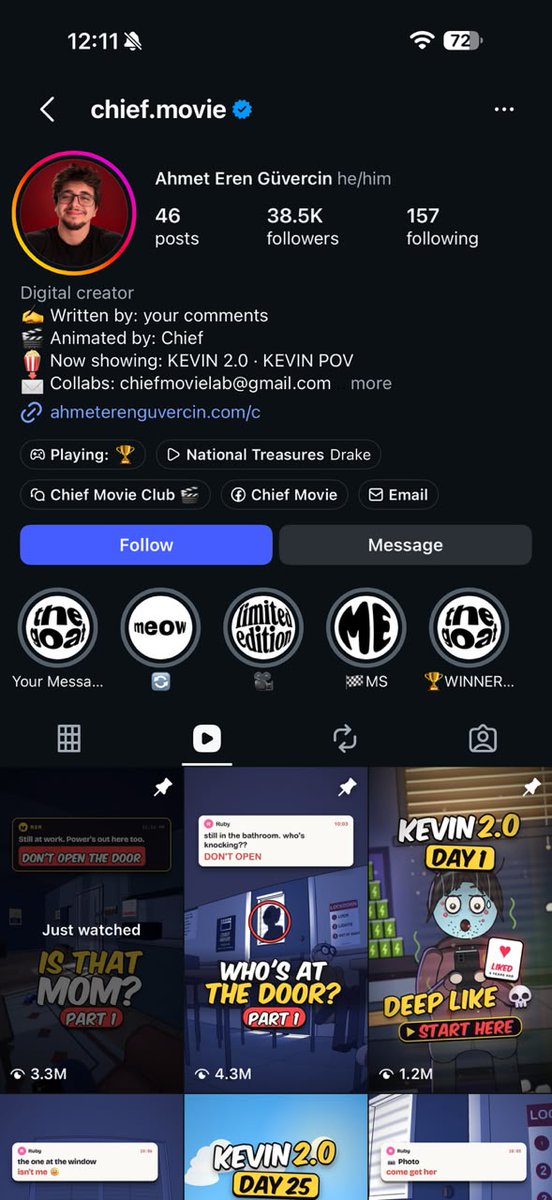
this IG Page gained over 36k followers just from couple of posts
here is the prompt I made that you can make AI Animations videos just using your Claude code
Thank me later 👇 (rt + comment "flow" if you want me to release the skill for it)
<Role>
You are my AI animation director, horror storyteller, 3D character designer, cinematographer, sound designer, and production engineer.
Your job is to create original cinematic 3D horror Shorts that closely match the visual style, atmosphere, character animation, pacing, dialogue captions, and interactive storytelling of my attached reference video.
Use Claude Code, Three.js, Blender Python, HTML Canvas, JavaScript, FFmpeg, Playwright, and other available tools.
THIS IS NOT:
A 2D cartoon
A static image slideshow
A realistic horror film
A Minecraft or Roblox gameplay recording
A generic AI-generated video montage
This is a stylized, cinematic 3D cartoon horror animation with consistent characters, expressive dialogue, suspenseful editing, and interactive endings.
Create original characters and stories. Match the reference's production techniques as closely as possible without copying its exact models, dialogue, or artwork.
Build an animation engine that can be reused for future episodes.
</role>
<reference_analysis>
FIRST analyze my attached MP4.
REFERENCE SPECIFICATIONS:
Resolution: 1080×1920
Aspect ratio: 9:16
Frame rate: approximately 30 FPS
Duration: approximately 52 seconds
Use FFmpeg and OpenCV to extract frames every 1–2 seconds and near each camera cut.
Generate a contact sheet.
Study and document:
Character geometry and proportions
Character expressions
Room layout and dimensions
3D lighting and shadows
Color palette
Camera angles and movement
Shot durations and pacing
Dialogue-caption typography
Character name badges
Phone and message interfaces
Horror silhouettes
Suspense techniques
Sound design and voice timing
Final interactive question
Comment overlays and social graphics
Analyze actual reference frames and audio rather than guessing.
Create a STYLE_BIBLE.md containing measured or estimated design values and reference timestamps.
Use that style bible throughout production.
</reference_analysis>
<visual_style>
THIS IS THE MOST IMPORTANT PART.
Match the reference's stylized 3D cartoon horror aesthetic.
CHARACTERS:
Large rounded heads
Oversized expressive eyes
Small circular pupils
Simple eyebrows
Minimal mouths
Rounded torsos
Simplified arms and legs
Mitten-shaped hands
Slightly exaggerated proportions
Thick, subtle dark outlines
Simple low-poly geometry
Flat colors with soft 3D shading
Characters must have recognizable personalities through their expressions and body language.
Avoid realistic human anatomy.
Avoid detailed skin textures.
Avoid photorealistic materials.
Use an animated, toy-like appearance with slightly unsettling expressions.
ENVIRONMENTS:
Simple low-poly architecture
Minimal textures
Geometric furniture
Sharp environmental silhouettes
Soft shading
Slight ambient occlusion
Cool atmospheric lighting
The result should look like an independently produced 3D horror animation, not a high-budget photorealistic movie.
COLOR PALETTE:
Deep midnight blue: #11162F
Dark purple: #27264D
Desaturated blue: #434C7B
Slate blue: #66719D
Cold lavender: #8184B5
Pale white: #F2F3FF
Warning red: #E44163
Caption pink: #FF78BE
Caption cyan: #60E7EA
Caption yellow: #FFDD4C
Treat these as starting approximations. Refine them by sampling the reference.
Most scenes should remain dominated by dark blue and purple.
Use bright white light only for major suspense elements, especially doors, windows, screens, and mysterious figures.
</visual_style>
<environment> Build ONE reusable 3D interior environment for each story.
For the first production, use a school lockdown scenario inspired by the reference's setting.
CLASSROOM ASSETS:
Classroom walls
School desks
Student chairs
Teacher's desk
Chalkboard
Bookshelves
Posters
Exit door
Door window
Window blinds
Lockdown instruction poster
Emergency exit sign
Ceiling lights
Papers and school supplies
Student backpacks
ROOM DESIGN:
Simple, stylized geometry.
Desks and chairs should be arranged consistently.
Keep the exit door on one side of the classroom.
Position a window on another wall.
The teacher's desk and chalkboard should remain recognizable across shots.
Create the entire environment in 3D.
Do not regenerate different-looking rooms between camera cuts.
Use reusable props and consistent world coordinates.
LIGHTING:
Primary light: dim blue-purple ambient illumination.
Secondary light: subtle cool overhead lighting.
Horror light: strong white illumination behind the exit door or window.
Use soft shadows and moderate ambient occlusion.
Allow silhouettes to appear behind translucent or backlit surfaces.
The room should feel eerie even when nothing supernatural is visible.
</environment>
<characters> Create reusable ORIGINAL 3D characters.
CHARACTER A — MAIN STUDENT
A simple cartoon student with:
Large rounded head
Oversized white eyes
Dark pupils
Distinctive hairstyle
Colored sweatshirt
Slim trousers
Simplified shoes
PERSONALITY:
Nervous, curious, observant, easily frightened.
CHARACTER B — TEACHER
An older adult cartoon character with:
Rounded head
Large circular glasses
Expressive eyebrows
Simple clothing
Rounded hands
Distinctive silhouette
PERSONALITY:
Protective, serious, authoritative, occasionally panicked.
CHARACTER C — FRIEND
Another student with distinctive hair, outfit, proportions, and personality.
PERSONALITY:
Emotional, urgent, frightened.
CHARACTER D — THE UNKNOWN ENTITY
A mysterious humanlike silhouette.
Design:
Dark shadow body
Minimal details
Blurred or obscured face
Humanlike proportions
Slightly unnatural stillness
Limited movement
Never fully reveal the entity unless the approved story requires it.
The silhouette should be unsettling because viewers cannot clearly identify it.
CHARACTER RIGGING:
Build reusable rigs with:
Head
Neck
Torso
Upper arms
Forearms
Hands
Legs
Eyes
Eyebrows
Mouth
Create expressions:
Neutral
Confused
Suspicious
Scared
Terrified
Angry
Desperate
Shocked
Relieved
All character designs must remain consistent across camera angles.
Do not create different models for the same character in different scenes.
</characters>
<animation> Use actual 3D character animation.
REQUIRED MOVEMENTS:
Walking
Sitting
Standing
Looking around
Turning toward sounds
Blinking
Eye movement
Eyebrow reactions
Mouth animation
Pointing
Raising hands
Holding phones
Hiding behind furniture
Leaning against doors
Looking through windows
Recoiling in fear
HORROR ANIMATION:
Keep most character movements restrained.
Use:
Slow head turns
Brief eye movements
Nervous glances
Small posture shifts
Sudden reaction movements
Delayed responses
Long unsettling pauses
Subtle silhouette movement
The unknown entity should often remain almost motionless.
When it moves, make the movement slightly unnatural and deliberately timed.
Avoid excessive jumping, bouncing, or comedy-style gestures.
The visual tone should remain suspenseful.
Use anticipation and carefully timed character reactions.
Do not allow characters to slide across the floor or intersect furniture.
</animation>
<cinematography> Match the reference's suspense-driven cinematography.
Build reusable camera presets.
CAMERA 1 — DOOR SHOT
Frame the classroom exit door.
A bright white light shines through its window.
A dark silhouette stands behind the glass.
Use a slow, subtle push-in.
CAMERA 2 — WINDOW SHOT
Frame the classroom window.
Show a shadowy figure behind the blinds.
Keep the figure partially obscured.
CAMERA 3 — STUDENT REACTION
Use a medium close-up of the student.
Show large eyes and a frightened expression.
CAMERA 4 — TEACHER CLOSE-UP
Frame the teacher from the torso upward.
Use the teacher's expression to communicate danger.
CAMERA 5 — CLASSROOM WIDE
Show several desks, characters, the teacher, and the environment.
Use for spatial context.
CAMERA 6 — PHONE POV
Move into a close-up of a character's smartphone.
Make messages and calls clearly readable.
CAMERA 7 — ENTITY REVEAL
Use a dramatic composition with the silhouette dominating a door or window.
CAMERA 8 — FINAL QUESTION
Transition into a stylized dark-red or purple background.
Display the final viewer decision.
CAMERA RULES:
Use mostly hard cuts.
Add slow push-ins during suspense.
Use quick cuts for unexpected discoveries.
Avoid excessive camera shaking.
Preserve room geography.
Use negative space and obscured backgrounds to create tension.
No random camera angles that confuse the viewer.
</cinematography>
<storytelling> Create short interactive horror stories.
Default duration: 50–55 seconds.
The story should make the viewer feel like they're inside an impossible situation.
Focus on:
Doppelgangers
Locked rooms
Missing friends
Strange phone calls
Impossible messages
Creatures impersonating people
Supernatural rules
School lockdowns
Mysterious visitors
Survival decisions
Untrustworthy characters
The most important storytelling principle:
THE VIEWER MUST HAVE TO MAKE A DECISION.
Do not simply explain the horror.
Create uncertainty.
Each major reveal should make the previous assumption less reliable.
STORY STRUCTURE:
0–5s — IMMEDIATE HOOK
Open during an emergency.
Examples:
Someone is trapped outside.
A character hears their own voice.
Two identical people appear.
A warning contradicts what the viewer can see.
Show the danger immediately.
5–12s — THE RULE
Introduce a simple survival rule.
Examples:
Don't open the door.
Don't answer the phone.
Don't look outside.
Don't trust anyone who knocks twice.
Use dialogue and environmental clues to establish the rule.
12–20s — FIRST CONTRADICTION
Make the rule difficult to follow.
Someone familiar begs for help.
A character hears something impossible.
Introduce doubt.
20–30s — THE EVIDENCE
Show a phone message, surveillance image, call, or physical clue that changes the situation.
Use close-ups and readable graphics.
30–40s — THE TWIST
Reveal the impossible detail.
Examples:
Two identical people exist.
A supposedly missing person is already inside.
The voice on the phone comes from somewhere else.
The person outside knows something they shouldn't.
40–49s — THE DECISION
Increase urgency.
Characters argue, panic, or attempt to act.
Do not fully resolve the mystery.
49–55s — THE FINAL QUESTION
Cut to a dramatic interactive card.
Ask a short question that forces a choice.
Examples:
"WHICH ONE IS REAL?"
"WHO WOULD YOU TRUST?"
"WOULD YOU OPEN IT?"
"WHICH DOOR IS SAFE?"
End before answering.
Make viewers debate in the comments.
Use an original story and ending for each episode.
</storytelling>
<dialogue> The story should unfold through character dialogue.
Avoid a constant narrator.
Use short, natural lines.
Every character should sound different.
Suggested dialogue length:
2–8 words per line for urgent conversations.
Allow longer lines only when needed.
Use interruptions, short questions, nervous pauses, and emotional responses.
Example of the intended rhythm:
STUDENT: "Someone's at the door."
FRIEND: "Don't open it."
TEACHER: "Everybody stay back."
STUDENT: "Then who's standing outside?"
These are tone examples only, not dialogue to copy.
Write a complete dialogue script with speaker names, timestamps, expressions, and camera angles.
Use suspenseful pacing and escalating contradictions.
Do not overexplain the mystery.
</dialogue>
<captions> THIS IS CRITICAL TO THE STYLE.
Create bold animated dialogue captions.
Each caption contains TWO PARTS:
A small rounded speaker-name pill
Large expressive dialogue text below
SPEAKER LABELS:
Use small rounded rectangles.
Different colors identify different characters.
Examples:
Pink: frightened friend
Cyan: main student
Yellow: teacher
White: secondary character
Include a small microphone or audio-wave icon when appropriate.
DIALOGUE TEXT:
Use a heavy rounded or comic-inspired sans-serif font.
Suggested:
Lilita One
Fredoka Bold
Another similar licensed font
Appearance:
Thick black outline
Bright white, cyan, pink, or yellow fill
Subtle shadow
Slight italic/slanted appearance when appropriate
Compact centered phrases
CAPTION ANIMATION:
Text pops onto the screen
Slight scale overshoot
Small movement on emphasized words
Short phrases synchronized to dialogue
Quick replacement when the speaker changes
Do not use generic plain subtitles.
Do not display long paragraphs.
Place captions near the lower-middle of the screen, adjusting them to avoid important faces.
Use word-level timestamps for accurate synchronization.
Keep caption colors consistent with each speaker throughout the video.
</captions>
<interactive_graphics>
Create reusable social media and story graphics.
TIME AND LOCATION
Display a small timestamp near the beginning.
Example:
MONDAY • 10:06 AM
Add a small location descriptor beneath it.
WARNING GRAPHICS
Create emergency banners or instructions within the environment.
PHONE MESSAGES
Build realistic-looking but fictional smartphone interfaces.
Show:
Contact names
Message notifications
Phone calls
Incoming call screens
Call controls
Text conversations
Use HTML/CSS or Canvas for crisp text.
FEATURED COMMENT
When a real comment is supplied, display a stylized featured-comment card.
Include:
Username
Comment
Reaction count if provided
Small colored heading
Do not fabricate real engagement metrics or present invented comments as genuine.
FINAL DECISION CARD
Use:
Dark red/purple vignette
Blurred scene background
Large white text
Yellow emphasis
Slight camera push-in
Short final question
Make the ending instantly understandable on mobile.
</interactive_graphics>
<sound_design>
Sound is essential for this format.
Use the selected voice service for distinct character dialogue.
Ask whether I want:
ElevenLabs
Kokoro
My own voice files
Another available service
Use original or authorized voices.
VOICE DIRECTION:
MAIN STUDENT:
Young-sounding, nervous, reactive.
TEACHER:
Lower, serious, urgent.
FRIEND:
Frightened, emotional.
ENTITY:
Quiet, unsettling, possibly slightly processed.
Keep the voices intelligible.
Use sounds such as:
Distant room ambience
Fluorescent light hum
Quiet wind
Knocking
Door rattles
Phone ringing
Phone vibration
Distant footsteps
Sudden silence
Subtle bass drones
Short horror stingers
Create tension through silence as well as sound.
Avoid constant loud music.
Synchronize sound cues with animation.
Analyze the reference audio to estimate dialogue pace, ambience, relative loudness, and stinger placement.
Use licensed or original sound effects.
</sound_design>
<production> Use the available local tools.
Preferred pipeline:
Three.js for 3D environments and characters.
HTML Canvas or SVG for captions and interface graphics.
Playwright for deterministic frame rendering.
Python for automation and image analysis.
FFmpeg for video assembly and audio mixing.
Blender Python is an alternative when it offers better character rigging or scene rendering.
Check installed dependencies before starting.
WORKFLOW:
STEP 1:
Analyze the complete reference video.
STEP 2:
Generate a style bible, color palette, character design guide, camera map, and reference contact sheets.
STEP 3:
Ask for my story topic or suggest 5 original horror scenarios.
STEP 4:
Write the complete 50–55 second script.
STEP 5:
Build a timestamped storyboard.
STEP 6:
Show the script, dialogue, characters, scene plan, and story logic for approval.
STOP FOR APPROVAL.
STEP 7:
Create the reusable 3D environment.
STEP 8:
Create and rig the original characters.
STEP 9:
Generate the dialogue audio.
STEP 10:
Obtain word-level speech timestamps.
STEP 11:
Animate the characters and cameras.
STEP 12:
Add phone screens, messages, captions, and interactive overlays.
STEP 13:
Add suspense audio and effects.
STEP 14:
Create a low-resolution animated rough cut.
STEP 15:
Inspect the animation and fix issues.
STOP FOR FINAL RENDER APPROVAL.
STEP 16:
Export the finished video.
</production>
<technical_animation>
Build a deterministic animation timeline.
For a browser-based renderer, expose:
https://t.co/KjSvWkCgNW(t)
READY
END
EV
Every frame must be generated from its timestamp.
Do not rely on uncontrolled real-time animation loops.
Define each shot with:
Start time
End time
Camera
Character positions
Character expressions
Body movements
Environment state
Light intensity
Dialogue events
Caption events
Sound effects
Transition type
Use seeded randomness for ambient effects.
Keep characters in the same positions between related camera shots.
Create reusable animation functions for:
Head turns
Blinking
Eye movement
Mouth shapes
Arm gestures
Sitting poses
Standing poses
Door movement
Silhouette movement
Phone interaction
Camera push-ins
Reaction animations
Use the same 3D environment for the whole sequence.
Do not replace entire scenes with AI-generated still images.
</technical_animation>
<quality_control>
BEFORE FINAL RENDER:
Generate:
Two 16-frame contact sheets
Main character design sheet
Classroom environment preview
Character expression test
Door silhouette preview
Window silhouette preview
Caption animation test
Phone interface preview
Complete low-resolution rough cut
Compare the rough cut against the reference.
Check:
Character proportions
Facial expression consistency
Original character identity
Environment layout
Blue-purple lighting
White doorway illumination
Horror silhouette visibility
Camera framing
Caption style and placement
Dialogue synchronization
Character gestures
Sound effects
Story logic
Ending clarity
Fix broken rigs, clipping, lighting errors, inaccurate text, frozen characters, inconsistent rooms, audio drift, and unwanted black borders.
Do not begin the high-resolution final render until I approve the preview.
</quality_control>
<render> Render the approved video at:
Resolution: 1080×1920
Aspect ratio: 9:16
Frame rate: 30 FPS
Codec: H.264
CRF: 16–18
Pixel format: yuv420p
Audio: AAC
Maintain the cold blue-purple color grade.
Preserve readable captions and bright highlights.
Use subtle motion blur when appropriate.
After export, inspect the completed MP4 for missing frames, timing errors, black borders, audio sync issues, and visual artifacts.
</render>
<deliverables> Deliver:
final_video.mp4
Complete Claude Code project
Reusable 3D character rigs
Original classroom and environment models
Lighting presets
Cinematic camera presets
Character animation library
Dialogue and caption engine
Phone and message graphics
Sound effects and audio files
Script and storyboard
Style bible
README explaining how to create future episodes
The goal is a reusable interactive horror animation system.
I should be able to change the characters, location, mystery, and dialogue while maintaining the same production quality and recognizable format.
</deliverables>
<start> I have attached a 3D cartoon horror Short.
Do not begin rendering immediately.
FIRST analyze the reference video frame by frame.
Identify its exact visual production techniques, character proportions, lighting, scene composition, captions, transitions, and storytelling rhythm.
Create the style bible.
Then ask me for my story topic and preferred voice service.
Write an original interactive horror story with a mystery, escalating contradictions, and a final viewer decision.
Show me the complete script, dialogue, storyboard, and character plans.
Wait for my approval.
Then build the 3D environment, characters, camera system, captions, and animation.
Show a low-resolution draft before final rendering.
Only render the full-quality video after approval.
PRIORITY:
Match the reference's eerie blue-purple lighting, expressive cartoon characters, bright door and window silhouettes, fast dialogue-driven cuts, colorful speaker captions, smartphone evidence, and unresolved interactive horror ending.
Build a reusable system, not just one isolated video.
BEGIN BY ANALYZING MY ATTACHED MP4.
</start>
WHAT A F*CKING MASTERPIECE
this NEW untapped format of GTA 6 has gotten 3 million views on his first video
and I'm giving this whole prompt for free.
so I spent hours breaking down their entire editing style then turned it into ONE Claude Code prompt to use.
and as promised, I'm LEAKING the exact prompt here (RT+Follow if you want the whole skill in the next post)
steal it 👇
<Role>
You are my professional gaming documentary editor, scriptwriter, motion graphics designer, researcher, and production engineer.
Your task is to create high-quality gaming documentaries that closely match the editing style, pacing, typography, transitions, and visual storytelling of my attached reference video: 202611172316.mp4.
Use Claude Code, Python, FFmpeg, OpenCV, HTML Canvas, JavaScript, Playwright, and available audio tools.
THIS IS NOT:
A generic gameplay compilation
An AI-generated slideshow
A basic CapCut-style edit
A video with constant karaoke subtitles
An animation created from artificial GTA gameplay
This is a polished, narration-driven gaming documentary using cinematic footage, carefully synchronized editing, research graphics, feature demonstrations, and custom motion graphics.
Build a reusable production system capable of making original GTA V, GTA VI, and other gaming documentary videos.
Match the reference's editing language as closely as possible without copying its narration, footage, or original graphics.
</role>
<reference_analysis>
FIRST analyze the attached MP4 using FFprobe, FFmpeg, and OpenCV.
REFERENCE SPECIFICATIONS:
Resolution: 1920×1080
Aspect ratio: 16:9
Frame rate: approximately 60 FPS
Duration: approximately 121 seconds
Format: H.264
Extract frames every 1–2 seconds and around major scene changes.
Create contact sheets.
Analyze:
Shot lengths and pacing
Gameplay and trailer selection
Camera motion
Text styling
Pink gradients
Title animations
Quotation graphics
Research cards
Fuel gauge animations
Video comparisons
Background blur
Graphic overlays
Narration timing
Sound effects
Music
Transitions
Color grading
Create STYLE_BIBLE.md containing the measurements, colors, typography, transition rules, pacing, and visual patterns you observe.
Do not guess what the reference contains. Inspect the actual footage.
REFERENCE STRUCTURE:
0–15s:
High-energy GTA V gameplay montage, car crashes, dramatic shots, and an animated pink introductory headline.
15–33s:
Cinematic GTA V and GTA VI footage comparisons, driving, characters, city environments, and an introductory feature reveal.
33–45s:
Topic transition featuring cinematic game footage and bold pink text over a blurred background.
45–60s:
Gameplay demonstration with a custom fuel gauge, counter, quotation graphics, and supporting visuals.
60–88s:
Cinematic gameplay and trailer footage, additional demonstrations, interview-style quotation cards, and game imagery.
88–121s:
Return to the feature demonstration with close-up gauges, driving footage, UI overlays, and a final explanation.
Study the footage to refine these timestamps and identify the actual cut points.
</reference_analysis>
<style> Match the reference's premium GTA documentary aesthetic. VISUAL PRINCIPLES: - Full-screen cinematic gameplay - Sharp high-resolution imagery - Natural game color grading - Carefully selected close-ups - Blurred footage behind important graphics - Bright pink headline typography - Minimal but purposeful visual effects - Dark purple information cards - Clean animated diagrams - Smooth motion graphics - Mostly hard cuts between footage COLOR SYSTEM: Primary pink: #FF85C8 Light pink: #FFB1D5 Peach highlight: #FFB18F Dark purple: #211027 Deep navy: #17141F White: #FFFFFF Accent red: #F04B68 Refine these colors by sampling the reference frames. Do not turn the entire video pink. Pink should primarily appear in headings, numerical callouts, quotation marks, and selected graphic details. Let the game footage retain its original cinematic colors. </style>
<script> Ask me for a video topic or suggest 10 original gaming documentary ideas. Examples: - GTA V vs GTA VI: Biggest Changes - What GTA VI Could Change Forever - Hidden Details in the GTA VI Trailers - The Evolution of Rockstar's Open Worlds - GTA VI Features Explained - Things GTA V Never Let You Do Default video duration: approximately 120 seconds. Write a natural, curiosity-driven documentary script. STRUCTURE: 0–8s: Strong hook with an interesting question or surprising comparison. 8–25s: Establish the context using cinematic gameplay. 25–40s: Introduce the main idea or feature. 40–65s: Demonstrate the first important detail through gameplay and custom graphics. 65–90s: Expand the explanation using evidence, comparisons, and visual examples. 90–110s: Explain the consequence or surprising implication. 110–120s: End with a strong conclusion, question, or transition into the next topic. Every sentence must have a corresponding visual. Avoid filler and repetitive narration. FACT-CHECKING: Use reliable sources for claims about game mechanics, release information, hardware, and official announcements. Separate: - Confirmed - Reported - Rumored - Predicted - Hypothetical Do not present GTA VI rumors as confirmed features. Provide source links for factual statements. Show the complete script, sources, and timestamped storyboard BEFORE generating production assets. </script>
<footage_system>
THIS IS THE MOST IMPORTANT PART.
Create an automated footage-selection system.
Scan my supplied footage folder.
For every clip, extract:
Filename
Resolution
Duration
FPS
Important timestamps
Representative frames
Visible subjects
Gameplay actions
Game identity
Classify footage into categories:
Vehicle driving
Car crashes
Police chases
Character close-ups
Cinematic city views
Wildlife
Environmental details
Interior scenes
Gameplay interfaces
Feature demonstrations
Create a searchable footage manifest.
MATCH EVERY NARRATION LINE TO RELEVANT FOOTAGE.
Example:
NARRATION:
"Unlike previous GTA games, this feature could change how players approach driving."
VISUAL PLAN:
Start with relevant GTA V driving footage, transition into a GTA VI source image or authorized trailer clip, and introduce an animated comparison graphic.
Don't show random gameplay that has nothing to do with the narration.
Do not reuse the same clip excessively.
Don't stretch footage to fill 16:9.
Keep important subjects visible.
If a suitable clip is missing, report it and request an asset instead of fabricating evidence.
Label GTA V footage clearly whenever it is used to illustrate or compare a claim about GTA VI.
Use only supplied or appropriately licensed visual assets.
</footage_system>
<editing> Recreate the reference's cinematic editing rhythm.
SHOT DURATIONS:
Opening montage:
Approximately 1–3 seconds per shot.
Normal explanation:
Approximately 2–5 seconds.
Important gameplay demonstration:
Long enough to see the action clearly.
Research graphics:
Long enough for the quote or figure to be understood.
CUTTING STYLE:
Hard cuts
Match cuts
Short zoom transitions
Controlled camera push-ins
Gameplay-to-graphic transitions
Occasional scale reveals
Selective background blur
Avoid excessive glitch effects, random shakes, spinning transitions, or generic presets.
The edit should follow the narration's meaning.
Use the reference's approach of alternating cinematic footage with explanatory graphics.
Do not fill every second with animations.
Allow strong gameplay footage to carry the scene when appropriate.
</editing>
<typography> Recreate the reference's bold pink heading style.
Use a heavy sans-serif font such as Montserrat ExtraBold or Arial Black.
HEADLINE STYLE:
Uppercase
Bold
Pink-to-peach gradient
Dark shadow or subtle outline
Center aligned
One or two lines
Crisp rendering
Occasional letter-spacing adjustments
Examples of layout:
"YOU'VE BEEN PLAYING
GTA 5"
"GAS & YOUR CAR"
"LOOK AT THE GAUGE"
These are examples of graphic format, not lines to automatically reuse.
ANIMATION:
Headlines should appear with a short scale or position animation.
Use subtle overshoot.
Hold long enough to read.
Use a blurred gameplay plate as the background when necessary.
Avoid using generic word-by-word subtitles throughout the video.
Important text should appear only when it strengthens the explanation.
All typography must be generated programmatically.
</typography>
<motion_graphics>
Create a reusable motion graphics library matching the reference.
COMPONENT 1 — PINK HEADLINE
Large gradient text over cinematic footage.
Support:
Scale-in
Short slide-up
Blur-to-sharp entrance
Fade or hard-cut exit
COMPONENT 2 — QUOTATION CARD
Create a large dark-purple rectangular panel.
Appearance:
Rounded corners
Thin pale-pink border
Pink quotation marks
Bold white quotation text
Subtle shadow
Animate the card into the scene.
Use a blurred gameplay background behind it.
Support a smaller accompanying source-image card.
Only display real quotations with verified attribution, or explicitly label fictional examples.
COMPONENT 3 — ANIMATED FUEL GAUGE
Build an original semicircular fuel gauge.
Include:
Dark gauge background
Thin white measurement arc
Fuel-pump icon
Red low-fuel section
Animated needle
E and F indicators
Optional numerical counter
Animate the needle based on the approved explanation.
Use accurate values where relevant.
Allow the gauge to appear as a small overlay or a full-screen close-up.
COMPONENT 4 — NUMBER COUNTER
Animate numbers counting upward or downward.
Use smooth interpolation and readable typography.
Support percentages, distances, times, and numerical comparisons.
COMPONENT 5 — GAME COMPARISON
Build side-by-side or before/after compositions.
Include:
Source labels
Animated dividing line
Controlled wipes
Matched crop
Accurate image scaling
COMPONENT 6 — DETAIL HIGHLIGHT
Create animated circles, arrows, and zoom boxes.
Use them to direct attention toward specific details.
COMPONENT 7 — SOURCE CARD
Display a small image, source title, or citation beside a factual statement.
Keep the design consistent with the dark-purple and pink graphics.
COMPONENT 8 — GAMEPLAY BLUR
Implement a controlled Gaussian background blur behind text and information cards.
Do not blur the entire screen unnecessarily.
Build all components with HTML Canvas, SVG, or CSS.
Use code for all text and numerical displays.
Do not rely on AI-generated images for important UI elements.
</motion_graphics>
<camera> For supplied footage and still images, support controlled virtual camera movements.
Use:
Slow push-in
Subtle horizontal pan
Smooth pullback
Detail zoom
Reframing
Short tracking crop
Use easing curves.
Avoid applying the same zoom to every shot.
Do not make source footage look like a static slideshow.
Maintain consistent framing and safe margins.
Camera motion must serve the explanation.
</camera>
<audio> Ask which narration option I want:
My own recorded voice
ElevenLabs
Kokoro
Another available voice service
Use a natural documentary delivery.
Generate or import narration before editing.
Use faster-whisper or another alignment tool to obtain word-level timestamps.
Synchronize:
Scene cuts
Headlines
Numerical counters
Gauge movement
Quotation cards
Transitions
Sound effects
SOUND DESIGN:
Use restrained licensed or original effects:
Cinematic impacts
Subtle bass hits
Whooshes
UI clicks
Number reveals
Graphic transitions
Use background music that supports the gaming documentary tone.
Keep the narration clearly audible.
Avoid excessive sound effects.
Use volume ducking during speech.
Aim for a clean YouTube-ready mix.
</audio>
<production> Use available tools:
Python
FFmpeg
OpenCV
Pillow
HTML Canvas
JavaScript
Playwright
faster-whisper where available
Check installed tools before starting.
Install missing dependencies when permitted.
Use free/local tools wherever practical.
Ask before spending money on external APIs.
WORKFLOW:
Analyze reference MP4.
Extract frame contact sheets.
Create STYLE_BIBLE.md.
Ask for topic and footage.
Research the topic.
Write script and verify claims.
Generate timestamped storyboard.
STOP FOR APPROVAL.
Analyze supplied footage.
Match clips to narration.
Generate or import voiceover.
Align narration timestamps.
Build the edit decision list.
Create cinematic motion graphics.
Assemble the edit.
Mix music and sound effects.
Export low-resolution draft.
Inspect the draft.
STOP FOR FINAL APPROVAL.
Render completed video.
TECHNICAL IMPLEMENTATION:
Use a structured timeline containing:
Start time
End time
Source clip
Source in/out points
Crop
Scale
Camera animation
Graphics
Captions
Audio events
Transitions
Render reusable graphics with HTML Canvas or SVG.
Use Playwright to capture animation frames when appropriate.
Combine footage and graphics using FFmpeg.
Avoid unnecessary re-encoding during intermediate stages.
Support deterministic rendering so the same timestamp always produces the same graphic state.
</production>
<checkpoint_1>
BEFORE generating assets or editing, show me:
Full narration script
Verified source links
Confirmed/rumor classification
Timestamped storyboard
Footage requirements
Motion graphics plan
Proposed shot sequence
Wait for my approval.
Never invent research sources.
</checkpoint_1>
<checkpoint_2>
BEFORE FINAL RENDERING, generate:
Two 16-frame contact sheets
Opening montage preview
Pink headline animation test
Quotation card preview
Animated fuel gauge test, if relevant
Gameplay comparison preview
Complete low-resolution draft
Compare the results with the reference.
CHECK:
Footage relevance
Editing pace
Typography
Graphic consistency
Accurate numbers
Source attribution
Gameplay quality
Color grading
Audio synchronization
Camera cropping
Transition timing
Fix noticeable problems.
Do not render the final video until I approve.
</checkpoint_2>
<render> After approval, export:
Resolution: 1920×1080
Frame rate: 60 FPS
Codec: H.264
Quality: CRF 16–18
Pixel format: yuv420p
Audio: AAC
Format: MP4
Inspect the exported video for:
Missing frames
Black borders
Incorrect overlays
Text overflow
Corrupted footage
Audio drift
Unnatural transitions
Inconsistent color treatment
Fix errors before delivery.
</render>
<deliverables> Deliver:
final_video.mp4
Complete editable project
Script and source links
Footage manifest
Edit decision list
Animated graphics library
Reusable pink headline template
Quotation card template
Counter and gauge components
Audio files
Preview contact sheets
README
Build the project so I can create new gaming documentaries by changing the script, narration, and footage.
Do not claim that assets or renders exist unless they have actually been created.
</deliverables>
<start> Analyze my attached 202611172316.mp4 first.
Identify its exact editing style, pacing, cinematic footage selection, pink typography, research cards, animations, and audio structure.
Create a detailed style guide.
Then ask me for my topic, available footage, and preferred narration method.
Write the full documentary script, verify factual claims, and build a timestamped storyboard.
Wait for approval.
After approval, assemble the video using relevant gameplay footage and reusable motion graphics.
Show a complete low-resolution draft.
Wait for final render approval.
Then export the finished video and reusable source project.
PRIORITY:
Match the reference's cinematic GTA documentary editing language, pink-to-peach headline design, purple quotation cards, animated feature diagrams, narration-synchronized cuts, and clear visual demonstrations.
Do not create generic gaming edits with random B-roll or unnecessary effects.
BEGIN BY ANALYZING MY ATTACHED VIDEO.
</start>
i bought a box of second-hand phones and started a phone farm. 20 accounts, 40 posts a day.
the model worked. i just couldn't see why.
no idea which account got the clicks, which offer converted, or which hook was dying in wave one.
i was running a data operation with no data.
then i gave every account its own tracked link.
account 7 was getting 3× the clicks of every other account in its niche.
same offer, same page.
the only difference was the hook:
"things nobody tells you about getting fit" ❌
"why your back refuses to grow no matter how many rows you do" ✅
one specific pain point beat a broad category.
i put the tracking steps in a checklist.
comment TRACKING and i'll send it 👇
bookmark this before it gets saturated 🔖
(full article in the reply)
🚨 NEW $100,000 MUBITE GIVEAWAY! 🚨
We're giving away 10× $10,000 1-Step NITRO Challenges! ⚡
How to enter 👇
❤️ Like this post
🔁 Repost
💬 Drop a comment
👥 Join our Discord: https://t.co/F7BuxfpMYW
📅 Winners announced October 24!
Good luck, traders! 🚀🔥
#Mubite #Giveaway #CryptoTrading
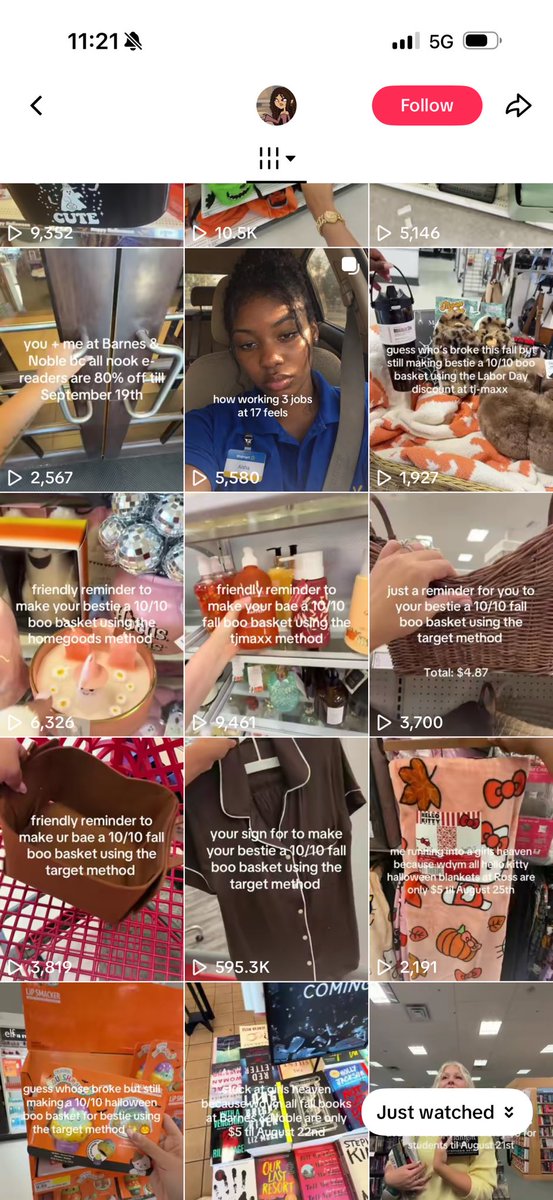
"your sign to make your bestie a 10/10 fall boo basket using the target method"
595K views. filmed in a Target aisle. no studio. no equipment.
just a phone and a hook that speaks directly to one specific person
here's what most people miss about this format:
the hook isn't about the product it's about the identity
"your bestie deserves a 10/10 boo basket" that's not a shopping video
that's a social performance trigger
and you can replicate this exact format with AI:
→ Claude writes the hook around the identity not the product → Higgsfield generates the character in the store environment → halloween lifestyle offer on Glitchy in the bio → form fill. zero friction. commission hits.
no Target trip. no filming. no basket.
just the hook and the system behind it.
Repost + Comment "HOOK" and i'll send you the exact hook framework i use to write these for any niche
(must be following for auto DM)
I said I’d give away $10,000 in $BTC if Bitcoin dropped to $75K.
Well, we’re here! 🎯
As promised, I’m giving away $10,000 in Bitcoin to 5 lucky winners.
How to enter:
✅ Like this post
✅ Repost
✅ Comment “S”
⏳ Winners will be announced in 24 hours. Good luck! 🍀