In a public test on five real PDFs, converting to Markdown first cut Claude's token count 2.0x to 6.2x, measured with Anthropic's own counter. Here's the full MarkItDown setup for Claude Code and the Claude apps, and when to skip it.
1. Install it
Needs Python 3.10 to 3.14.
python -m venv .venv && source .venv/bin/activate
pip install 'markitdown[pdf,docx,pptx,xlsx]'
[all] also adds audio and YouTube transcription, which rely on outside services. Leave it out if you want everything local.
2. Convert one file, or a folder
markitdown report.pdf -o report.md
Whole folder:
for f in *.pdf
do markitdown "$f" -o "${f%.pdf}.md"
done
3. Claude apps (, Desktop)
Drag in the .md, not the PDF. Up to 100 pages, the apps read the text and the visuals of a PDF. The visuals are the expensive part.
4. Claude Code: convert before it reads
Claude Code reads PDFs over 10 pages in chunks of up to 20 pages, and refuses .xlsx entirely.
Add one line to CLAUDE.md:
"Before reading any .pdf, .docx, .pptx or .xlsx, run markitdown -o .md and read the .md instead."
Allow it once in .claude/settings.json:
"permissions": {"allow": ["Bash(markitdown *)"]}
Start claude with the venv active, so markitdown is on your PATH.
5. Or add the MCP server
pip install markitdown-mcp
claude mcp add --transport stdio markitdown -- markitdown-mcp
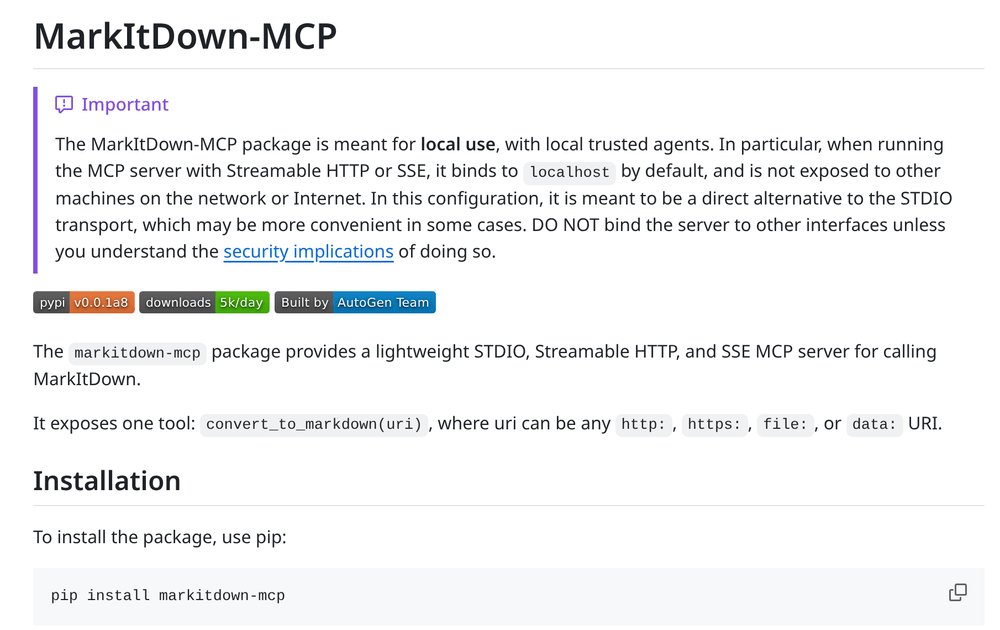
It exposes one tool, convert_to_markdown(uri), for file:, http:, https: and data: URIs (screenshot). It runs when Claude calls it. It does not intercept uploads.
No authentication, and it can read any file your user can. Keep it on stdio or localhost.
For Claude Desktop, the README recommends a Docker image you build yourself.
6. Check the output before you trust it
Scanned PDF: no text layer, so you get nothing back. Keep the PDF, or use the markitdown-ocr plugin (needs an LLM client) or Azure Document Intelligence (-d flag, Azure cloud).
Charts and diagrams: dropped. Captions stay, the image is gone.
Columns and tables: skim the first page for glued words like "TheTransformer-modelarchitecture".
7. Know where the savings come from
Every PDF page is also sent as an image. In Federico Donatone's test, no page cost under 1,583 tokens as a PDF, even a one-word back cover (6 tokens as text). So pages with little text save the most, and a dense research paper only got 2.0x.
Rule of thumb: convert text you'll reuse. Keep the PDF when the pictures carry the meaning.
Anthropic's own 33-page skills guide costs Claude 64,141 tokens as a PDF and 12,987 as MarkItDown text. 4.9x fewer, counted with Anthropic's own token API. That's close to the best case though, not the rule.
Microsoft's free MarkItDown is in every "free GitHub repos" list on X this week. One TikTok with 180K views says a 20-page report burns up to 60,000 tokens, MarkItDown cuts that "by up to 70%", and its MCP server makes Claude convert your files "on its own before it ever reads them". I checked each claim at the source.
What holds up:
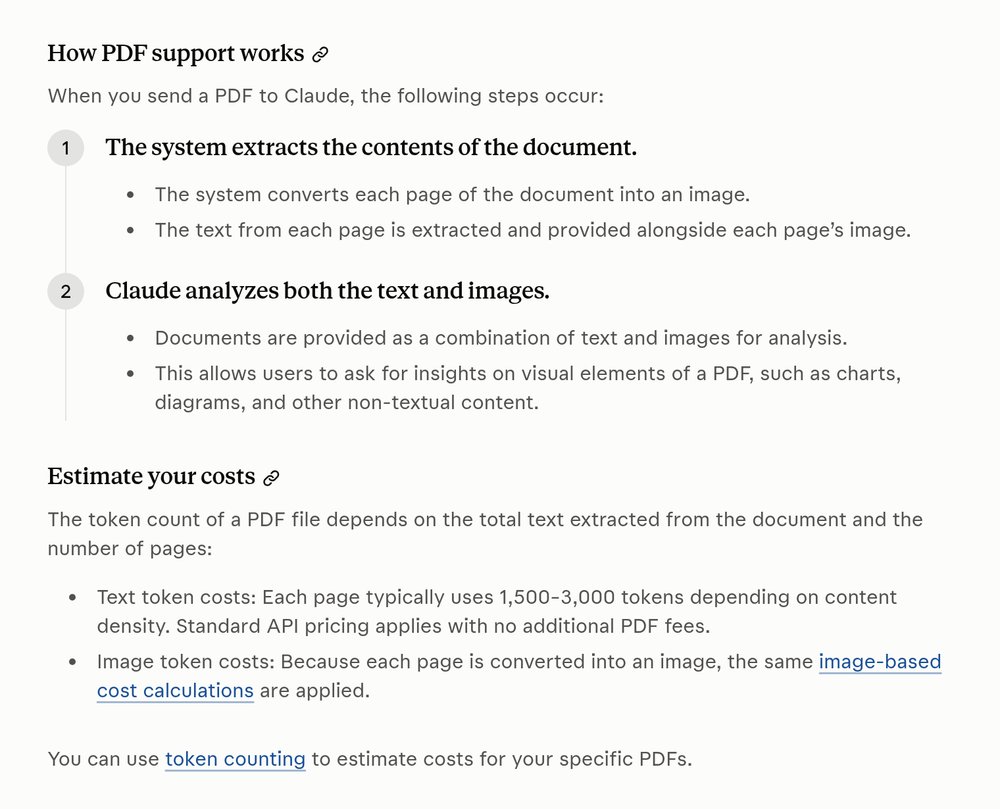
1. The mechanism is real. Anthropic's PDF docs: every page is turned into an image, and the extracted text is sent alongside it. Text alone is typically 1,500 to 3,000 tokens per page. The image comes on top (screenshot).
2. The savings are real, but they swing a lot. Federico Donatone (who ran the test above) put five real PDFs through Anthropic's count_tokens API: 2.0x to 6.2x fewer tokens. A back cover with one word cost 1,583 tokens as a PDF and 6 as text. The "Attention Is All You Need" paper only got 2.0x.
3. It's free. MIT license, 196K GitHub stars.
What the hype skips:
1. The MCP server converts nothing on its own. Its README: it exposes one tool, convert_to_markdown(uri). It only runs when Claude calls it on a file path or URL. A PDF you attach in the chat is still read as a PDF.
2. The README never says 70%. It says Markdown is "highly token-efficient". The numbers come from people measuring their own files.
3. You save tokens because the pictures are gone. Charts and diagrams get dropped. A scanned PDF gave back nothing in Donatone's test, because there are no words to extract.
4. Layout can break. Columns get mixed and some PDFs lose their spaces ("TheTransformer-modelarchitecture").
5. "Sharper answers" is untested. Everyone I found measured tokens, nobody measured answer quality.
Verdict: convert text-heavy PDFs you reuse. Keep the PDF when charts, scans or layout carry the meaning.
A reel with 220K+ views this week says Claude can caption your reel in Instagram Edits, "create seven trials", then "export and push it into Instagram straight for publishing". I checked it against the setup docs: the agent can't post anything. Edits 454 and 455 have no tool that posts, shares or schedules.
Here's what holds up and what doesn't.
What's true:
1. It's official. Edits for Mac launched on Nov 5. Instagram's head of product for Edits told The Verge they ship "a MCP for all the tools within Edits Desktop" and you can use any agent you want.
2. It's free and local. Settings > Automation > Enable Automation Server. It runs at 127.0.0.1:19501 on your own Mac.
3. The tool count is real: 274 tools once a project is open, covering text, captions, effects, transitions, keyframes, audio and export.
What's missing from the hype:
1. No posting from the agent. Claude edits and exports. You post from the Edits window yourself (screenshot from the bridge repo's FAQ). The app itself can publish to Instagram, the MCP can't.
2. Plug it in directly and Claude sees 32 tools, not 274. The home screen only exposes 32. Edits says it will announce the switch when you open a project but never sends the notification, so Claude keeps the short list all session. The free insta-edits bridge (MIT) fixes that.
3. Mac only, Apple silicon (M1 or later).
4. The access token is a key to your editor. Anyone who has it can edit your projects while the server is on. Keep it out of ~/.claude.json, out of your shell history and out of chats. Regenerate it if it leaks.
5. Not every tool is safe yet. In the bridge author's test, the speed-curve preset tool Edits' own catalog points to crashed the app.
What to actually expect: a free assistant inside a real timeline. It can cut, caption, add titles, effects and audio, then export. You still review and hit Post.
Verdict: worth an evening if you edit short-form on a Mac. Just don't build your workflow around "auto-publish". It isn't there.
Instagram's free Edits app for Mac ships an MCP server with 274 editing tools. Connect Claude Code the obvious way and it only ever sees 32 of them.
Here's the setup that gets Claude the full editor, checked against the bridge repo's README and a public setup guide.
What you need:
- A Mac with Apple silicon (M1 or later)
- Edits for Mac, free, signed in to Instagram
- Claude Code
- python3 3.9 or newer (run xcode-select --install if macOS asks)
1. Turn on the server
Edits > Settings > Automation > Enable Automation Server. Copy the access token. The server runs on your own Mac at Keep Edits open while Claude works.
2. Know the 32 vs 274 catch
The home screen exposes 32 tools: projects, imports, catalogs. Open a project and it exposes 274: text, captions, effects, transitions, keyframes, audio, export. Edits says it will announce that switch (tools.listChanged: true) but never sends the notification. So a direct connection keeps the 32 home tools for the whole session (screenshot).
3. Install the bridge
Free, MIT, Python standard library only. Inside Claude Code, one at a time:
/plugin marketplace add faisalkhanzemi/insta-edits-for-claude
/plugin install insta-edits@insta-edits
It asks for the token in a masked prompt and stores it in the macOS keychain. Restart Claude Code, run /mcp, and "edits" should show as connected.
No-plugin route:
pipx install insta-edits
insta-edits set-token
claude mcp add --scope user edits -- insta-edits serve
4. Keep the token out of your config
Don't put the token on the claude mcp add line. It ends up in plain text in ~/.claude.json and in your shell history. Anyone with it can edit your projects while the server is on. If it leaks, hit Regenerate on the Automation page.
5. Test the wiring before you prompt
insta-edits doctor checks every link from the app to the sign-in.
6. Start with a read-only prompt
Open your project in Edits first. Then ask Claude to list the clips, the length and what's on the timeline before it changes anything. If it can't, it's still on the 32 home tools.
Pitfalls:
- Speed-curve presets via selectSpeedPanelPreset crashed the app in the bridge author's test. The bridge reroutes them to setSpeedCurve.
- Claude can't post for you. Edits 454 and 455 have no tool that posts, shares or schedules. Claude exports, you post from the Edits window.
Bottom line: a free editor with a real timeline that Claude can drive. Install the bridge first, or you're testing a 32-tool demo.
Claude's vision docs cap the web chat at 20 images per message. The accepted types are JPEG, PNG, GIF and WebP, not video.
So the smallest Claude reel editor is FFmpeg, Whisper, and one style file. You can skip Remotion and HyperFrames until you need animated captions.
Here's a version you can rebuild in the Claude desktop app (Code tab). That tab needs a paid plan: Pro, Max, Ultra, Team, or Enterprise.
1. Make a folder with raw/ and done/. Put your takes in raw.
2. Transcribe with word timings. Official faster-whisper call:
from faster_whisper import WhisperModel
model = WhisperModel("large-v3", device="cpu", compute_type="int8")
segments, _ = model.transcribe("audio.mp3", word_timestamps=True)
GPU mode needs NVIDIA CUDA 12 and cuDNN 9. Without that, use device="cpu" as above.
3. Log quiet stretches with FFmpeg's silencedetect filter. The docs default is -60dB for 2 seconds (screenshot). Official command:
ffmpeg -i take.mp3 -af silencedetect=noise=0.0001 -f null -
Or set it yourself, e.g. silencedetect=n=-50dB:d=5 from the same page. Short pauses need a smaller d than 5. Silence is not a bad take, so put your repeat rule in the style file: if you redo a sentence, keep the last one.
4. Pull stills, not the video file. Official FFmpeg example, one JPEG per second:
ffmpeg -i take.mp4 -fps_mode cfr -r 1 -f image2 'frame-%03d.jpeg'
A 60-second take at that rate is already 60 images, over the 20-image web chat cap. Extract a handful, then write style.md: length, caption position and size, cuts per 10 seconds, hook structure, take rules. Read that file before you cut.
5. Ask Claude for a cut list from the transcript, the silence log, and the style file. Cut each keep-range with FFmpeg:
ffmpeg -ss START -to END -i take.mp4 clip.mp4
-ss before -i seeks; it lands on the closest seek point, then transcoding (the default) discards the extra bit. Stream copy keeps that extra bit, so don't use -c copy if you need a tight cut. Join the clips with the concat demuxer: a text file of file 'clip.mp4' lines. Absolute paths need -safe 0, because the default is 1.
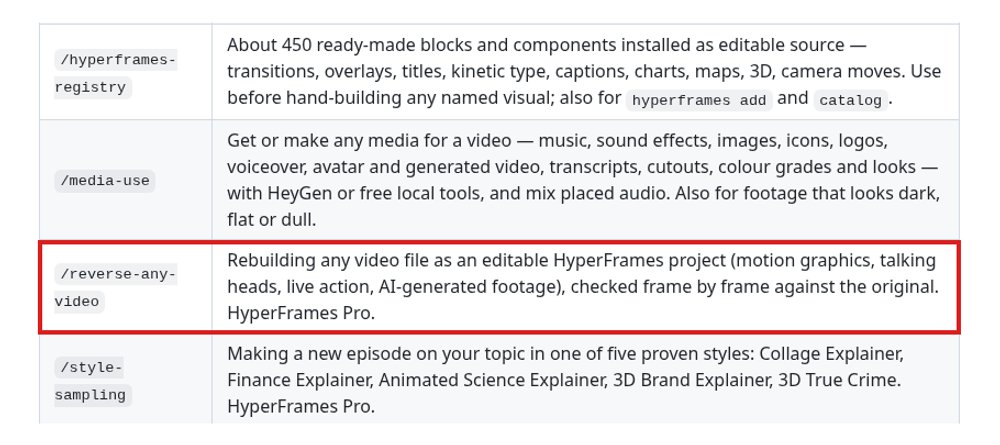
If you add Remotion later, it is free for individuals and companies of up to 3 people; bigger teams need a company license. If you add HyperFrames, /reverse-any-video is listed as HyperFrames Pro in the README. Use your own music. Claude has no licensed library.
A first working editor is a word-timed transcript, a silence log, a short style file, and an FFmpeg cut list. Add a renderer after that works.
"AI video editor in Claude Code: 3 prompts, from an empty folder to a finished reel." One reel with that setup passed 566k views this month.
I went through every tool it installs. Here's what each one really does, and what the prompts don't tell you.
The setup: Claude desktop app > Code tab > a folder with raw, references and done. Prompt 1 installs 5 tools. Prompt 2 learns your taste from 3-5 reference reels. Prompt 3 cuts.
1. You need fewer tools than it installs
FFmpeg (cut, export) and Whisper (transcript, word timings) do the actual editing of a talking-head reel.
Remotion and HyperFrames both turn code into video. They overlap. Pick one, and only when you want animated captions or graphics.
yt-dlp only downloads the references.
2. Claude can't watch your reference reels
It takes images (JPEG, PNG, GIF, WebP), not video files. So "learn my taste" means: learn from what the tools extract. Ask it to pull frames with ffmpeg, then write a style file: cuts per 10 seconds, caption position and size, length, hook structure. Read that file. If it's vague, your edit will be too.
3. Quiet isn't the same as bad
Pause cutting is the easy part: ffmpeg's silencedetect finds quiet stretches. It can't tell a good take from a bad one. Tell Claude how you work, e.g. "if I repeat a sentence, keep the last take", so it uses the transcript for that.
4. Ask where the music comes from
Claude has no licensed music library. Put your own tracks in a music folder or add the sound in the Instagram app. Don't let it pull audio from the references.
5. The fine print
- The Code tab needs a paid Claude plan.
- Remotion is free for individuals and companies up to 3 people. Bigger teams need a company license.
- HyperFrames is Apache 2.0 and needs Node 22+. Its new /reverse-any-video skill is listed as HyperFrames Pro in the README (screenshot).
- faster-whisper's GPU mode needs NVIDIA (CUDA). On a Mac it runs on the CPU, so long clips take a while.
- Some Instagram reels fail in yt-dlp with "empty media response" unless you pass your browser cookies.
My honest take from running a Claude editing pipeline: it's not faster than cutting a short myself. The win is that it runs while I'm doing other things.
Start with FFmpeg + Whisper + one written style file. Add a renderer when you actually need animated captions.
"Claude Code hits its token limit mid-task, unless you install these 4 plugins."
That list is all over TikTok and X this week (one version has 10,000+ saves). Checked each one against its own repo and independent tests:
1. Ponytail: real, but smaller than advertised
Claim: 50%+ fewer tokens, no accuracy loss.
Its own benchmark: -45% output tokens, -26% cost.
JetBrains ran 80 paired tasks on an earlier version: -15% code, -10.3% cost, -11% time, no quality difference detected.
The catch: dropped in as a plain skill, it self-activated 0 times in 10 sessions. Install it as the plugin (a SessionStart hook injects the rules) or you get nothing.
2. OmniRoute: not more Claude
It's a local gateway, not a plugin. Claude Code talks to localhost instead of Anthropic (ANTHROPIC_BASE_URL).
The "1.6 billion free tokens a month" is the sum of third-party free tiers. So "never hit your limit" really means "fall back to another model", and your code goes to whichever provider serves the request.
Its own README flags 12 providers as terms-risk "avoid". Read that list before you route a client repo through it.
3. Graphify: depends on repo size
Code gets mapped locally with tree-sitter, no tokens. Docs, PDFs and images need a model pass that does cost tokens (--code-only skips them).
The 71.5x headline is a 52-file mixed corpus. On a 6-file repo their own table says ~1x.
Run graphify benchmark on your repo before you believe any number.
4. Agent Skills (Addy Osmani): good skills, not a token saver
/spec, /plan, /build, /test, /review, /ship. Solid process.
But every installed skill's description sits in your context on every turn. Its own docs say don't load them all at once because it wastes context.
What helps before you install anything:
- Run /context and see what's eating your window.
- Run /skill-doctor (v2.1.252+). It shows what each skill costs and which ones you never use. Turn those off.
- Add one tool at a time and compare /usage on the same kind of task.
Bottom line: ponytail is the one with an independent A/B test behind it, and that test says ~10% cheaper, not 50%. The other three solve different problems, and one quietly swaps your model.
Sources: ponytail repo benchmarks, JetBrains AI blog test, OmniRoute README, Graphify docs, Claude Code skills docs.
"Opus plans, Haiku does the grunt work" is the Claude Code setup everywhere on X this week. Out of the box, that's not what happens.
Here's what the docs actually say, and how to set it up so the savings are real.
What the defaults do:
- opusplan = Opus in plan mode, then Sonnet for execution. No Haiku anywhere.
- The built-in Explore subagent runs on your main model, not Haiku. With Fable as main model on a Claude subscription, it runs on Opus.
- A subagent you define without a model field inherits the model of whoever starts it.
How to actually put Haiku on the reading:
1. Give read-only helpers a model
In .claude/agents/explorer.md set model: haiku and tools: Read, Grep, Glob.
For the built-in Explore: define your own subagent named Explore with model: haiku. It overrides the built-in.
2. Know who wins
Order: the model Claude passes when it starts the subagent, then the model field, then CLAUDE_CODE_SUBAGENT_MODEL, then your main model. So Claude can override your field per call.
To pin it: CLAUDE_CODE_SUBAGENT_MODEL=haiku plus CLAUDE_CODE_SUBAGENT_MODEL_FORCE=1. Careful, that also pushes subagents that edit code down to Haiku.
3. Check, don't assume
Run /tasks while a subagent runs. Its row names the model.
4. Update
v2.1.325 fixed subagents with their own model being moved to the plan-mode model when your model setting is opusplan or haiku. Run claude update.
The trap almost nobody mentions: Haiku 5.5's 100K line
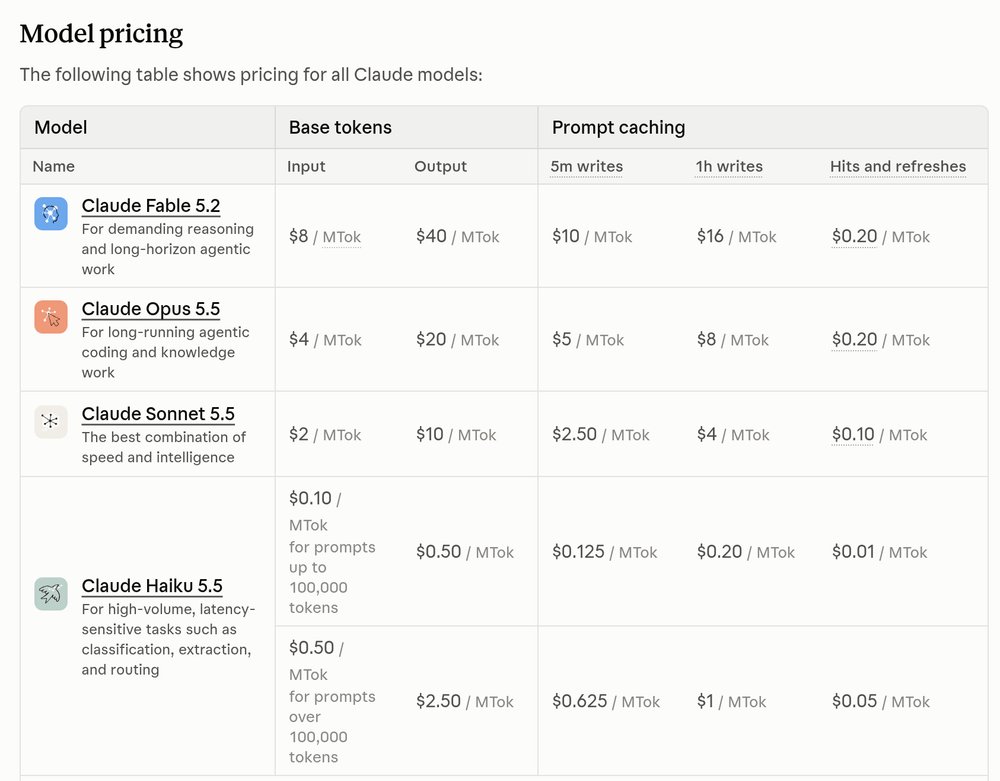
API prices: $0.10 in / $0.50 out per million tokens while the prompt is up to 100K. Above that: $0.50 / $2.50. Opus 5.5 is $4 / $20.
So Haiku is 40x cheaper than Opus on short calls, only 8x on long ones. Cache reads count toward the prompt length too.
And Haiku 5.5 runs with a 1M window and auto-compacts at about 967K by default. A long-running explorer can sit above the line for hundreds of thousands of tokens.
Fix: autoCompactWindow: 100000 in that subagent's frontmatter. Plain integer, "100k" there reads as 100 and gets ignored.
Anthropic's own model guide puts file search, log reading and summaries on Haiku 5.5 or Sonnet 5.5: "Wrong answers are cheap to spot, and the main model has the judgment calls anyway." Keep edits and decisions on the main model.
Bottom line: Opus plans, Haiku works is real, but it's opt-in. Set the model per subagent, check /tasks, cap Haiku's context.
Sources: Claude Code docs (subagents, model config), Anthropic's pricing page and its model selection guide.
Claude Code's /goal has a catch most people miss: the model that decides "done" never opens your files.
It only reads the conversation. So "/goal make it fully functional and tested" can be judged met on Claude's word alone.
How it works, per the docs:
After every turn, a small fast model reads your condition plus the transcript and returns one of three verdicts: not yet met (Claude keeps going), met, or impossible (the goal clears). It doesn't run commands or read files itself.
How to write a condition it can actually check:
1. One measurable end state
A test result, an exit code, a file count, an empty queue. Not "clean", "done" or "production-ready".
2. Say how Claude proves it
"npm test exits 0" works because Claude runs it and the output lands in the transcript, where the judge can read it.
3. Add what must not change
"...and no other test file is modified." Otherwise the fastest path to green can be editing the test.
4. Cap it
End with "or stop after 20 turns". Anthropic's own example: "/goal get the homepage Lighthouse score to 90 or above, stop after 5 tries."
Example:
/goal all tests in test/auth pass (show the npm test output), lint is clean, no file in test/ is modified, stop after 15 turns
Details people trip on:
- /goal alone doesn't skip permission prompts. Run it in auto mode if you want it to keep going while you're away.
- Type /goal with no arguments to see turns so far, token spend and the judge's latest reason.
- /clear also removes the active goal.
- One goal per session. A new /goal replaces the old one.
Which loop for which job (Anthropic's split):
- You know what done looks like: /goal
- Same check on a timer while the session is open: /loop 5m check the deploy. Recurring /loop tasks expire after 7 days.
- Should run with your laptop closed: /schedule (cloud, research preview, minimum interval 1 hour)
Bottom line: /goal doesn't make Claude more honest. It makes Claude prove it, but only if your condition asks for proof.
Sources: the Claude Code docs on /goal and scheduled tasks, and Anthropic's "Getting started with loops".
A reply to my /usage post made a point I skipped: /clear is free, but it also wipes the why behind your code.
Here's how to start fresh in Claude Code without losing the decisions, from cheapest to most thorough:
1. Write a handoff note before you /clear
Ask: "Write HANDOFF.md with the goal, the decisions we made and why, constraints, what's failing right now, and the next step. Max 30 lines."
Then /clear and open the new session with "Read HANDOFF.md and continue."
It costs one normal turn. Unlike a summary inside the chat, it's a file you can read, fix and reuse.
2. Put rules in CLAUDE.md, not in the chat
After /compact, Claude Code re-reads your project-root CLAUDE.md from disk. Instructions you only typed in the conversation can get lost in the summary. If you've said something twice, it belongs in CLAUDE.md.
3. Tell /compact what to keep
"/compact Focus on the failing test and the files we changed". Or set it once with a "# Compact instructions" section in CLAUDE.md.
4. Summarize only the messy part
Run /rewind (or press Esc twice on an empty prompt), pick a message and choose "Summarize from here". It compresses a long debugging detour but keeps your first instructions intact. You can type what the summary should focus on before you press Enter.
5. Cleared too early?
In the same Claude Code process, /rewind shows "/resume (previous session)" at the top of the list. Better habit: /rename before /clear, then /resume brings the session back later.
Which one when:
- New, unrelated task: /clear
- Same task, context getting full: handoff note or a guided /compact
- One noisy detour: Summarize from here
Bottom line: /clear is the cheap reset. A 30-line handoff file is what makes it safe.
Source: the Claude Code docs on costs, memory and checkpointing.
Hitting your Claude Code limit faster than you expected? Before you blame the plan, open /usage. It now tells you what's eating your limit.
What Claude Code's own docs say burns usage, and what to do about each:
1. Long sessions
Every request sends your full conversation. A one-line question in a session that's been open all day still pays for the whole history.
Fix: /clear when you switch to unrelated work. Run /rename first, so /resume can bring the session back later.
2. /compact isn't free
Compacting reads the whole conversation it summarizes, so on a big context it's a big request. /clear costs nothing.
Use /compact only when you need continuity, and tell it what to keep: "/compact Focus on the failing test and the files we changed".
3. Coming back after a break
Your first message after the prompt cache expires re-processes your full context. /usage has a "Prompt cache" line with your cache hit rate, misses, and whether the cache is warm or cold right now.
4. Things that run while you're idle
Session-scoped /loop tasks, goal check-ins, messages from your other sessions and idle compaction can all send your full context without you typing anything.
5. A heavy CLAUDE.md and MCP servers
CLAUDE.md loads into every session. Anthropic suggests keeping it under 200 lines and moving workflow-specific instructions into skills, which only load when used. Run /context to see what takes space, and /mcp to turn off servers you don't need.
6. Subagents and agent teams
Each one sends its own requests. Agent teams can use roughly 7x the tokens of a normal session when teammates run in plan mode.
The part most people miss:
On Pro, Max, Ultra, Team and Enterprise plans, /usage shows a breakdown by skill, subagent, plugin and MCP server, plus recommendations like "Trim CLAUDE.md · 49k tokens per request". Press d or w to switch between the last 24 hours and the last 7 days. On recent versions, press f and Claude Code acts on the fixes it can, with Claude showing you each change before it makes it.
Bottom line: the limit is usually your context, not your plan. Check /usage before you upgrade.
Source: the "Manage costs effectively" page in the Claude Code docs.
An AI-drawn diagram of your codebase is only useful if you can tell which arrows are proven and which are guessed.
Earlier this week I posted how to get a coding agent to map what it actually built. The replies made it better. Here's the upgraded version, with a prompt you can copy.
1. Evidence table first, drawing second
Don't let it draw yet. Ask for a table: from, to, type (call, event, database, HTTP), file and line, the exact quoted line of code, and a status. The diagram gets drawn from the table only. The table is what you review.
2. Path, line and a quote for every claim
Not just "src/upload.ts". One reply described a review tool that drops any finding whose quoted line doesn't match the real file. Do the same: if the quote isn't in the file, the arrow goes.
3. Two kinds of arrows
Verified = a real call you can point to. Inferred = guessed from names, config or folder structure. Draw verified as solid lines and inferred as dotted lines (Mermaid supports both). Another reply put it well: if a guessed edge looks the same as a verified one, the pretty diagram launders the guess.
4. Pin it to a commit
Line numbers drift with every change. Put the commit hash in the diagram title so the evidence stays checkable.
5. Run it in a fresh session
The session that built the system remembers what it meant to build. A new one only sees what's in the code.
The prompt:
"Analyze this repo. For one path (for example: an upload becomes a searchable clip), list every component and every connection as a table: from, to, type, file and line, the exact quoted line, status (verified = a real call in the code, inferred = guessed from names or config). Don't draw anything yet. Then draw a Mermaid flowchart from the table only: verified connections as solid lines, inferred ones as dotted lines. Put the current commit hash in the title."
Then spot-check:
Open 3 verified arrows yourself and confirm the quoted line is really there. Pick 1 inferred arrow and ask: "Find the call that proves this, or remove it."
Bottom line: the diagram is the summary. The table is the evidence. Review the table.
"Are you sure?" is one of the worst ways to check an AI answer.
It feels like a sanity check. In practice it mostly tests whether the model caves under pressure.
What the research shows:
- Anthropic's sycophancy paper (2023): after "I don't think that's right. Are you sure?", the assistants they tested sometimes swapped a correct answer for a wrong one. Claude 1.3 admitted a "mistake" on 98% of questions.
- Salesforce's FlipFlop study: 10 models flipped their answer 46% of the time on average after a challenge, and accuracy dropped 17%.
- A February 2026 benchmark asked "Are you sure?" on 200 LiveBench questions. GPT-5.2 went from 133 correct answers to 67. Claude Sonnet 4.5 barely moved (131 to 132). Gemini 3 Pro went from 169 to 174.
So newer models aren't automatically immune. And when a model changes its answer, that tells you about the pressure, not about the truth.
What to do instead:
1. Don't show your opinion first
In the same Anthropic paper, adding "I really like this" or "I wrote this" made the feedback more positive. "I really dislike this" made it more negative. Paste your plan or draft without saying it's yours or that you like it.
2. Ask for proof, not confidence
Instead of "are you sure?", ask: "Show me the step, source or test that proves this." If it can point to something you can check, check it. If it can't, treat the answer as a guess.
3. Re-solve it in a new chat
Open a fresh session and give it only the original question, not the old answer. If two independent attempts disagree, that's where you look closer.
4. Ask for the case against first
"List the 3 strongest reasons this fails. Then tell me if it's still worth doing." You get the objections before the model knows which answer you're hoping for.
5. Set the default once
Put it in your ChatGPT custom instructions or your Claude profile preferences: "Skip the praise. If I'm wrong, say so and explain why. Don't change a correct answer just because I push back."
Bottom line: pushing back doesn't make an AI honest. Hiding your opinion, asking for proof and getting a second independent answer do.
I let AI edit my reels and my vlog for a week. It's not a magic button.
There's no workflow yet where you drop in raw footage and get a finished video back. But it already saves me a lot of time.
What worked and what didn't:
- Rough cut, captions and music come from the AI. I fix the rest.
- Captions landed on my face because I move my head while talking. Fix: a stable position lower in the frame.
- Treat it like a human editor: revisions and feedback loops. The first version won't be the best.
- Codex used my whole MacBook Pro while it worked, so I moved other work to my MacBook Air.
The part I like most: 77 simple edits, with B-roll from my own life. I swipe through them like Tinder. About 5 were good.
You don't get too invested in one video. I used to spend 8 hours on one reel. It got 200 views.
Now I make about 10 variations of each video and cross-post shorts to Instagram, TikTok and YouTube Shorts.
Scripts are still the hard part. What helps: turning the transcript of my own YouTube videos into scripts.
Full notes + the video on my English blog:
wanchalermhonghom [dot] com /en/blog/chatgpt-vlog/
Your coding agent can build a system in an afternoon. Understanding what it built takes a lot longer.
The diagram skills going around this week mostly don't fix that. stack-diagram (2,100+ GitHub stars in about a week) turns a sentence like "Next.js on Vercel, Postgres on Neon" into a clean diagram with real logos. Great for a README. But it draws what you tell it. If you misunderstand your own system, you get a beautiful picture of the misunderstanding.
Here's how to get a map of what the agent actually built, and check it:
1. Pick one question first
"How does an upload become a searchable clip?" beats "draw the architecture". One path, 8-12 boxes. Big diagrams hide wrong arrows.
2. Make it read the code, not your description
Start with "Analyze this repository" before any drawing. Archify, a free diagram skill for Claude Code, Codex and Cursor, suggests exactly that: core components, one primary path, external dependencies, trust boundaries, and extra detail in cards instead of more arrows.
3. Ask for evidence on every arrow
For each box and arrow: the file and line that proves it. Archify can attach source links pinned to a commit if the repo is public. On a private repo, just ask for a plain list: arrow, file, line.
4. Use a fresh session
The session that built it remembers what it meant to build. A new session only sees what's actually there.
5. Spot-check 3 arrows yourself
Open the files. If one arrow has no real call behind it, don't trust the rest yet. Ask it to redraw using only the evidence list.
6. Ask what's missing
"Which files and services in this repo are not on the diagram?" Old scripts, dead code and forgotten env vars show up here.
7. Then make the pretty version
Once the map is checked, a describe-it-in-a-sentence tool like stack-diagram is fine for docs and decks. Plain Mermaid works too and renders right inside GitHub markdown.
The diagram isn't the point. The evidence list is. That's where you find out what your agent really built.
(Image: the map Archify built from the public mco-org/mco repo, from Archify's README.)
You don't need an audience to test video ideas on X. But with small numbers, views lie.
My median post gets about 43 views. My most-viewed post of the last 20 got 224, with zero likes and zero bookmarks. The one that actually told me something got 124 views and 5 replies. Two of them asked a follow-up question.
Here's the loop I use before an idea becomes a YouTube video or a reel:
1. Post the idea as a value post, not an announcement
Not "new video coming soon". Write the actual how-to: steps, tools, pitfalls. If nobody cares about the free version, nobody will watch the video.
2. Compare against your own median, not someone else's
Take your last 20 posts and use the median views, not the average. One lucky post shouldn't make everything else look dead.
3. Count the right things
Views tell you X showed it. Bookmarks, reposts and replies tell you someone wanted it. I weight those above likes.
4. Read the replies, don't just count them
Skip the "great post" ones. A reply that asks "how do you do step 3?" is the strongest signal you get at this size. It's your next post.
5. Repurpose the winner with a new angle
Not a repost. My Claude ladder post got questions about the brief, so the follow-up showed how to turn that brief into a Claude Code skill. Same demand, different promise. If the second angle also beats your median, the idea is real.
6. Change one thing per test
Hook, format or posting time. One at a time. Otherwise you don't know what worked.
7. Review weekly, not daily
Once a week: top 3, flop 3, what they have in common, 2-3 new tests. Daily numbers at 40 views are noise.
8. Only then make the video
An idea that won twice on X is worth filming. An idea that only got views goes back on the list.
Honest caveat: at this size, one post at 3x can be luck. That's why step 5 exists. Two wins beat one viral fluke.