$C as expected, a lot of chop in this zone to rinse out late longs and the impatient.
for me, a return to trendline is always a good bet as invalidation is easy if there is a strong close below 👌
$SIREN looking like volume coming back in. but this is a crime coin so very risky trade.
maybe can try if it returns and holds the box. but of course - low lev and with tight risk management.
Exactly my friend.
If you have been following me for a while then you would already know that I chart sometimes weeks in advance before actually pulling the trigger.
Patience and execution 👌
@servedcoldest $MAGMA over 1000% on 20x leverage is an exceptional trade. Charting the setup weeks ahead and executing with conviction at the right time is exactly how this game is won.
same as $BTC bro. for now no point trading majors until BTC finds some strength.
I will be looking for longs when the liquidity at 60k is taken.
I think around 57k-60k is a good zone to look for a reaction.
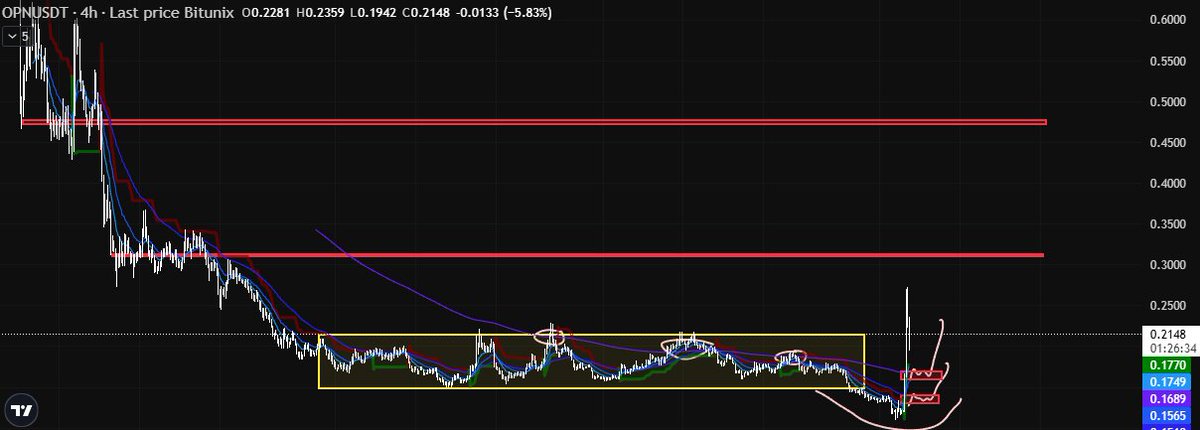
$OPN here is a lesson on trading psychology so that you would be able to identify the next time you see something like this.
1. yellow box (accumulation zone) - here you can see that there are several times where it gives a tap on the 200EMA.
usually this would make you think "oh it's breaking out of the 200EMA might be time to long" - only for it to fake out and dip back down to the bottom of the range.
often, this happens several times with the objective to trap early longs.
if you are playing leverage, you should not open here. for spot though, great zone to start accumulating.
2. break down from range (manipulation zone) - here is where many traders would go short but this is the plan as it would trap them with the objective to provide liquidity for a move up.
if you are playing leverage, THIS is where you should go long.
often times, there are previous liquidity wicks in this zone that would signal or act as a sort of magnet for price and where it would bounce - however, since this is quite a new pair, there are none.
you should not try to catch a falling knife - hence, two places you are able to enter, assuming volume is good:
1. on flip of 4h supertrend resistance or;
2. on flip of 4h 200EMA.
$LAB seems like the cabal is keeping the price up - along with some quick wicks to wipe out the overleveraged and attract shorts.
wouldn't be surprised if we get a quick wick into the box and expansion further into the $20 region.
I think we might go higher before this inevitably goes to 0.
@codr99 $MAGMA Now price discovery so hard to tell. But 0.5 next psychological level.
I am mostly out already as all of my targets have been hit. Now it’s just a moon bag left in this pos
$MAGMA I had previously charted this - I think as a response to someone's request but unfortunately, can't seem to find it.
now up 24% from my box.
the set up looks very similar to $C which I also charted.
enter on flip of zone or a return to trendline.
invalidation on strong close below trendline 👌