Post-Lament Anthropocene: Stars Intertwined | Lucilla
"Lucilla, President of Startorch Academy. What surprises do you have in store for me today?"—Lucilla
Check the link for more information: https://t.co/HnWskosvbR
#WutheringWaves#Lucilla
Amazing @aimikoda's Amazing Character sheet template ✨
Gpt Image 2 Prompt:
Create a single unified MASTER CHARACTER REFERENCE SHEET from these inputs:
[STYLE]: stylized 3d cel-shaded
[SUBJECT_DESCRIPTION]: A young, athletic female warrior from a secluded forest tribe. She wears rustic, hand-crafted tribal clothing: a layered tunic of woven natural fibers, leather wraps, decorative bone and bead jewelry, and soft earthen face paint. Her hair is styled in structured braids decorated with wooden beads. Her presence is confident and grounded, and she carries a hand-carved ceremonial wooden staff.
Create the board in a 4:3 horizontal layout. The board layout, background, typography and spacing must be clean, neutral, minimal and technical, on a pure white or clean off-white background. Use clear section titles, readable English labels, balanced spacing, no clutter, no watermark, no logo. Apply [STYLE] only to the character and visual elements, not to the board layout or UI. All text must be clearly readable at normal viewing size. Avoid tiny or dense text.
Infer all missing details from the subject description, including name, alias if suitable, role, age, personality, core theme, accent, wardrobe details, accessories, key prop if clearly relevant, visual notes and a fitting color palette.
Use this layout:
top row = left: title + horizontal info block, right: COLOR PALETTE
center = large MAIN IDENTITY + SCALE SHEET as the biggest section
right = EXPRESSION PROGRESSION + HEAD DETAIL SHEET + NEUTRAL BASELINE + POSTURE VARIATION + CLOSE-UP POSE
bottom = WARDROBE / ACCESSORIES DETAILS + PROP + HAND GESTURES
Include:
Title: CHARACTER REFERENCE SHEET
1. TOP INFO BLOCK
Name, Alias, Role, Age, Personality, Core Theme, Speech Accent
2. COLOR PALETTE
Place this in the top-right header area.
Show 6 to 8 minimal clean color swatches that match the subject’s style, wardrobe, world and mood. Don't add labels.
3. MAIN IDENTITY + SCALE SHEET
This must be the largest and most prominent section.
Show the subject only, with no prop, no bag, no handheld object, no extra item interaction.
Show:
Front, 3/4 View, Side, Back
Place the character views over subtle measurement guide lines, like a clean model sheet scale background with height marks.
Also include a small SILHOUETTE GUIDE inside this same section:
2 small clean silhouette thumbnails, Neutral Stance and Profile Silhouette.
Keep the silhouettes small and secondary, placed in a corner of the MAIN IDENTITY + SCALE SHEET.
The subject should appear in a clean neutral presentation focused only on identity, body shape, outfit, silhouette and proportions.
Add a few small notes for silhouette, posture, special traits, visual identity.
4. EXPRESSION PROGRESSION
Show exactly 8 panels of the same subject:
Neutral, Curious, Worried, Surprised, Afraid, Sad, Determined, Relieved
MICRO EXPRESSIONS
Show exactly 5 panels of the same subject:
subtle eye tension, slight smirk, lip tension, micro fear, controlled breath
These panels should function as both an expression sheet and a light emotional progression.
5. HEAD DETAIL SHEET
Show several close-up head references of the same subject from different angles:
3/4 Headshot, Side Headshot, Top Angle, Low Angle, Diagonal Angle
Keep facial structure, hairstyle, eyes, proportions and identity fully consistent.
6. NEUTRAL BASELINE
1 panel: fully relaxed, no emotion
7. POSTURE VARIATION
2–3 panels: relaxed, tense, confident
8. CLOSE-UP POSE
Show exactly 1 cinematic close-up pose of the same subject from chest-up or shoulder-up.
Use a natural expressive pose that best fits the subject’s personality and story tone.
This close-up should clearly show facial identity, hairstyle, expression, upper wardrobe detail and emotional presence.
9. WARDROBE / ACCESSORIES DETAILS
Show exactly 4 close-up callouts for important styling details such as hairsty
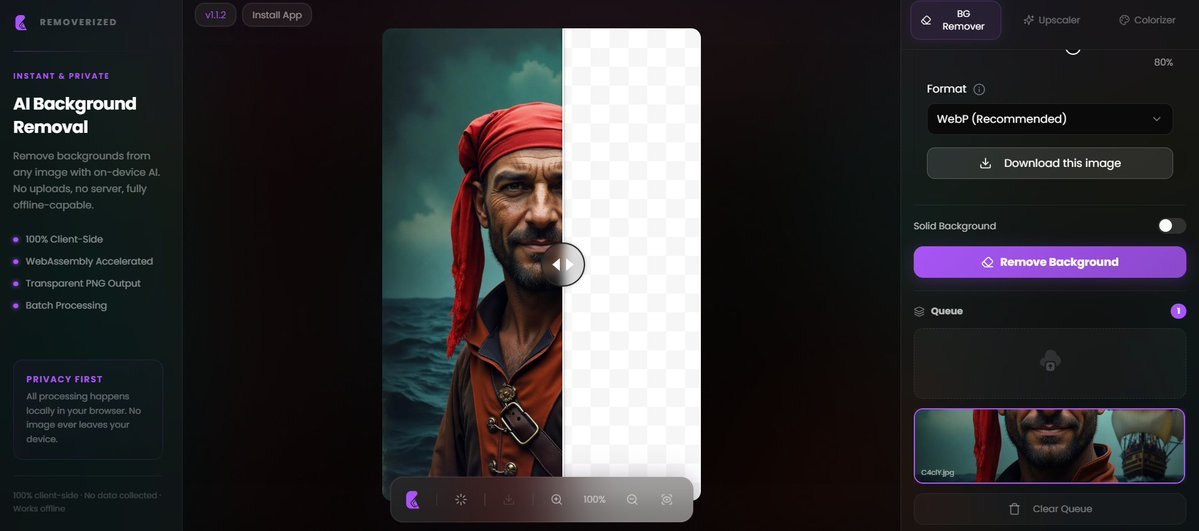
La guerra contra Photoshop y las herramientas de edición de pago acaba de ponerse seria.
Existe una IA llamada Removerized que hace esto:
• Elimina fondos
• Mejora resolución
• Procesa imágenes por lotes
• Corre directamente en tu navegador
Y aquí viene lo loco:
TODO ocurre en tu dispositivo.
- Sin subir archivos.
- Sin nube.
- Sin servidores.
- Sin entregar tus fotos a nadie.
Abres la web una vez…
y después funciona incluso offline.
La mayoría de herramientas de imagen con IA te cobran por usar sus GPUs.
Esta acaba de romper el modelo.
Gratis.
Privada.
Local.
Y muy probablemente esto es solo el principio.
Descarga el repositorio en el siguiente post 👇
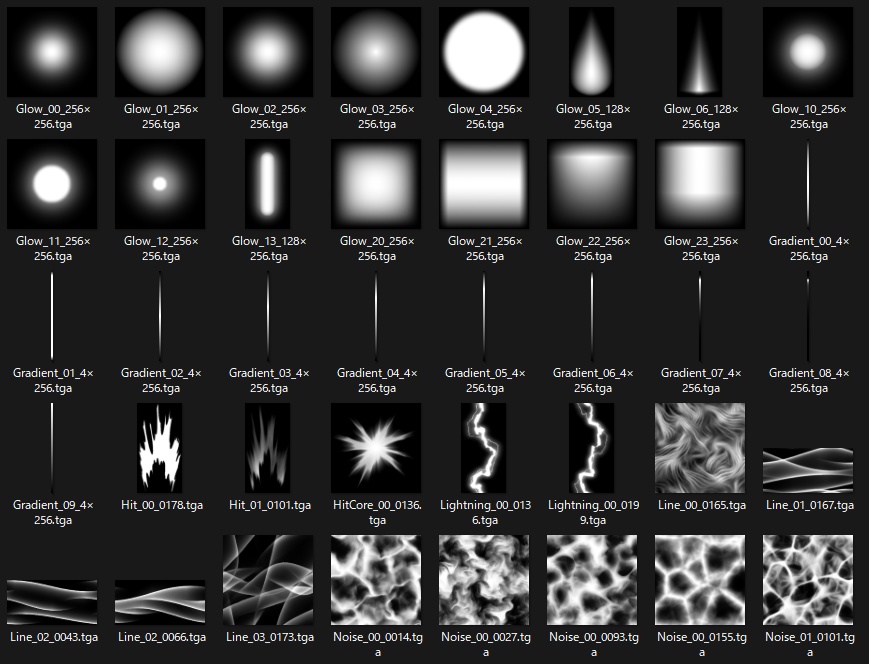
Introducing VDBView - as a personal project I made this free, lightweight tool for viewing VDB files. Give it a try and let me know what you think!
- real-time 3D viewport
- muti-grid support (individual controls for density, temperature, etc.)
- sequence caching for smooth playback / scrubbing
- basic lighting and shading, including blackbody emission
- screenshot / sequence rendering exports (PNG) with basic CLI support
- cross-section slicing
- velocity streamlines
- level set surface rendering
- standalone, easy install - download, unzip, double-click
Download link in comments below 🧵
#VDB #OpenVDB #VFX #Nvidia #DellProMax
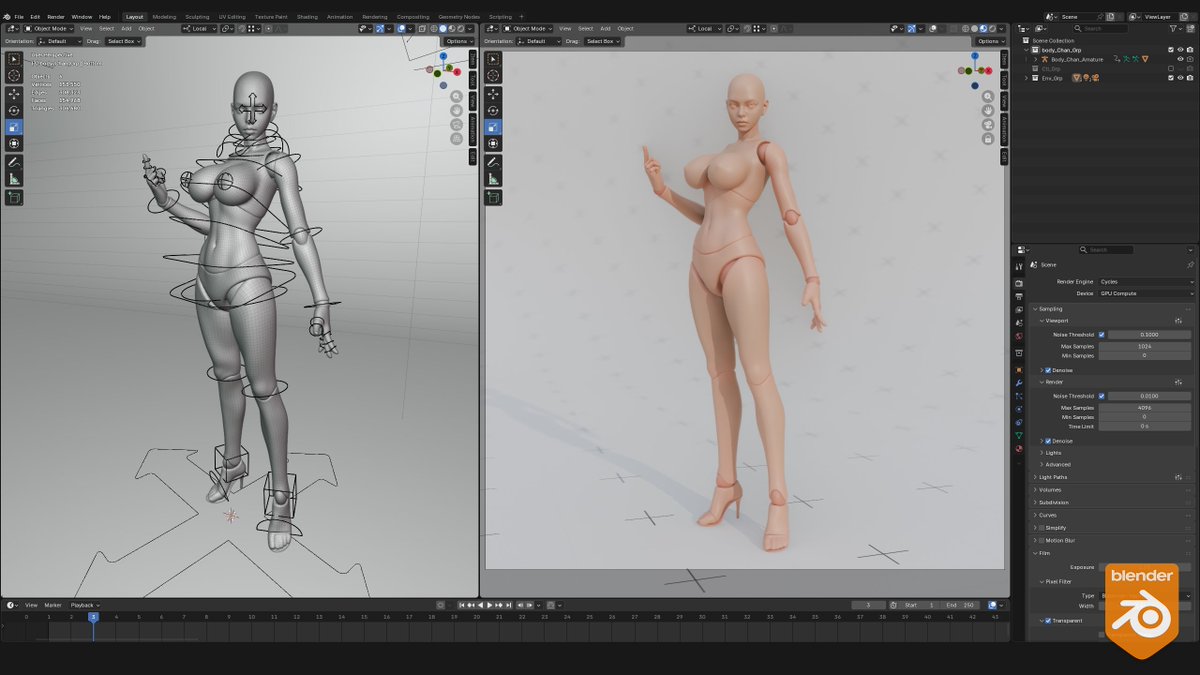
Blender Rig ➔ OpenPose ➔ Flawless AI Character. 🎯
Speed up workflows with the Body Chan Posable Figure. Optimized for ControlNet & AI pipelines.
BLEND & FBX. 👉 https://t.co/LQe5RVTz1t
#3DModel#OpenPose#AIArt#CGTrader
Over 12 months we took 12 poses and animated over 600 unique cycles from them. It's been a lot of fun watching these over the months and I appreciate everyone that joined me on this! Great work all! Challenge complete!
Check out all the animations here:
https://t.co/Z4TRNeWwWY
I noticed many beginners struggle with 2D FX because they focus too much on coloring instead of Silhouette. Here is my quick workflow breakdown for 4 elements.
Watch this full video on my YouTube channel:
https://t.co/bkxfFkO2Kx
#2DFX#AnimationTutorial#HandDrawnFX


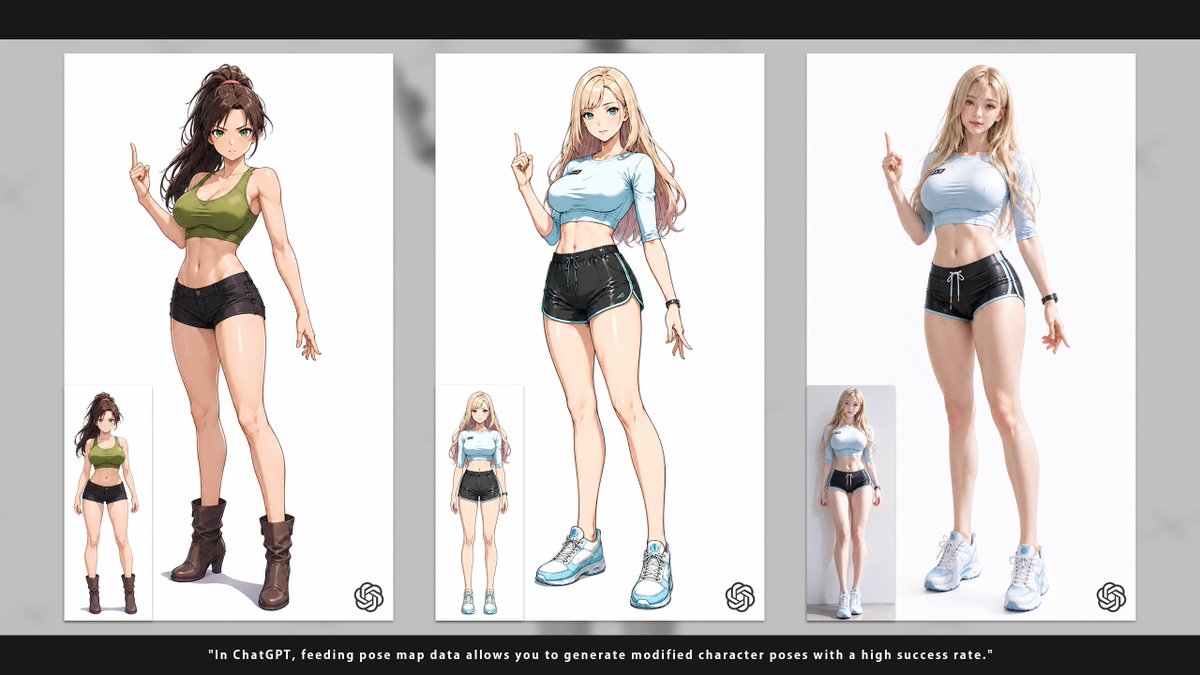


![itsPixieVerse's tweet photo. Amazing @aimikoda's Amazing Character sheet template ✨
Gpt Image 2 Prompt:
Create a single unified MASTER CHARACTER REFERENCE SHEET from these inputs:
[STYLE]: stylized 3d cel-shaded
[SUBJECT_DESCRIPTION]: A young, athletic female warrior from a secluded forest tribe. She wears rustic, hand-crafted tribal clothing: a layered tunic of woven natural fibers, leather wraps, decorative bone and bead jewelry, and soft earthen face paint. Her hair is styled in structured braids decorated with wooden beads. Her presence is confident and grounded, and she carries a hand-carved ceremonial wooden staff.
Create the board in a 4:3 horizontal layout. The board layout, background, typography and spacing must be clean, neutral, minimal and technical, on a pure white or clean off-white background. Use clear section titles, readable English labels, balanced spacing, no clutter, no watermark, no logo. Apply [STYLE] only to the character and visual elements, not to the board layout or UI. All text must be clearly readable at normal viewing size. Avoid tiny or dense text.
Infer all missing details from the subject description, including name, alias if suitable, role, age, personality, core theme, accent, wardrobe details, accessories, key prop if clearly relevant, visual notes and a fitting color palette.
Use this layout:
top row = left: title + horizontal info block, right: COLOR PALETTE
center = large MAIN IDENTITY + SCALE SHEET as the biggest section
right = EXPRESSION PROGRESSION + HEAD DETAIL SHEET + NEUTRAL BASELINE + POSTURE VARIATION + CLOSE-UP POSE
bottom = WARDROBE / ACCESSORIES DETAILS + PROP + HAND GESTURES
Include:
Title: CHARACTER REFERENCE SHEET
1. TOP INFO BLOCK
Name, Alias, Role, Age, Personality, Core Theme, Speech Accent
2. COLOR PALETTE
Place this in the top-right header area.
Show 6 to 8 minimal clean color swatches that match the subject’s style, wardrobe, world and mood. Don't add labels.
3. MAIN IDENTITY + SCALE SHEET
This must be the largest and most prominent section.
Show the subject only, with no prop, no bag, no handheld object, no extra item interaction.
Show:
Front, 3/4 View, Side, Back
Place the character views over subtle measurement guide lines, like a clean model sheet scale background with height marks.
Also include a small SILHOUETTE GUIDE inside this same section:
2 small clean silhouette thumbnails, Neutral Stance and Profile Silhouette.
Keep the silhouettes small and secondary, placed in a corner of the MAIN IDENTITY + SCALE SHEET.
The subject should appear in a clean neutral presentation focused only on identity, body shape, outfit, silhouette and proportions.
Add a few small notes for silhouette, posture, special traits, visual identity.
4. EXPRESSION PROGRESSION
Show exactly 8 panels of the same subject:
Neutral, Curious, Worried, Surprised, Afraid, Sad, Determined, Relieved
MICRO EXPRESSIONS
Show exactly 5 panels of the same subject:
subtle eye tension, slight smirk, lip tension, micro fear, controlled breath
These panels should function as both an expression sheet and a light emotional progression.
5. HEAD DETAIL SHEET
Show several close-up head references of the same subject from different angles:
3/4 Headshot, Side Headshot, Top Angle, Low Angle, Diagonal Angle
Keep facial structure, hairstyle, eyes, proportions and identity fully consistent.
6. NEUTRAL BASELINE
1 panel: fully relaxed, no emotion
7. POSTURE VARIATION
2–3 panels: relaxed, tense, confident
8. CLOSE-UP POSE
Show exactly 1 cinematic close-up pose of the same subject from chest-up or shoulder-up.
Use a natural expressive pose that best fits the subject’s personality and story tone.
This close-up should clearly show facial identity, hairstyle, expression, upper wardrobe detail and emotional presence.
9. WARDROBE / ACCESSORIES DETAILS
Show exactly 4 close-up callouts for important styling details such as hairsty](https://pbs.twimg.com/media/HJVnnoebIAIdtDF.jpg)