𝗥𝗮𝗯𝗯𝗶𝘁𝗠𝗤 vs 𝗞𝗮𝗳𝗸𝗮 vs 𝗔𝗰𝘁𝗶𝘃𝗲𝗠𝗤
Let's briefly look at how each of these stands out:
1️⃣ 𝗥𝗮𝗯𝗯𝗶𝘁𝗠𝗤
• 𝗟𝗮𝗻𝗴𝘂𝗮𝗴𝗲: Built on Erlang
• 𝗣𝗿𝗼𝘁𝗼𝗰𝗼𝗹𝘀: Supports a multitude of protocols, including AMQP, MQTT, and STOMP.
• 𝗘𝗮𝘀𝗲 𝗼𝗳 𝗨𝘀𝗲: Known for being developer-friendly.
• 𝗨𝘀𝗲-𝗰𝗮𝘀𝗲: Excellent for complex routing to multiple consumers.
2️⃣ 𝗞𝗮𝗳𝗸𝗮
• 𝗟𝗮𝗻𝗴𝘂𝗮𝗴𝗲: Built on Scala and Java
• 𝗣𝗿𝗼𝘁𝗼𝗰𝗼𝗹𝘀: Proprietary Kafka Protocol over TCP
• 𝗦𝗰𝗮𝗹𝗮𝗯𝗶𝗹𝗶𝘁𝘆: Highly scalable with the ability to handle huge volumes of data.
• 𝗨𝘀𝗲-𝗰𝗮𝘀𝗲: Perfect for real-time analytics and monitoring, data lakes, aggregating data from different sources.
3️⃣ 𝗔𝗰𝘁𝗶𝘃𝗲𝗠𝗤
• 𝗟𝗮𝗻𝗴𝘂𝗮𝗴𝗲: Built on Java
• 𝗣𝗿𝗼𝘁𝗼𝗰𝗼𝗹𝘀: Supports various protocols like AMQP, STOMP, MQTT, and more.
• 𝗙𝗹𝗲𝘅𝗶𝗯𝗶𝗹𝗶𝘁𝘆: Provides a lot of features and can be used in multiple configurations.
• 𝗨𝘀𝗲-𝗰𝗮𝘀𝗲: Often used in enterprise systems and excels in scenarios that require complex routing and transformations.
Credit: Brij kishore Pandey
How to design secure web API access for your website?
When we open web API access to users, we need to make sure each API call is authenticated. This means the user must be who they claim to be.
In this post, we explore two common ways:
1. Token based authentication
2. HMAC (Hash-based Message Authentication Code) authentication
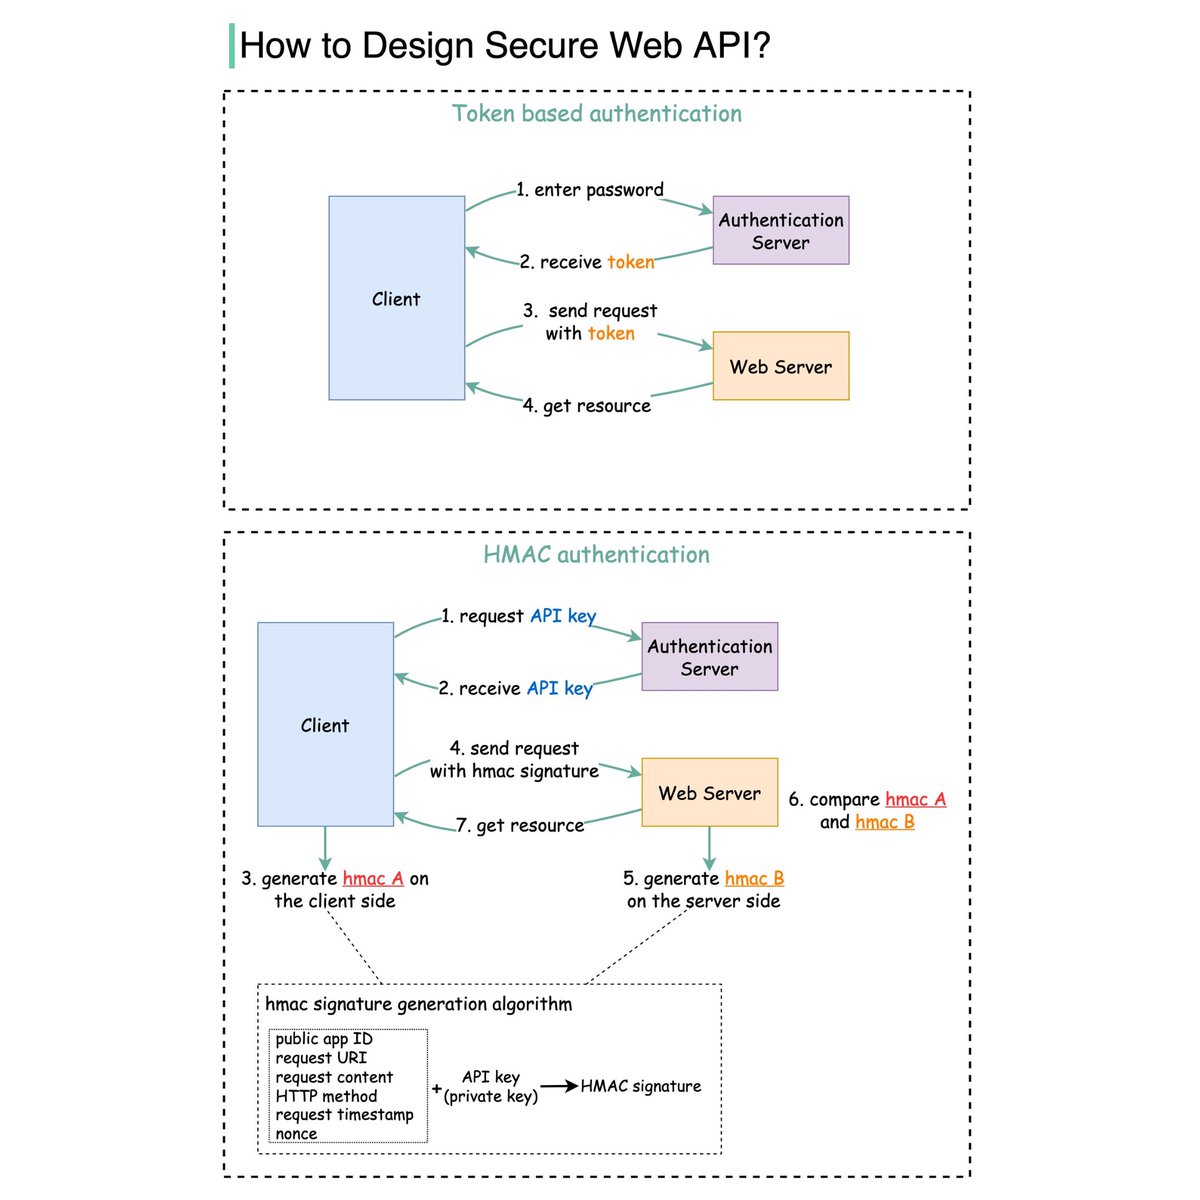
The diagram below illustrates how they work.
Token based
Step 1 - the user enters their password into the client, and the client sends the password to the Authentication Server.
Step 2 - the Authentication Server authenticates the credentials and generates a token with an expiry time.
Steps 3 and 4 - now the client can send requests to access server resources with the token in the HTTP header. This access is valid until the token expires.
HMAC based
This mechanism generates a Message Authentication Code (signature) by using a hash function (SHA256 or MD5).
Steps 1 and 2 - the server generates two keys, one is Public APP ID (public key) and the other one is API Key (private key).
Step 3 - we now generate a HMAC signature on the client side (hmac A). This signature is generated with a set of attributes listed in the diagram.
Step 4 - the client sends requests to access server resources with hmac A in the HTTP header.
Step 5 - the server receives the request which contains the request data and the authentication header. It extracts the necessary attributes from the request and uses the API key that’s stored on the server side to generate a signature (hmac B.)
Steps 6 and 7 - the server compares hmac A (generated on the client side) and hmac B (generated on the server side). If they are matched, the requested resource will be returned to the client.
–
Subscribe to our weekly newsletter to get a Free System Design PDF (158 pages): https://t.co/uc5M7CdXXC
Session, cookie, JWT, token, SSO, and OAuth 2.0 - what are they?
These terms are all related to user identity management. When you log into a website, you declare who you are (identification). Your identity is verified (authentication), and you are granted the necessary permissions (authorization). Many solutions have been proposed in the past, and the list keeps growing.
From simple to complex, here is my understanding of user identity management:
🔹WWW-Authenticate is the most basic method. You are asked for the username and password by the browser. As a result of the inability to control the login life cycle, it is seldom used today.
🔹A finer control over the login life cycle is session-cookie. The server maintains session storage, and the browser keeps the ID of the session. A cookie usually only works with browsers and is not mobile app friendly.
🔹To address the compatibility issue, the token can be used. The client sends the token to the server, and the server validates the token. The downside is that the token needs to be encrypted and decrypted, which may be time-consuming.
🔹JWT is a standard way of representing tokens. This information can be verified and trusted because it is digitally signed. Since JWT contains the signature, there is no need to save session information on the server side.
🔹By using SSO (single sign-on), you can sign on only once and log in to multiple websites. It uses CAS (central authentication service) to maintain cross-site information
🔹By using OAuth 2.0, you can authorize one website to access your information on another website
Over to you: nowadays, some website allows you to log in by scanning the QR code using your phone. Do you know how it works?
–
Subscribe to our weekly newsletter to get a Free System Design PDF (158 pages): https://t.co/FIzCeaWsZV