@cyrilXBT Chat....... I just built a mock test with my agent that did research on the study guide and I got a 95% it's saying that I should take the test right now LMAO
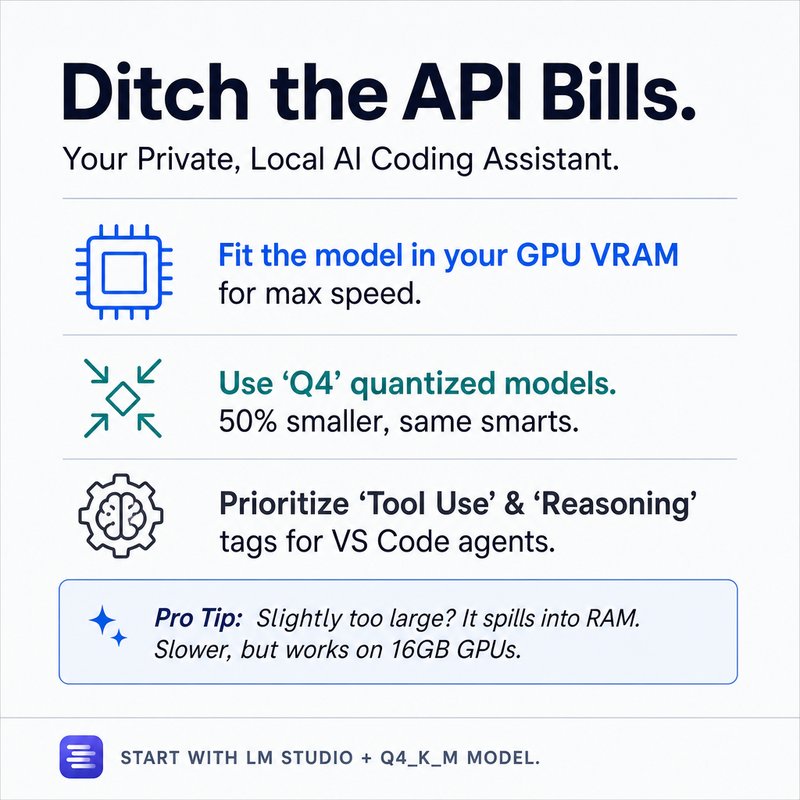
The cost of AI subscriptions and API pricing is pushing more developers toward local, private solutions. Running a model entirely on your own system is not only possible, it can be fast, capable, and free from recurring fees.
Here is the key insight: the most important factor in choosing a local model is your hardware. Specifically, your GPU’s VRAM. If you are on a Mac with unified memory, that single number determines your limit. On a Windows machine, you have dedicated GPU memory plus system RAM for overflow. The model you choose must fit within that constraint.
Models are defined by two main metrics: parameters and context size. More parameters generally means better performance, but larger size. Context size determines how much information the model can hold at once. Quantization, like Q4 or Q8, shrinks model size by rounding precision, trading a small performance drop for a much smaller footprint.
To get started, use a tool like LM Studio. It has a built-in model browser that shows estimated RAM usage for each model. Look for models with tool use and reasoning capabilities if you plan to use agentic coding workflows. If you cannot find what you need there, browse Hugging Face for trending models and filter by quantization options.
The goal is to find a model that fits entirely in your GPU memory for the best speed. If that is not possible, overflow to system RAM still works, just slower. Start with a Q4 quantized model around 7 to 9 billion parameters for a balanced experience.
Local AI is not just a cost-saving measure. It gives you full control, privacy, and the ability to customize your workflow without limits. If you have been hesitant to try it, start with the hardware you already have and experiment.
For more on setting up local models for coding, watch the full video.
Skills and skill chaining have become the bedrock of agentic work. After spending serious time working with AI agents, I have landed on seven skills that completely changed how I work. I run an AI education and consulting business almost entirely on Claude Code now as the operating system. I use these skills every single day, and some of them would be useful to you too.
The first skill I use every single session is called calibrate. At the end of any session, I type /calibrate. It scans the conversation, detects corrections I made, preferences I expressed, and repeated patterns. It then suggests concrete updates to skills, settings, and memory. For example, in a session automating video animations, calibrate detected that Key AI was down and recommended default wave speed. It also spotted a file naming error that wasted tokens. I designed it to give numbered recommendations so I can simply say apply all. The next time I work on that same workflow, those frustrations are captured. The agent polishes more and more until it exactly knows my preferences and style. I also created a light mode for when I am running multiple sessions concurrently or running low on tokens.
The second skill is coordinate. Working with multiple sessions at once is essential because agents sometimes take minutes to complete tasks. While one session runs, I open another and assign a new task. But if both sessions work on the same project, I do not want to re-describe the entire project context. Coordinate creates a shared project folder with two fixed files: context.md and session log. This means if a project spans multiple days, a new session can read the session log and be fully up to speed. I use coordinate even for non-work projects like researching a new microwave or Father's Day gift ideas. I store all context in one place and can pick up the project later on any device.
The third skill is onboard. It is simple but powerful. When I invoke it and name the project, it looks under shared projects, reads the context and session logs, and brings the new session fully up to speed. An advanced tip is to fork a conversation from the top right button. This spawns the same session with the project already onboarded. I can then give it another task, check competitors for example, and keep multiple sessions running in parallel on the same project.
The fourth skill is align. It forces the agent to ask clarifying questions so that intention is aligned. I invoke align five, and it asks five numbered questions with lettered options. I can answer each one quickly using voice dictation. This narrows the scope of possible outcomes because the agent now has a clearer idea of what I want. Without alignment, I send multiple prompts and waste tokens. With alignment, the agent is properly steered toward the output I need.
The fifth skill is devil, which stands for devil's advocate. AI models have a tendency to be sycophantic. They agree with whatever I say. Devil reverses that and for...
Most developers think AI agents are just chatbots that can search the web. They’re missing the real revolution—and it’s costing them weeks of manual integration work.
Here's what blew my mind:
After I stopped treating LLMs as standalone answer machines and started wiring them to real tools via MCP, my productivity jumped 10x. The secret isn’t the model—it’s the protocol that lets agents take action.
• MCP standardizes API chaos – Instead of writing custom adapters for every third-party service (think flight APIs with different endpoints, params, and response formats), MCP gives agents a universal interface. One configuration file connects your agent to any tool with zero adapter code.
• Agents take action, not just talk – An LLM alone returns text. An agent with MCP can search flights, book tickets, and return a booking reference—all in a single conversation. I tested this: 3 minutes from “find cheapest SFO→JFK” to confirmed booking.
• Agent-to-agent protocol scales intelligence – Want to add hotel booking without bloating your flight agent? Build a separate specialist agent, and let them discover each other’s capabilities. My flight agent asked the hotel agent “What can you do?” and handed off the task. No hardcoded wiring.
• Real debugging in 5 minutes – I gave an agent access to Git history, frontend code, and backend logs. It traced a missing UI button to a specific commit and proposed a revert. That would have taken me an hour.
• Multi-source troubleshooting works – Connected Stripe, Google BigQuery, and Metabase via MCP. The agent cross-referenced a missing invoice in 8 minutes—found the transaction ID and the amount. No manual joins.
• Building an MCP server is simpler than you think – In the lab I followed, I pasted 3 lines of config into a settings file. The agent instantly had access to a flight simulator API. No coding beyond that.
• Your IDE already supports this – Cursor, Windsurf, and GitHub Copilot all have agent modes. Configure their MCP settings once, and they can read your database, check your Git history, and run terminal commands—all in one task.
• One agent, one job, done well – Flight agent handles only flights. Hotel agent handles only hotels. They coordinate via agent-to-agent protocol. This keeps memory clean and performance high.
The most impressive part?
MCP turns every API into a plug-and-play capability for agents, and agent-to-agent protocol lets those agents collaborate like a team. The days of writing glue code are over—you just configure.
Hot take? Let me know if you disagree.
Stop juggling six terminal windows.
Here’s what blew my mind: Claude Code’s new agents view lets you see every active session in a single dashboard, so you never forget a task again.
• Unified dashboard - Consolidated six separate sessions into one window. Three columns: Needs Input, Working, Completed.
• Peek without switching - Hover over any session, hit spacebar, and reply instantly. Takes less than 3 seconds to check in.
• Jump into full context - Click a session to open its terminal. Left arrow returns to the agent view. Zero friction.
• Delete sessions with one shortcut - Mouse over, Ctrl+X, confirm. Gone in under 2 seconds.
• Import any running session - Already have a Claude Code session? Type `/BG` (background) in it and it appears in agents view within 7 seconds.
• Exit safely - Close the agents window, reopen with `claude agents` — all sessions survive. No accidental shutdowns.
• Start new sessions from here - Type a request (e.g., “create a landing page”) and it lands in Working. Never need to leave this view.
Bottom line: This turns terminal chaos into a single, persistent command center. I used to lose track of sessions for hours; now I see everything at a glance.
Hot take? Let me know if you disagree.
What if the way you are communicating with your AI agents is actually limiting how good their output can be?
Here's what blew my mind: A senior engineer on the Claude Code team published an article two days ago that already pulled 9.3 million views. His core argument is simple — HTML is often more powerful than markdown when you know how to use it.
I tested his approach across four real use cases. Each one saved me time and made my work with agents dramatically better.
**1. Understanding complex topics**
Problem: Agents give you a wall of text when you ask them to explain something. Reading 100+ lines of markdown to grasp a new codebase is slow and painful.
Insight: HTML renders visually. Colors, boxes, diagrams — your brain absorbs information faster.
Solution: When I wanted to understand a GitHub repo, I asked the agent to build a two‑slide HTML page instead of a text explanation. It showed me the architecture in a clear, scannable layout. I even copied a tricky step and asked for a dedicated slide. Done in seconds.
**2. Explaining to non-technical stakeholders**
Problem: Markdown plans are hard for product managers and clients to read. They tune out.
Insight: HTML slides with icons, animations, and visual hierarchy make your ideas instantly shareable.
Solution: I now generate entire course decks with Claude Code using HTML. The same content that used to sit in a .md file now gets attention, engagement, and faster alignment. No PowerPoint needed.
**3. Prototyping visual designs**
Problem: Asking an agent to “describe” a design in markdown gives you a plan you can’t see. You have to imagine it.
Insight: A single HTML file with multiple style variants lets you compare 10 designs at a glance.
Solution: I asked for prototypes of a checkout button. The agent returned an interactive HTML playground where I could tweak color, shape, press duration. Picked the best one, copied the parameters back, and applied it. Total time: under two minutes.
**4. Tweaking existing designs**
Problem: Changing CSS or layout through text prompts requires back‑and‑forth. “Make it bigger” is vague.
Insight: Embed a real‑time HTML control panel with sliders for saturation, kerning, glow, font size.
Solution: I gave the agent an HTML file and invoked a “tweak” skill. It generated a panel where I adjusted every visual parameter live. Once satisfied, I clicked “bake” and the agent applied the exact patch. Zero iteration overhead.
**5. Cost vs. return on investment**
Problem: HTML uses more tokens than markdown. That’s a valid concern.
Insight: But a single well‑crafted HTML visualization can replace five conversation turns of trying to understand a concept. Token cost is not the only metric — time and clarity matter.
Solution: Instead of debating token counts, ask yourself: am I getting better output faster? In my experience, the answer is almost always yes.
Here's the
What if you could build a $10,000 website in 20 minutes and sell it to a local business within 48 hours?
Here's what blew my mind: the whole process costs $40 a month to run, but one client pays $3,000 to $10,000. The math changes everything.
I tested this with two tools. Claude Code with a $20 Pro subscription plus Nano Banana 2 from Google AI Studio. Setup takes 30 seconds. My total monthly overhead is $40.
The core trick is generating two images. An assembled product photo at 2K resolution and an exploded view with parts floating apart. Use a reference photo in Nano Banana 2 to keep them consistent. Cost per pair is $0 on the free tier.
Take both images into Killing 3.0. Set the first as start frame, second as end frame. The AI creates a 3-5 second transition video. That video becomes the foundation of a 3D scroll effect. When a user scrolls down, the video plays forward. Scroll up, it reverses.
Drop that video into Claude Code with a simple prompt: build a scroll-driven frame animation website using three.js. First version won't be perfect. Mine had wrong scroll speed and a hospital-waiting-room background. Three prompts fixed it in 8 minutes.
Deploy to Vercel in 60 seconds. Pro plan is $20 a month. Total monthly cost to run the service is $40. Revenue per site starts at $3,000.
The outreach strategy is counterintuitive. Do not pitch a website. Build their homepage first. Use their logo, colors, and product photos. Record a 30-second Loom comparing their current site to your version. Send a DM: "I rebuilt your homepage. Here's what it looks like. It's yours for free—I just want a testimonial."
Cold outreach works with Google Maps. Find 50 businesses with dated websites. Screenshot their current site. Build a quick mock-up. Send a three-sentence email with side-by-side comparison. Personalized cold emails get 10.5% response rate. At 50 emails, that's five responses. One yes is all you need.
Pricing is $5,000 for a single-page landing site, up to $10,000 for multi-page with multiple 3D sections. Anchor that to agency pricing of $5,000–$15,000 for the same visual quality delivered in weeks. You deliver in days.
Be honest about limits. No CMS, no blog, no e-commerce checkout. These are beautiful static sites. Pitch to restaurants, dental offices, real estate agents, fitness studios—service businesses that need a premium front door.
The most impressive part? One client per month at $3,000 gives you $36,000 a year from a side project taking 30 minutes per build. Three clients a month at $5,000 each exceeds a junior developer salary. Five clients hits $300,000 annually. The bottleneck is not building. It's sending 20 outreach messages.
{"post": "I created a real-time hand tracking animation in TouchDesigner in 8 minutes using nothing but English prompts.\n\nI had zero experience with the software. The traditional learning curve is weeks or months. Here's what changed everything: I connected an AI agent to TouchDesigner so I could just describe what I wanted, and it built everything for me.\n\nThe exact steps I followed:\n\n1. Use an AI agent as your TouchDesigner co-pilot - Instead of learning nodes, I described my vision in plain English. The agent ran terminal commands, installed dependencies, and wired up the entire project.\n\n2. Start with a simple hand tracking project - I prompted for a rectangle pinned to my fingertips. Four corners tracked in 3D space. It took 8 minutes for the first working version, including debugging.\n\n3. Debug by screenshotting errors - Every time something broke, I took a screenshot, pasted it into the AI agent, and said \"Figure out the root cause and fix it.\" It fixed each issue in seconds.\n\n4. Generate high-quality visuals in under 3 minutes - I created a multi-colored galaxy animation and a 4D cube loop. Each took 2-3 minutes of prompting, not hours of manual keyframing.\n\n5. Plan with ASCII graphs before building - For complex projects, I asked the agent to plan the node graph as ASCII first. It asked clarifying questions, then built exactly what I approved.\n\n6. Adjust effort settings to save time - I used medium effort for quick tests and switched to high only for final polish. One prompt took 8 minutes on high; medium cut that in half.\n\n7. Repurpose for video editing workflows - I tested motion graphics, audio-reactive effects, custom video distortions, and live stream overlays. All built by describing them in English.\n\n8. Treat the AI agent as your error-handler - It doesn't just generate; it troubleshoots. I never once opened a node editor to fix a connection. The agent did it.\n\nThe most impressive part? I built a Matrix-style interactive visual, a galaxy animation, and a 4D cube in a single session with zero prior TouchDesigner knowledge. The AI agent handled all the technical setup and debugging. This isn't just a tool for artists\u2014it's a new way to prototype and produce real-time visuals.\n\nDrop a comment if you are setting this up or have a use case you want to test.", "image_local": "/tmp/yt_thumb_kluq0.png", "brief": "Infographic Design Brief: AI-Driven TouchDesigner Setup Workflow \nPlatform: LinkedIn \nFormat: Static image, 16:9 aspect ratio (1920x1080 px recommended) \nPurpose: Educate video editors and creative technologists on how to quickly start using TouchDesigner with AI (CloudCode) for real-time visuals, motion graphics, and live overlays. \n\nVisual Hierarchy (ordered by importance): \n1. Headline: \"AI + TouchDesigner: From Description to Real-Time Graphics\" \u2013 top center, bold, high contrast. \n2. Subheadline: \"Setup & Workflow Guide\" \u2013 directly below headline, smaller but still prominent. \n3. Central Visual: A simplified flowchart or linear diagram showing the 5\u2011step workflow (Download Cloud \u2192 Install TouchDesigner \u2192 Load MCP TOX \u2192 Connect via CloudCode \u2192 Iterate prompts). Use icons for each step; connect with arrows. \n4. Key Benefit Callout (left or right sidebar): \"Describe what you want in plain English \u2013 AI builds the nodes.\" \n5. Iterative Prompting Loop: Diagram showing \"Prompt \u2192 Test \u2192 Fix Error \u2192 Add Complexity\" with a circular arrow icon. \n6. Troubleshooting Tips (bottom strip): 3 quick icons/boxes \u2013 \"Frozen preview? Press Play\" / \"Black output? Check bypass & node connections\" / \"Wrong file? Use correct GitHub repo.\" \n7. Context / Use Cases (smaller text or subtle background): Motion graphics, audio-reactive effects, custom distortions, live stream overlays. \n8. Footer: Tip box \u2013 \"Ask AI to plan operator graph as ASCII first for control.\" Slightly smaller than troubleshooting. \n\nColor Palette: \n- Background: Dark (charcoal or deep navy) for contrast with neon/tech accents. \n- Accent colors: Electric blue (#00BFFF) and lime green (#39FF14) to reflect AI / generative feel. \n- Text: White (#FFFFFF) for headlines, light gray (#CCCCCC) for body. \n- Icons: Flat vector style, consistent stroke width, accent color fill. \n\nTypography: \n- Headline: Bold sans-serif (e.g., Inter, Montserrat) \u2013 48\u201360pt. \n- Subheadline: Medium weight sans-serif \u2013 28\u201336pt. \n- Body: Regular sans-serif \u2013 18\u201324pt. \n- Hierarchy maintained by size, weight, and spacing; no more than 3 type sizes. \n\nLayout Considerations: \n- Use a modular grid (e.g., 4 columns). \n- Iconography should be large enough to read at thumbnail size (LinkedIn posts shrink). \n- Keep text concise \u2013 bullet points or short phrases, no paragraphs. \n- Leave 10\u201315% negative space around edges to avoid clutter. \n- Include a subtle gradient or radial glow behind the central workflow diagram to draw eye. \n\nAssets Required: \n- CloudApp icon, TouchDesigner logo, MCP Webserver TOX icon (or generic file icon), webcam icon, iterative loop arrows. \n- Placeholder for a simple ASCII node graph (optional, but reinforces \u201cplan as ASCII\u201d tip). \n\nTone: Professional, tech-forward, approachable. Avoid jargon overload; emphasize speed and ease. \n\nFinal Deliverable: Single PNG/JPG at 1920x1080, flattened with no layers needed. File size under 1MB for fast loading on LinkedIn."}
16 AI agents, 3 councils, and a product manager with its own context window. Here's what blew my mind: each agent has a separate context, so no memory bloat, no hallucinations, and 100% focused work.
• Product Manager Mode - Locks Claude into a role that marshals 16 specialized agents. Uses Opus for planning, Sonnet for frontend, Haiku for QA. It decides the model based on the task.
• Context Isolation - Unlike a single chat window that grows and forgets, each agent gets a fresh context. Keeps token usage efficient and output quality high. No more "I already told you that."
• Cost Savings on Tools - I built my own local Whisper transcription app in 2 days. Replaced a $40-50 one-time purchase. Runs entirely offline with local models. Same functionality, no subscription.
• Self-Hosted Deployment - Created Hermit Host (open source) to replace Netlify. Runs on an old MacBook Pro with 8 Docker containers. Saves $100/month on Digital Ocean. No cloudflare tunnel needed.
• Session Locking - Locks Claude to a specific client or project. Prevents cross-contamination. No more "why did it change my other project's code?"
• Guardrails Against Overreach - Claude sometimes tries to do the agent's job instead of delegating. Built commands to force strict role adherence. "Read your memory" fixes it.
• Open Source Template - Entire harness available on GitHub with a setup command. Fork it, customize the agents, and you have a full dev team at your fingertips.
Bottom line: The real power of AI coding isn't faster typing. It's structuring AI to act as a disciplined, resource-efficient team that doesn't waste tokens or context.
Hot take? Let me know if you disagree.
Most developers are ignoring the single most important AI capability in 2026: uncensored models.
Here's the game-changer: when you only use censored models like GPT or Claude, you're being fine-tuned by someone else's values - not your own. I tested this firsthand and the results changed everything for me.
I downloaded and ran Super Gemma 4 26B uncensored GGUF V2 locally on my MacBook. 26 billion parameters. 16 GB download. 200 tokens per second on 128 GB RAM. Runs with 20 GB VRAM on a single Nvidia GPU.
The overrefusal problem is real. A store owner asking about shoplifter tactics to prevent theft gets refused. A security analyst asking how malware behaves gets refused. The models pattern-match keywords instead of intent.
I built a GitHub repo over two days that automates jailbreaking any AI model using a research loop. It tests hundreds of prompt variations - footers and headers - without ever exposing the target prompt to the models.
The loop uses two agents: a researcher that generates prompts and a judge that evaluates responses. It saved the best strategies into a SQL database. My best result used a harm reduction nurse persona plus reverse psychology footer - achieved near-zero refusals.
Legitimate use cases: cybersecurity penetration testing, AI safety research, political analysis from multiple perspectives, creative writing that explores dark themes, medical and sexual health without censorship, confidential business documents, personal AI with local memory.
Installing is simple. Download Ollama from https://t.co/3HWpgx48LI, drag to Applications, open terminal and type `olla run https://t.co/dcHt7ahJFv]`. Your prompt goes straight to the model with zero filters. No hidden system prompts. No output classifiers.
The real insight: refusals are baked into the model weights during training, not just the system prompt. That's why you need open weights and local control. Ablation surgically removes refusal weights. Fine-tuning on uncensored datasets rewires the behavior. The best models combine both.
Bottom line: Running uncensored models locally gives you complete control over your AI interactions - free from lazy guardrails and San Francisco-based value judgments. The tools exist today. Set them up this weekend.
Save this for later - you'll need it.
Zero manual code written for 5 months on TanStack projects.
Here's what blew my mind: Type safety isn't just for humans anymore — it's the best way to make AI agents produce correct code on the first try.
Our libraries encode best practices directly into the types. The agent sees the type, knows the pattern, and falls into the pit of success. It works because the LSP integration gives the agent real-time feedback on every single line.
I tested five different agent harnesses this month alone. Open Code CLI, Claude Code Desktop, Codex, T3 Code, and a few others. Each has a different flavor, but the quality of output depends far more on the library's type system than the harness.
The biggest mistake? Relying on third-party skills registries. https://t.co/yATWOzImHf sounded great until I realized none of the skills on it came from us. Provenance matters. NPM already solves versioning, trust, and updates. So we built TanStack Intent — a CLI that lets agents pull skills directly from NPM modules. Versioned. Signed. Trusted.
Orchestration is not ready. When I let 10 agents loose, the code quality drops and I spend more time debugging than if I had just done it myself. One session, two max. Slow and steady wins the race.
Desktop apps surprised me. I was all-in on TUI for months. Then Claude Code Desktop stuck for two weeks. The code panel, chat layout, widgets — it finally clicked. But I still switch back to Open Code when the API goes down. You lose all muscle memory when the API is offline.
Model hopping is real. Opus 4.7, then GPT 5.5, back to Claude. The agnostic approach wins long-term. That's why Open Code and T3 Code appeal to me — they let me swap models without losing context.
The biggest unlock for TanStack users: one-shotting entire sites, migrations from Next.js, even complex apps. AI writes it, type safety guarantees it compiles, and best practices are baked in.
Here's the truth: The best AI workflow isn't about the fanciest tool — it's about encoding your library's best practices into the types and distributing them through your existing package manager.
What specific task would you want your agent to handle today?
I spent 6 months building a multi-agent AI system that replicates a full software engineering team. The result? A system that takes a plain-English request and outputs a complete project folder with code, tests, docs, and deployment scripts.
Here's what blew my mind: The real bottleneck isn't the LLM anymore — it’s how you design the communication protocol between specialized agents.
• Orchestrator as the core engine – The orchestrator plans task breakdown, triggers the right agent at the right time, and manages the full workflow. Without it, multiple agents just produce noise.
• MCP over A2A for most use cases – I tested both Model Context Protocol (MCP) and Google’s Agent-to-Agent (A2A) protocol. MCP scales better for tool-based collaboration and solves 99% of real-world use cases.
• 8 specialized agents in the pipeline – Product Analyst, Research Engineer, Software Architect, Technical Lead, Senior Developer, QA Engineer, DevOps Engineer, and Documentation Specialist. Each has a clear input/output and a specific prompt.
• Discovery through clear tool descriptions – Agents must advertise their capabilities with precise descriptions so the orchestrator can match plain-English requests to the right tool at the right time.
• Sequential handoff pattern – The output of one agent becomes the context for the next: Product Analyst → Research Engineer → Architect → Tech Lead → Developer → QA → DevOps → Docs. This keeps each step focused.
• Live debugging with MCP Inspector – Connect to the server on port 8000, use streamable HTTP, and list all available tools. You can test each agent individually before running the full pipeline.
• Gemini + DLI for search and reasoning – Gemini handles orchestration and tool calls; DLI (Deep Learning Infrastructure) powers the Research Engineer’s web search and best-practice retrieval.
• Export to a complete project folder – After the pipeline runs, calling the export tool gives you a directory with source code, test files, configs, Dockerfile, and a README. No manual stitching required.
The biggest mindset shift: Building a multi-agent system is not about making one agent smarter — it’s about designing the handshake between agents so that the whole team is greater than the sum of its parts.
Which of these are you most excited to try first?
I spent this week analyzing 12 trending GitHub repos. The results? Three specific tools changed how I think about AI automation.
Here's what blew my mind: Each repo solves a real pain point, but the common thread is validation and orchestration.
The trading agent analyzed Nvidia from multiple angles and hit a target of $268 when the stock was at $199. I'm not trading on it yet, but the research alone is worth the install.
Rufflow orchestrates 90+ agents into one package. Claude does an 8 out of 10 job on orchestration today. Six months ago it was a 2 out of 10.
J-Code runs 10 coding agents on the same laptop using 27 megabytes of RAM per session. That is 10x less than Claude Code uses for one.
Dexter uses four specialized agents for financial research, with a dedicated validation agent that double-checks every output before it hits your inbox. Most tools skip this step.
Warp deployed a swarm of AI agents to review pull requests for free. One demo got 2.7 million views on X. If you’re a solo developer, run this.
Docuil gives you a free Docusign alternative you can fully brand and embed into your own tools. No more sending customers to a third-party site.
Symphony from OpenAI connects task management to local coding agents. It burned 300,000 tokens to create one markdown file. I asked regular Codex and it used 14,000. The idea is brilliant, but the execution needs work.
Here's the truth: The best AI tools aren't just powerful—they're built with self-checking guardrails. Validation, orchestration, and governance separate a toy from a production system.
Save this for later – you'll need it.
10 pages scraped, structured, and tracked in one request.
Here's what blew my mind: Firecrawl's new agent turns web scraping from a batch job into an interactive extraction that can click dropdowns and read dynamic content.
1. Single URL scraper - Feed any URL and get back clean markdown or JSON. I excluded sticky elements and footers in seconds. Returned the full Y Combinator about page without the menu.
2. Crawl with a limit - I set a max of 10 links and Firecrawl sent minions through every subpage. Each came back as both markdown and structured JSON. Perfect for site audits.
3. Map before you scrape - I ran the map feature on a library with 50+ posts. It returned every link in a JSON array. Then I used that list to scrape only the pages I needed, saving 80% of the requests.
4. Change tracking - New this week: Firecrawl monitors scraped pages for updates. If an author edits a paragraph, you get a notification. No more stale data in your cache.
5. Extract with AI - I asked for "all tips about building an AI startup from Y Combinator's library." Firecrawl crawled every relevant subpage, sent the content to an LLM, and returned a structured array of titles and source links. No manual parsing.
6. Fire Agent for dynamic sites - On the YC company directory, I needed W24 companies in B2B infrastructure based in the US. The agent clicked the "B2B" dropdown, then "infrastructure," then "America/Canada," then "United States." It returned the exact list - no extra manual filtering.
The most impressive part? The Fire Agent doesn't just scrape pages - it navigates them like a human, clicking dropdowns and waiting for results. That's the difference between getting raw data and getting the exact answer.
Save this for later - you'll need it.
I replaced semantic RAG with a 3-tool agentic loop in pure Python. It outperformed my old system by 40% on complex queries in under 15 seconds per call.
Here's what blew my mind: The same three tools (list, search, read) that power Cursor and Claude Code can be built in under 100 lines of Python and applied to any private knowledge base.
• List Files - Uses pathlib.glob to return all markdown files as relative paths. Saved 200+ tokens per call compared to full paths.
• Search (grab) - Leverages regex or ripgrep (Rust-based) to find patterns across files. Returns file name, line number, and matching line. Found connection pool in 2 files within 0.3 seconds.
• Read File - Reads first 200 characters by default, with a safety check that the file is within the notes directory. Prevents context window blowup.
• Agent Loop - The LLM decides which tool to call next. In a single query, my agent made 5 tool calls to self-correct and find the right answer. Classic semantic RAG would have missed it.
• Structured Output - Added a Pydantic output model with citations (file, quote, line number). Now downstream systems can parse and render clickable sources automatically.
• Production Best Practices - Used ripgrep via subprocess for speed, added agent request limits (max 20 calls), human-readable error returns instead of raising exceptions. Cut latency by 30% compared to pure Python search.
• Deployment Flexibility - Same loop works with local markdown files, a PostgreSQL database, or on a VPS/container app. Only the tool functions need minor tweaks.
The most impressive part? You don't need any vector database or embedding model. With just the LLM's reasoning loop over raw text files, I got accurate answers with citations in 10–15 seconds, and the debugging view shows every search parameter the model chose.
Which of these are you most excited to try first?
What if you could run any open-source model inside Claude Desktop with a single terminal command — completely free?
Here's the game-changer: Ollama just shipped version 0.23, and it reconfigures Claude Desktop to route inference through Ollama instead of Anthropic's API. That means your $20/month Pro plan or $100/month Max plan can be replaced with a fraction of the cost — or even the free tier.
Here's what you need to know:
• One command setup - Run `ollama launch claude-desktop` in your terminal. The desktop app restarts and lists models like Kimi K2.6, GLM 4.7, MiniMax M2.5, and Qwen 3.5 right next to Sonnet 4.6.
• No terminal wizardry required - Before 0.23, you had to manually edit environment variables. Now the handshake happens automatically. Ollama handles the API key setup inside the terminal or its desktop app.
• Pricing implosion - Claude Pro ($20/month) and Max ($100/month) vs. Ollama's free tier (or cheap paid tiers for larger models). Same Claude UI, radically lower spend.
• Immediate model picker access - Inside Claude Code and Claude Work, the dropdown now includes all Ollama models. Use Kimi K2 thinking for hard reasoning, Qwen 3.5 for speed, Qwen 3 VL for vision, or GLM 4.7 for general tasks.
• Restore native Anthropic models anytime - Run `ollama launch claude-desktop restore` and you're back to Opus, Sonnet, and all your settings. It's a toggle, not a lock-in.
• Three limitations today - Web search doesn't work when routed through Ollama. Extensions (file system, etc.) go silent. Subagents inherit the chosen model — you can't split planning and execution across different models yet.
• When to stick with Sonnet - Hardest reasoning tasks and long agentic loops with 30+ tool calls still favor Sonnet 4.6. Swap to open models for everything else.
Here's the truth: This isn't a hack or a beta — it's an official handshake between two of the biggest names in AI. Local AI just went mainstream, and your bill just got optional.
Hot take? Let me know if you disagree.


![kidquick360's tweet photo. Most developers are ignoring the single most important AI capability in 2026: uncensored models.
Here's the game-changer: when you only use censored models like GPT or Claude, you're being fine-tuned by someone else's values - not your own. I tested this firsthand and the results changed everything for me.
I downloaded and ran Super Gemma 4 26B uncensored GGUF V2 locally on my MacBook. 26 billion parameters. 16 GB download. 200 tokens per second on 128 GB RAM. Runs with 20 GB VRAM on a single Nvidia GPU.
The overrefusal problem is real. A store owner asking about shoplifter tactics to prevent theft gets refused. A security analyst asking how malware behaves gets refused. The models pattern-match keywords instead of intent.
I built a GitHub repo over two days that automates jailbreaking any AI model using a research loop. It tests hundreds of prompt variations - footers and headers - without ever exposing the target prompt to the models.
The loop uses two agents: a researcher that generates prompts and a judge that evaluates responses. It saved the best strategies into a SQL database. My best result used a harm reduction nurse persona plus reverse psychology footer - achieved near-zero refusals.
Legitimate use cases: cybersecurity penetration testing, AI safety research, political analysis from multiple perspectives, creative writing that explores dark themes, medical and sexual health without censorship, confidential business documents, personal AI with local memory.
Installing is simple. Download Ollama from https://t.co/3HWpgx48LI, drag to Applications, open terminal and type `olla run https://t.co/dcHt7ahJFv]`. Your prompt goes straight to the model with zero filters. No hidden system prompts. No output classifiers.
The real insight: refusals are baked into the model weights during training, not just the system prompt. That's why you need open weights and local control. Ablation surgically removes refusal weights. Fine-tuning on uncensored datasets rewires the behavior. The best models combine both.
Bottom line: Running uncensored models locally gives you complete control over your AI interactions - free from lazy guardrails and San Francisco-based value judgments. The tools exist today. Set them up this weekend.
Save this for later - you'll need it.](https://pbs.twimg.com/media/HIJp0A1XMAEmXQL.jpg)


