@brownbikephoto@DJIGlobal [x] Remove Color Abberation in Calibration tab, or in PS, select a rectangle of the horizon across image >copy> paste into mask of color balance layer>invert mask>tweak adj. Will begin appearing closer as blue is removed due to expectation of atmospheric hue shift w/ distance.
@jjeremycai I’ve just applied w/ Italic to offer my services as the remote retoucher, and must thank you for the reply email which Italic applicants receive. Immense; a huge breath of fresh air. Thank you for the additional effort precisely where you knew it would matter. 🏆
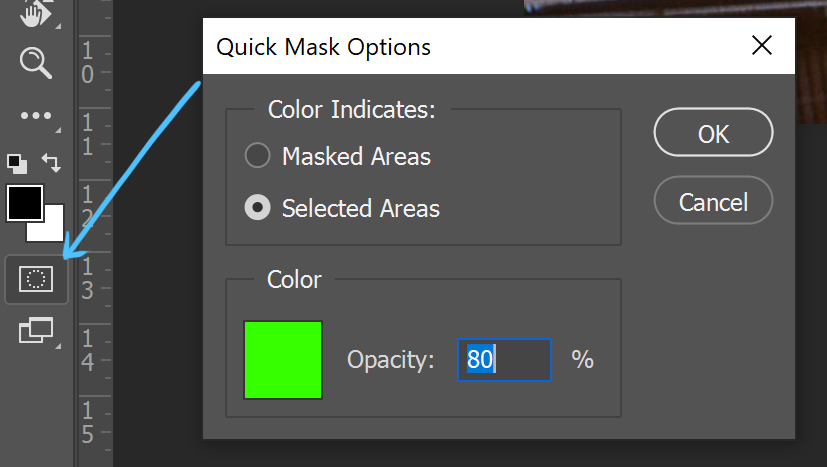
@defragmybrain@anthonydpaul Also, it’s likely selecting the whole screen because the setting “Color Indicates:” in the Quick Mask dialogue needs to be changed to “Selected Areas” and not “Masked Areas”.
@defragmybrain@anthonydpaul Note; I’d create an entire copy folder of your images, and label the folder “… _edited”, and work from that folder, leavung originals u touched. This way, the basic Save and close commands work (overwrite). Removing steps = removing time).
@defragmybrain@anthonydpaul I believe this error results from attempting to fill in an empty layer. The process I mentioned doesn’t require layers either. Every step adds time. Simply stroke on top of and apply content aware fill right on the locked background layer.
@defragmybrain@anthonydpaul This batch-process method would take a good bit of tweaking, but may save a lot of time & provide usable results depending on end usage. Let me know if I can be of any further assistance, or if you'd like to farm this out. We retouchers are accustomed to the grind :)
@defragmybrain@anthonydpaul The other option is as you stated; building an Action wherein Photoshop applies a custom built Dust&Scratches filter to all the photos in hopes of minimizing the appearance of the dust. The results of this will vary however, can be blotchy, & perhaps as dirty as the original.
@defragmybrain@anthonydpaul While still a manual/tedious process, I believe this will provide the best results, the quickest, with the most control. It also leverages shortcuts/setups to keep the process-steps minimal and rapid.
@defragmybrain@anthonydpaul You'll find once you build a brush size/stroke that works well to paint over the dust in one photo, that same brush will likely work consistently across all photos that have been scanned at the same size. (Example of the amount of stroke overlap.)
@defragmybrain@anthonydpaul Here is where the Quick Mask tool resides (double click for dialogue, Tool shortcut (Q) turns tool on/off. This allows to make pixel selections with brush strokes. I find neon green is more visible than the default red. For this process, be sure Color Indicates: Selected Areas.
@defragmybrain@anthonydpaul The hard-edged brush is important. With Photoshop's AI, I find it chokes a bit on soft edges with this process. A hard edge better defines for Photoshop the area you want Content-Aware to affect/work. The brush strokes should be a touch larger than the dust itself.
@defragmybrain@anthonydpaul My go-to process for edits like this utilizes Quick Mask (Q) to manually apply a hard-edged brush stroke to all dust you wish to remove , and then a Content Aware Fill (Shift+F5 / Fill Mode: Content Aware) to allow Photoshop to essentially AI illustrate out the dust.
@defragmybrain@anthonydpaul I'm sorry about the DMs being closed, thank you for notifying me. Regarding the photos, that is a formidable challenge. While it is likely to be a manual process as you mentioned, there are ways to make it less tedious, possibly w/ better results.