How does Docker work?
The diagram below shows the architecture of Docker and how it works when we run “docker build”, “docker pull” and “docker run”.
There are 3 components in Docker architecture:
🔹 Docker client
The docker client talks to the Docker daemon.
🔹 Docker host
The Docker daemon listens for Docker API requests and manages Docker objects such as images, containers, networks, and volumes.
🔹 Docker registry
A Docker registry stores Docker images. Docker Hub is a public registry that anyone can use.
Let’s take the “docker run” command as an example.
1. Docker pulls the image from the registry.
2. Docker creates a new container.
3. Docker allocates a read-write filesystem to the container.
4. Docker creates a network interface to connect the container to the default network.
5. Docker starts the container.
–
Subscribe to our weekly newsletter to get a Free System Design PDF (158 pages): https://t.co/uc5M7CdXXC
I'm 18.
I’m obsessed with learning how to learn.
So, I spent 200+ hours studying how geniuses, prodigies, and high performers master their disciplines.
Here's what I found on how to master anything faster:
I asked this question to 11 candidates and only 3 managed to answer:
“What’s the difference between Session-based authentication and JWTs?”
The rest of the candidates just dropped some basic keywords and got things mixed up.
But why did I ask this question?
Because the candidates mentioned about implementing Sessions and JWTs in their projects.
So it was a good follow-up question to judge their credibility.
In this case, the interviewer isn’t usually expecting a perfect answer unless it’s not an API Security Engineer opening or something like that.
But a basic understanding of these concepts can boost your chances.
Here are a few important points that can help you answer this question:
[1] Session-Based Authentication
In this approach, you store the session information in a database or session store and give a session ID to the user.
For the user, it’s similar to just getting the Ticket ID of their flight. All other details are stored in the airline’s database.
Here’s how it works:
- The user makes a login request and the frontend app sends the request to the backend server
- The backend creates a session using a secret key and stores the data in session storage
- Then, the server sends a cookie back to the client with the unique session ID
- The user makes a new request to view another page and the browser sends the session id along with it.
- The server verifies the user using this ID.
[2] JWT-based Authentication
In the JWT-based approach, you don’t store the session information in the session store.
The entire information is available within the token.
It’s like getting the flight ticket along with all the details available on the ticket but encrypted.
Here’s how it works:
- The user makes a login request and it goes to the backend server
- The backend server verifies the credentials and issues a JWT. The JWT is signed using a private key. No session storage is involved.
- The JWT is passed to the browser using a cookie.
For every subsequent request, the browser sends the cookie with the JWT
- The server verifies the JWT using the secret private key and extracts the user info.
[3] What’s the better approach - Session or JWTs?
In a general sense, you can give the favorite answer of every software engineer.
“It depends”
JWTs offer some cool benefits when compared to sessions such as:
- No separate storage
- Easier to scale the client and server
But JWTs also have some disadvantages:
- Invalidating a JWT is not easy. With session, you can simply delete them from the session store.
- The data in the JWT can become stale
- The JWTs aren’t exactly small when it comes to size
Ultimately, the choice depends on the security requirements of your application.
If you can confidently explain this much, you are already ahead of many candidates.
Of course, there can be several additional follow-up questions.
👉 So - have you used sessions or JWTs in your project? (Not an interview question)
And what other points do you think can be added to boost a candidate’s chances?
Git Merge vs. Rebase vs. Squash Commit
What are the differences and when should you use each? As I explain in more detail in the video, there are some key distinctions.
Git Merge
This creates a new commit in the target branch. The new commit ties the histories of both main and feature branches together.
Git merge is non-destructive - it introduces a new commit without altering existing ones.
Git Rebase
Rebase transplants commits to the tip of another branch. It creates new commits for each one moved over.
The benefit is linear history. But be cautious with shared branches to avoid confusing collaborators.
Squash Commit
Squashing condenses multiple commits into one, streamlining the commit history.
Watch the video to see when to use merge vs rebase vs squash when incorporating changes between main and feature branches.
–
Subscribe to our weekly newsletter to get a Free System Design PDF (158 pages): https://t.co/kNfv0DVDdf
My recommended materials for cracking your next technical interview
Coding
- Leetcode
- Cracking the coding interview book
- Neetcode
System Design Interview
- System Design Interview Book 1, 2 by Alex Xu, Sahn Lam
- Grokking the system design by Design Guru
- Design Data-intensive Application book
Behavioral interview
- Tech Interview Handbook (Github repo)
- A Life Engineered (YT)
- STAR method (general method)
OOD Interview
- Interviewready
- OOD by educative
- Head First Design Patterns Book
Mock interviews
- Interviewingio
- Pramp
- Meetapro
Apply for Jobs
- Linkedin
- Monster
- Indeed
Over to you: What is your favorite interview prep material?
–
Subscribe to our weekly newsletter to get a Free System Design PDF (158 pages): https://t.co/uc5M7CdXXC
How do companies ship code to production?
The diagram below illustrates the typical workflow.
Step 1: The process starts with a product owner creating user stories based on requirements.
Step 2: The dev team picks up the user stories from the backlog and puts them into a sprint for a two-week dev cycle.
Step 3: The developers commit source code into the code repository Git.
Step 4: A build is triggered in Jenkins. The source code must pass unit tests, code coverage threshold, and gates in SonarQube.
Step 5: Once the build is successful, the build is stored in artifactory. Then the build is deployed into the dev environment.
Step 6: There might be multiple dev teams working on different features. The features need to be tested independently, so they are deployed to QA1 and QA2.
Step 7: The QA team picks up the new QA environments and performs QA testing, regression testing, and performance testing.
Steps 8: Once the QA builds pass the QA team’s verification, they are deployed to the UAT environment.
Step 9: If the UAT testing is successful, the builds become release candidates and will be deployed to the production environment on schedule.
Step 10: SRE (Site Reliability Engineering) team is responsible for prod monitoring.
--
Subscribe to our weekly newsletter to get a Free System Design PDF (158 pages): https://t.co/uc5M7CdXXC
Session, Cookie, JWT, Token, SSO, and OAuth 2.0 Explained in One Diagram
When you login to a website, your identity needs to be managed. Here is how different solutions work:
- Session - The server stores your identity and gives the browser a session ID cookie. This allows the server to track login state. But cookies don't work well across devices.
- Token - Your identity is encoded into a token sent to the browser. The browser sends this token on future requests for authentication. No server session storage is required. But tokens need encryption/decryption.
- JWT - JSON Web Tokens standardize identity tokens using digital signatures for trust. The signature is contained in the token so no server session is needed.
- SSO - Single Sign On uses a central authentication service. This allows a single login to work across multiple sites.
- OAuth2 - Allows limited access to your data on one site by another site, without giving away passwords.
- QR Code - Encodes a random token into a QR code for mobile login. Scanning the code logs you in without typing a password.
Over to you: QR code logins are gaining popularity. Do you know how it works?
–
Subscribe to our weekly newsletter to get a Free System Design PDF (158 pages): https://t.co/uc5M7CdXXC
How do companies ship code to production? The method to download the high-resolution PDF is available at the end.
The diagram below illustrates the typical workflow.
Step 1: The process starts with a product owner creating user stories based on requirements.
Step 2: The dev team picks up the user stories from the backlog and puts them into a sprint for a two-week dev cycle.
Step 3: The developers commit source code into the code repository Git.
Step 4: A build is triggered in Jenkins. The source code must pass unit tests, code coverage threshold, and gates in SonarQube.
Step 5: Once the build is successful, the build is stored in artifactory. Then the build is deployed into the dev environment.
Step 6: There might be multiple dev teams working on different features. The features need to be tested independently, so they are deployed to QA1 and QA2.
Step 7: The QA team picks up the new QA environments and performs QA testing, regression testing, and performance testing.
Steps 8: Once the QA builds pass the QA team’s verification, they are deployed to the UAT environment, where the QA team, dev team, and even the product owner perform UAT testing.
Step 9: If the UAT testing is successful, the builds become release candidates and will be deployed to the production environment on schedule. Here we might not want to deploy to all the users in one go to mitigate the change risks, so some techniques like feature toggle, canary deployment can be used.
Step 10: SRE (Site Reliability Engineering) team is responsible for prod monitoring. They leverage a bunch of log-analyzing tools and process-tracing tools like ELK stack, Prometheus, and Skywalking. They report production issues to QA and dev teams, and teams need to fix them based on defined priority.
–
Subscribe to our newsletter to download the 𝐡𝐢𝐠𝐡-𝐫𝐞𝐬𝐨𝐥𝐮𝐭𝐢𝐨𝐧 𝐏𝐃𝐅. After signing up, find the download link on the success page: https://t.co/0v29X0VLNt
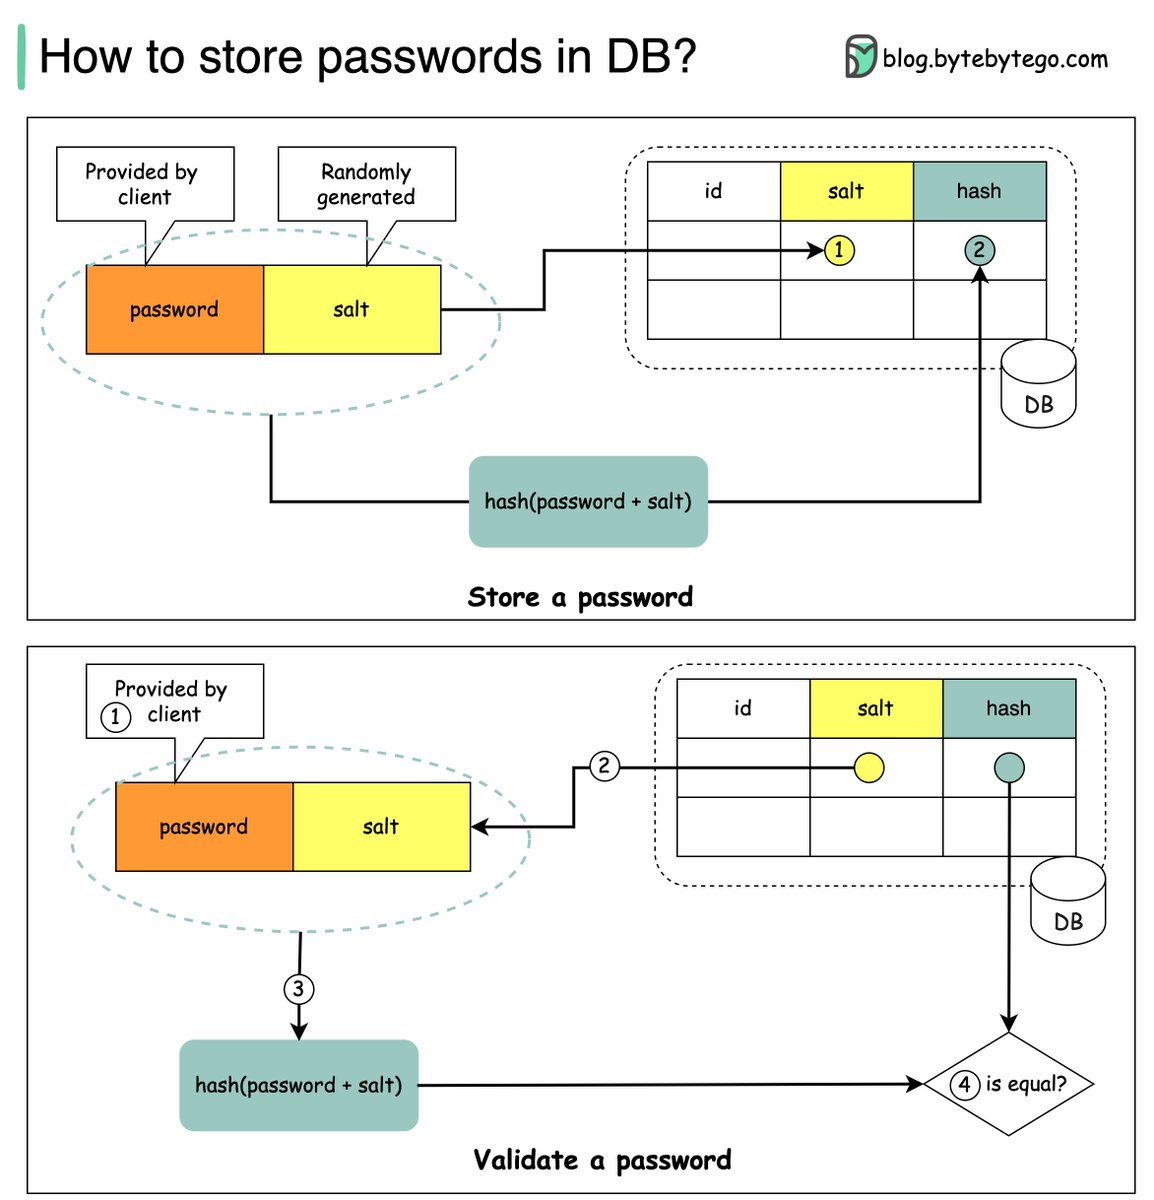
How to store passwords safely in the database and how to validate a password? Let’s take a look.
𝐓𝐡𝐢𝐧𝐠𝐬 𝐍𝐎𝐓 𝐭𝐨 𝐝𝐨
🔹 Storing passwords in plain text is not a good idea because anyone with internal access can see them.
🔹 Storing password hashes directly is not sufficient because it is pruned to precomputation attacks, such as rainbow tables.
🔹 To mitigate precomputation attacks, we salt the passwords.
𝐖𝐡𝐚𝐭 𝐢𝐬 𝐬𝐚𝐥𝐭?
According to OWASP guidelines, “a salt is a unique, randomly generated string that is added to each password as part of the hashing process”.
𝐇𝐨𝐰 𝐭𝐨 𝐬𝐭𝐨𝐫𝐞 𝐚 𝐩𝐚𝐬𝐬𝐰𝐨𝐫𝐝 𝐚𝐧𝐝 𝐬𝐚𝐥𝐭?
1️ A salt is not meant to be secret and it can be stored in plain text in the database. It is used to ensure the hash result is unique to each password.
2️ The password can be stored in the database using the following format: 𝘩𝘢𝘴𝘩( 𝘱𝘢𝘴𝘴𝘸𝘰𝘳𝘥 + 𝘴𝘢𝘭𝘵).
𝐇𝐨𝐰 𝐭𝐨 𝐯𝐚𝐥𝐢𝐝𝐚𝐭𝐞 𝐚 𝐩𝐚𝐬𝐬𝐰𝐨𝐫𝐝?
To validate a password, it can go through the following process:
1️ A client enters the password.
2️ The system fetches the corresponding salt from the database.
3️ The system appends the salt to the password and hashes it. Let’s call the hashed value H1.
4️ The system compares H1 and H2, where H2 is the hash stored in the database. If they are the same, the password is valid.
Over to you: what other mechanisms can we use to ensure password safety?
—
Subscribe to our weekly newsletter to get a Free System Design PDF (158 pages): https://t.co/uc5M7CdXXC
CSS Tip! ✨
You can create icon sprite animations using the steps() animation-timing function 🤙
You could use this to create little icon button animations, etc. 😎
But how do you do it? Like this 👇
button img {
object-fit: cover;
object-position: 0 0;
}
The image is a sprite strip of the frames in the animation. To animate the frames, you do something like this:
[aria-pressed=true] img {
animation: play 0.5s steps(20) forwards;
}
@ keyframes play {
to {
object-position: 100% 0;
}
}
We are toggling aria-pressed in our scripts to show a pressed state and we can then fire the animation to play our sprite 🎉
Check out the video that breaks things down a little bit
@CodePen link blow! 👇
Array<T> vs T[] - which should you use in TypeScript?
I think the difference is close enough to be subjective - but here's everything I know:
The two syntaxes are functionally identical - you can use them interchangeably.
keyof T[] is a massive gotcha. Instead of it resulting in ('id' | 'name')[], it does a keyof on 'person[]'.
This instinctively makes me lean towards Array<T>.
TypeScript's errors and hovers always use the T[] syntax.
This means that using T[] feels more natural, is more supported in the docs, and leads to less cognitive load for beginners.
What would I recommend? The decision is too close to be objective about. Would I reject a PR containing one or the other? No.
But if pushed, I would choose T[] - it just feels natural.


![ProgressiveCod2's tweet photo. I asked this question to 11 candidates and only 3 managed to answer:
“What’s the difference between Session-based authentication and JWTs?”
The rest of the candidates just dropped some basic keywords and got things mixed up.
But why did I ask this question?
Because the candidates mentioned about implementing Sessions and JWTs in their projects.
So it was a good follow-up question to judge their credibility.
In this case, the interviewer isn’t usually expecting a perfect answer unless it’s not an API Security Engineer opening or something like that.
But a basic understanding of these concepts can boost your chances.
Here are a few important points that can help you answer this question:
[1] Session-Based Authentication
In this approach, you store the session information in a database or session store and give a session ID to the user.
For the user, it’s similar to just getting the Ticket ID of their flight. All other details are stored in the airline’s database.
Here’s how it works:
- The user makes a login request and the frontend app sends the request to the backend server
- The backend creates a session using a secret key and stores the data in session storage
- Then, the server sends a cookie back to the client with the unique session ID
- The user makes a new request to view another page and the browser sends the session id along with it.
- The server verifies the user using this ID.
[2] JWT-based Authentication
In the JWT-based approach, you don’t store the session information in the session store.
The entire information is available within the token.
It’s like getting the flight ticket along with all the details available on the ticket but encrypted.
Here’s how it works:
- The user makes a login request and it goes to the backend server
- The backend server verifies the credentials and issues a JWT. The JWT is signed using a private key. No session storage is involved.
- The JWT is passed to the browser using a cookie.
For every subsequent request, the browser sends the cookie with the JWT
- The server verifies the JWT using the secret private key and extracts the user info.
[3] What’s the better approach - Session or JWTs?
In a general sense, you can give the favorite answer of every software engineer.
“It depends”
JWTs offer some cool benefits when compared to sessions such as:
- No separate storage
- Easier to scale the client and server
But JWTs also have some disadvantages:
- Invalidating a JWT is not easy. With session, you can simply delete them from the session store.
- The data in the JWT can become stale
- The JWTs aren’t exactly small when it comes to size
Ultimately, the choice depends on the security requirements of your application.
If you can confidently explain this much, you are already ahead of many candidates.
Of course, there can be several additional follow-up questions.
👉 So - have you used sessions or JWTs in your project? (Not an interview question)
And what other points do you think can be added to boost a candidate’s chances?](https://pbs.twimg.com/media/GEG4jr4a4AADa1Y.jpg)


![mattpocockuk's tweet photo. Array<T> vs T[] - which should you use in TypeScript?
I think the difference is close enough to be subjective - but here's everything I know:
The two syntaxes are functionally identical - you can use them interchangeably.
keyof T[] is a massive gotcha. Instead of it resulting in ('id' | 'name')[], it does a keyof on 'person[]'.
This instinctively makes me lean towards Array<T>.
TypeScript's errors and hovers always use the T[] syntax.
This means that using T[] feels more natural, is more supported in the docs, and leads to less cognitive load for beginners.
What would I recommend? The decision is too close to be objective about. Would I reject a PR containing one or the other? No.
But if pushed, I would choose T[] - it just feels natural.](https://pbs.twimg.com/media/F4IdvllXUAED3KY.png)
![mattpocockuk's tweet photo. Array<T> vs T[] - which should you use in TypeScript?
I think the difference is close enough to be subjective - but here's everything I know:
The two syntaxes are functionally identical - you can use them interchangeably.
keyof T[] is a massive gotcha. Instead of it resulting in ('id' | 'name')[], it does a keyof on 'person[]'.
This instinctively makes me lean towards Array<T>.
TypeScript's errors and hovers always use the T[] syntax.
This means that using T[] feels more natural, is more supported in the docs, and leads to less cognitive load for beginners.
What would I recommend? The decision is too close to be objective about. Would I reject a PR containing one or the other? No.
But if pushed, I would choose T[] - it just feels natural.](https://pbs.twimg.com/media/F4IdWRVXAAAroo3.png)






![ProgressiveCod2's tweet photo. I asked this question to 11 candidates and only 3 managed to answer:
“What’s the difference between Session-based authentication and JWTs?”
The rest of the candidates just dropped some basic keywords and got things mixed up.
But why did I ask this question?
Because the candidates mentioned about implementing Sessions and JWTs in their projects.
So it was a good follow-up question to judge their credibility.
In this case, the interviewer isn’t usually expecting a perfect answer unless it’s not an API Security Engineer opening or something like that.
But a basic understanding of these concepts can boost your chances.
Here are a few important points that can help you answer this question:
[1] Session-Based Authentication
In this approach, you store the session information in a database or session store and give a session ID to the user.
For the user, it’s similar to just getting the Ticket ID of their flight. All other details are stored in the airline’s database.
Here’s how it works:
- The user makes a login request and the frontend app sends the request to the backend server
- The backend creates a session using a secret key and stores the data in session storage
- Then, the server sends a cookie back to the client with the unique session ID
- The user makes a new request to view another page and the browser sends the session id along with it.
- The server verifies the user using this ID.
[2] JWT-based Authentication
In the JWT-based approach, you don’t store the session information in the session store.
The entire information is available within the token.
It’s like getting the flight ticket along with all the details available on the ticket but encrypted.
Here’s how it works:
- The user makes a login request and it goes to the backend server
- The backend server verifies the credentials and issues a JWT. The JWT is signed using a private key. No session storage is involved.
- The JWT is passed to the browser using a cookie.
For every subsequent request, the browser sends the cookie with the JWT
- The server verifies the JWT using the secret private key and extracts the user info.
[3] What’s the better approach - Session or JWTs?
In a general sense, you can give the favorite answer of every software engineer.
“It depends”
JWTs offer some cool benefits when compared to sessions such as:
- No separate storage
- Easier to scale the client and server
But JWTs also have some disadvantages:
- Invalidating a JWT is not easy. With session, you can simply delete them from the session store.
- The data in the JWT can become stale
- The JWTs aren’t exactly small when it comes to size
Ultimately, the choice depends on the security requirements of your application.
If you can confidently explain this much, you are already ahead of many candidates.
Of course, there can be several additional follow-up questions.
👉 So - have you used sessions or JWTs in your project? (Not an interview question)
And what other points do you think can be added to boost a candidate’s chances?](https://pbs.twimg.com/media/GEG4pUIa4AAGCuA.jpg)


![mattpocockuk's tweet photo. Array<T> vs T[] - which should you use in TypeScript?
I think the difference is close enough to be subjective - but here's everything I know:
The two syntaxes are functionally identical - you can use them interchangeably.
keyof T[] is a massive gotcha. Instead of it resulting in ('id' | 'name')[], it does a keyof on 'person[]'.
This instinctively makes me lean towards Array<T>.
TypeScript's errors and hovers always use the T[] syntax.
This means that using T[] feels more natural, is more supported in the docs, and leads to less cognitive load for beginners.
What would I recommend? The decision is too close to be objective about. Would I reject a PR containing one or the other? No.
But if pushed, I would choose T[] - it just feels natural.](https://pbs.twimg.com/media/F4IefaoWUAAJamB.png)


