Day 6 (Part 2) – Understanding Autoscaling
Today I learned an important infrastructure lesson:
A self-hosted application running on a single machine doesn't magically scale.
PaaS platforms can handle autoscaling automatically, but that convenience comes at a cost.
Then I explored AWS solutions:
🔹 Auto Scaling Groups (ASG)
>Add instances when CPU utilization exceeds a threshold (e.g., 50%)
>Remove instances when utilization drops (e.g., 10%)
While powerful, ASGs require additional configuration and management.
A simpler approach:
🔹AWS Elastic Beanstalk
Upload your source code and AWS manages much of the infrastructure for you, including scaling-related components.
Key concepts I explored:
• Environment configuration
• IAM Roles
• Instances
• Infrastructure management
Day 6 of my DevOps course
Today was all about deployment and infrastructure.
> Migrated a React.js app to Next.js
> Deployed the Next.js app on Cloudflare
> Deployed the same app on an AWS VM
> Self-hosted it on my own home machine (yes, from my own network)
Then connected everything using Cloudflare Tunnel:
🔹 Created and connected a tunnel
🔹 Added custom domains and subdomains
🔹 Let Cloudflare handle the routing and networking
Every day I'm understanding a little more of what happens behind the scenes when we type a URL into a browser.
Day 5 of the DevOps course.
Deployed my React application using Object Storage + CDN using bunny!
✅ Built the app with React
✅ Uploaded static assets(i.e dist folder) to an Object Store
✅ Connected a CDN for global content delivery
✅ Added a custom domain with SSL
✅ Learned how caching and edge locations improve performance
Instead of relying solely on traditional servers, I explored how modern web apps can scale efficiently using CDNs and Object Storage.
Takehome :
First user in Chennai hits your site → request travels to your US server → response cached at Chennai's POP
Every user after that? Gets it from Cehnnai. Never touches your origin.
That's why YouTube doesn't run on EC2
A llama.cpp/Qwen3 finding that cost me a few hours
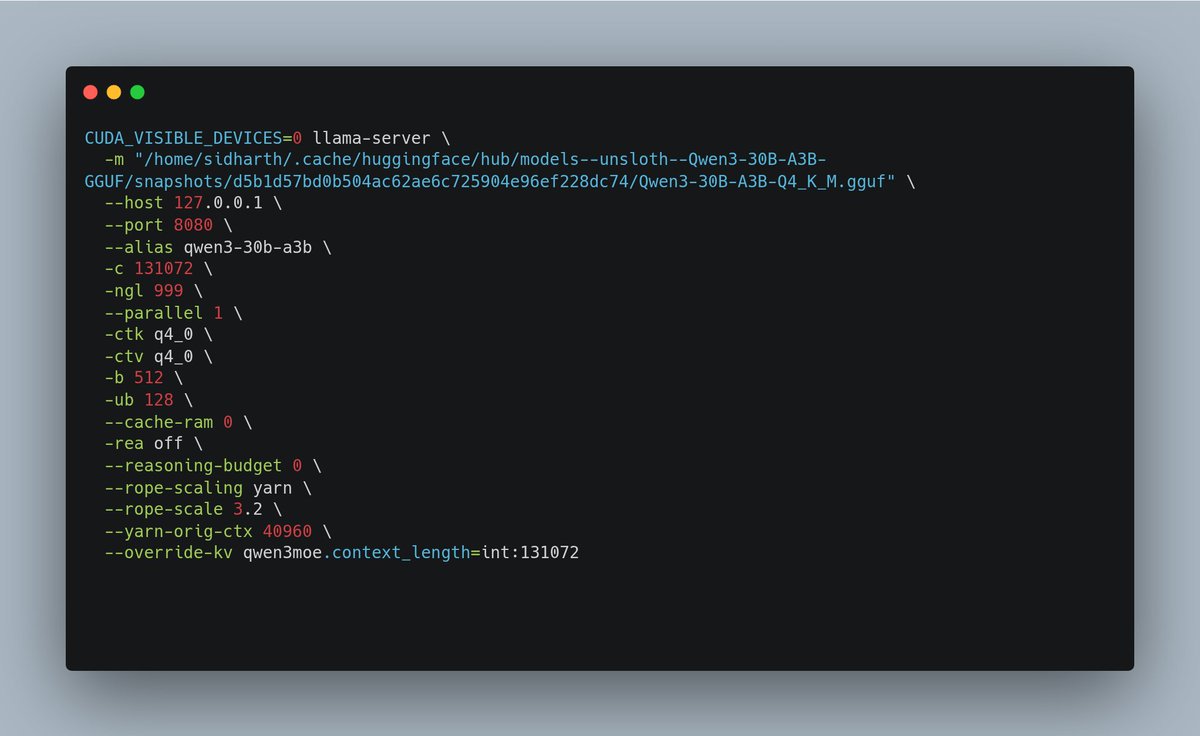
Setting -c 131072 does NOT necessarily mean you're actually running with a 131K context window.
The thing that matters is the slot initialization line:
❌ slot load_model: ... n_ctx = 40960
✅ slot load_model: ... n_ctx = 131072
Fix:
--rope-scaling yarn
--rope-scale 3.2
--yarn-orig-ctx 40960
--override-kv qwen3moe.context_length=int:131072
Now 21 GiB VRAM, ~150 tok/s, 131k live
First time running an MoE model locally
Qwen3-30B-A3B (Q4_K_M GGUF) on an RTX 3090:
• ~150 tokens/sec
• 40K context
• Full GPU offload
• Reasoning budget: 0
Serves in llama.cpp
Coming from dense models, the latency difference is immediately noticeable.
Day 4 of DevOps course.
Today I deployed a pure frontend on an AWS EC2 instance. Spun up the instance, built it, served it on port 3000, and tried opening it with the public IPv4 address. It didn't load.
Turns out AWS blocks all ports by default. Had to go into the security group.
Added an inbound rule for TCP on port 3000. After that it opened fine.
Assignment:
I added an SSL certificate using Certbot with Apache. So the site went from running on a raw IP and port to having a proper HTTPS setup.
Spent today on something that sounds boring but actually breaks your mental model of the internet
Day 3 of Devops course : the difference between a domain and an IP
Here's what clicked for me:
Your machine has 127.0.0.1. That's localhost. It loops back to itself. You can run a server and talk to it without touching the internet at all.
But your router also gives you a private IP something like 192.168.1.x. That one is real on your local network. Phone on the same WiFi? Hit that IP on port 3000.
Then there's /etc/hosts a file that existed before DNS and still wins over it.
Add 127.0.0.1 https://t.co/GdsZWI50Wr and your machine believes that domain is local.
The whole internet is just: IP → packet routing → domain abstraction on top
I don't know splitting a 31B dense model across a 3090 + 3060 is slower than just using the 3090 alone
Memory bandwidth mismatch destroys any VRAM gain. The 3060 contributed extra VRAM on paper but the communication overhead between GPUs was worse than just offloading 2–3 layers to RAM and staying on one card.
Dual GPU MTP even crashed mid-run:
GGML_ASSERT failed → ggml_reshape_3d → llm_build_gemma4_mtp
The fix: SPLIT_MODE=none, MAIN_GPU=0, PARALLEL=1. Single 3090. That's it
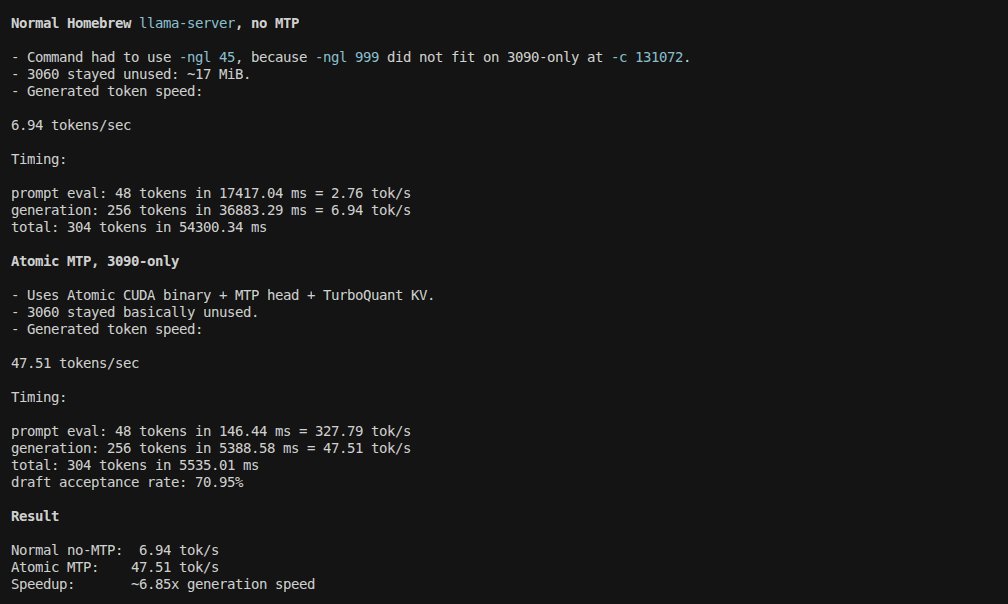
6.85x faster generation on Gemma 4 31B same RTX 3090, same context window
Atomic llama-server with MTP heads:
> 47.51 tok/s generated
> 327 tok/s prompt processing
Homebrew llama-server, no MTP:
> 6.94 tok/s
> partial CPU offload.
Key differences that actually matter:
> MTP (Multi-Token Prediction) heads enabled vs disabled
> TurboQuant KV cache fits everything on-device at 131k context
> Atomic build: -ngl 999, no CPU spillover.
>Homebrew: forced -ngl 45
VRAM profile at 131k ctx:
Model: ~17.5 GiB
Context: ~2.2 GiB
Compute: ~0.5 GiB
Free: ~3.1 GiB headroom → enough to push to 262k context
🔴Tested 262144 context on the 3090. It holds at 40-45 tok/s with -b 1024 -ub 256. That's 262k tokens of active context on consumer hardware, no degradation in generation speed.
If VRAM is tight at 262k, ladder down: reduce batch buffers first (-b 512 -ub 128), then try turbo2 KV cache, then pull a few layers to RAM. Avoid touching --parallel keep it at 1.
The 3090 is genuinely underrated for 31B inference if you're running the right stack.
Anyone else benchmarking MTP vs non-MTP on llama.cpp builds?
Curious if the gap holds on 4090s or if it closes.
Day 2 of the DevOps course
20+ bash commands down today
Also touched Vim for the first time.Spent the first 10 minutes figuring out how to exit that thing needs muscle memory to do it fast
But how guys you are often using Vim.I have seen @ThePrimeagen used
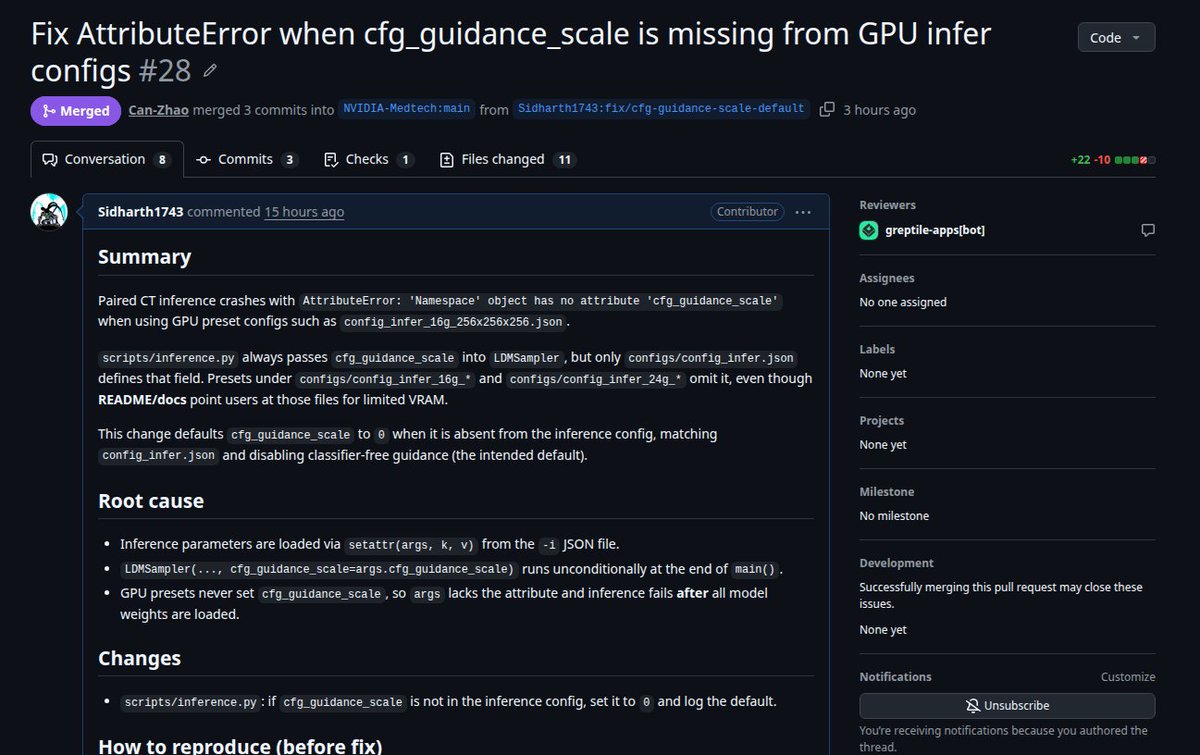
🚀 Just merged my PR into @NVIDIAHealth NV-Generate-CTMR!
Fixed AttributeError when `cfg_guidance_scale` was missing from GPU inference configs (e.g. 16G/24G presets). Now paired CT inference runs smoothly on limited VRAM without crashes defaults safely to 0.0 while keeping full compatibility
→ https://t.co/PbdkA0ElUZ
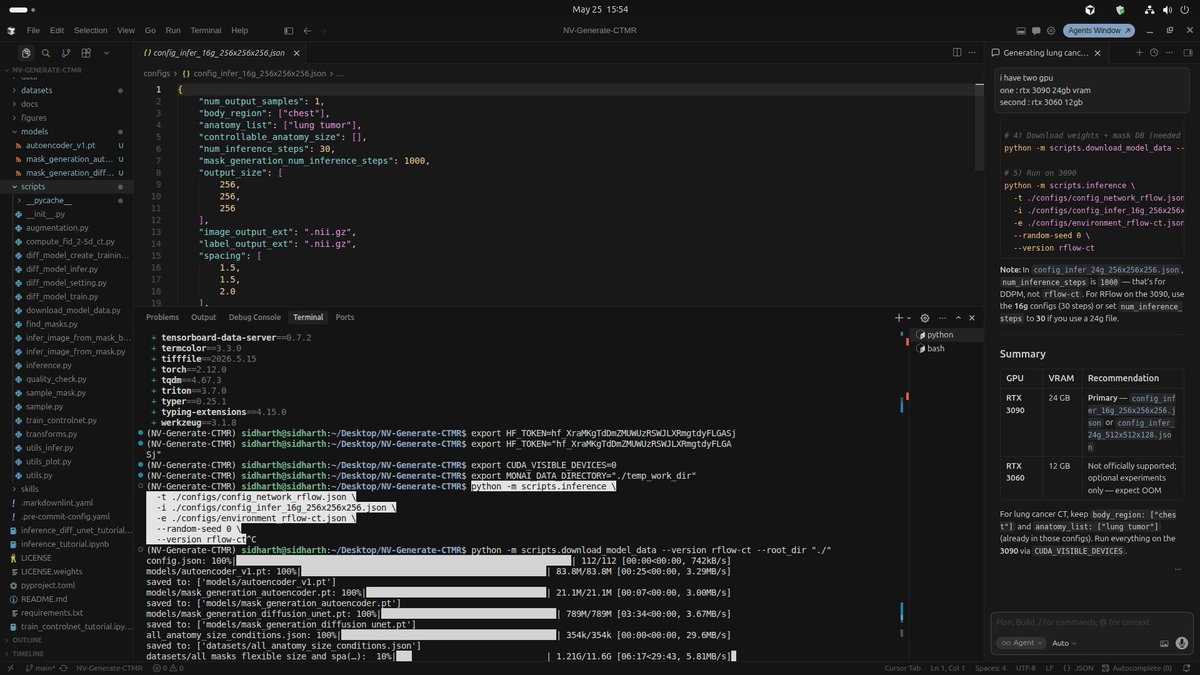
@NVIDIAHealth 's NV-Generate-CTMR just gave me my first synthetic chest CT generated on my RTX 3090 in under 30 steps.
Not a real patient scan.
Fully synthetic. 256³ volume, 1.5×1.5×2.0mm spacing, paired segmentation mask included.
Config: anatomy_list ["lung tumor"] so the pipeline pulled a real training mask with a tumor seed
The cool part is it uses
- Autoencoder (VAE)
- Diffusion U-Net
- ControlNet
- Mask Generation Autoencoder
- Mask Generation Diffusion U-Net
but only consumes 15gb vram(peak) which is very high memory efficient
Running NV-Generate-CTMR on my RTX 3090 right now
>downloading the rflow-ct weights, targeting lung tumor generation.
>The 16g config drops inference from 1000 steps to 30. That's the difference
Testing if this runs clean on 24GB VRAM today
Will post the actual output.


![sid250581's tweet photo. @NVIDIAHealth 's NV-Generate-CTMR just gave me my first synthetic chest CT generated on my RTX 3090 in under 30 steps.
Not a real patient scan.
Fully synthetic. 256³ volume, 1.5×1.5×2.0mm spacing, paired segmentation mask included.
Config: anatomy_list ["lung tumor"] so the pipeline pulled a real training mask with a tumor seed
The cool part is it uses
- Autoencoder (VAE)
- Diffusion U-Net
- ControlNet
- Mask Generation Autoencoder
- Mask Generation Diffusion U-Net
but only consumes 15gb vram(peak) which is very high memory efficient](https://pbs.twimg.com/media/HJLJmtxakAAXPWa.jpg)